ENGR 100: Bridge Design Project

Design a structure to span a given distance while supporting a maximum load using a minimum of materials.
The goals for this project are for students to:
The grade for the bridge project is broken down into the following categories:
Group Bridge Report (20%)
Group Bridge Presentation (5%)
*Students will also be responsible for a number of homework assignments including bridge ideas, component test memo, prototype worksheets, bridge software analysis and other related assignments.
Each team needs to design and build a prototype and final bridge which span a distance of 16 in. and hold a minimum weight of 15 lbs. The dimensional constraints are shown in Figure 1:
SIDE VIEW FRONT VEW
Figure 1. Required dimensions for the bridge design.
The length of the bridge should not exceed 19 inches. The width of the bridge should be at least 2.5 inches but not more than 3.5 inches. The height of the bridge should not exceed 8 inches above or 2.5 inches below "ground level".
Teams are encouraged to use as much creativity as possible, but are limited to the following materials:
Teams are limited to a certain total number of tongue depressors (ask instructor).
Each bridge will be tested to failure using the testing apparatus in Wilcox Hall (Materials Science and Engineering Dept) or Mechancial Engineering Bldg. All bridges must accommodate a 2" x 6" plate accessible from the top for loading purposes as shown in Figure 2:

Figure 2. Loading Procedure
Although prototype bridges will be tested, and scores calculated, they will not be counted towards the final score. The purpose of the prototype bridge is to learn how the bridge behaves under actual loading and improve the design based on the performance.
Scoring for final bridge performance will be based on the equation:
SCORE = Load at Failure (lbs)/ Weight (lbs) (Eq. 1)
Teams should strive for outstanding performance and originality.
This
project is really about engineering design! Your team should follow the steps
described in the engineering design process lecture. Your bridge design process
should include the following steps:
1.
Problem definition.
· As a
team, carefully read the problem statement and put it into your own words.
· Identify
the functional requirements of the bridge.
· Identify
the constraints.
· Ensure
that everyone in the team shares the same vision of the problem before
proceeding.
· Also
ensure that any questions regarding the project specification are resolved with
the instructor.
2.
Analysis/synthesis/conceptualization.
· Perform
the bridge component strength tests and discuss the results with other members
of the team.
· Conceptualize
alternative designs with your team.
· With wild
abandon, toss around ideas that range from the ridiculous to the doable.
Remember that a key element of brainstorming is to not get in the mode of being
critical towards ideas. This comes later. You should never hear "That won't
work!" at this stage in the planning. Document at least three alternatives
with sketches and descriptions. You will need to write about these in the final
report.
3.
Prototype design and testing.
· Evaluate
the proposed (alternative) designs and select the best approach.
· Develop
the selected approach into a detailed design. Decide on design details such as
materials, construction method, tools and dimensions. This is probably the most
critical stage in your design process. If you invest a little more time here,
you may save a lot of time in the construction stage.
· Prepare a
drawing of your design.
· Build and
test a prototype based on this drawing.
4.
Redesign.
· Analyze
the failure of the prototype.
· Redesign
and build your final bridge for testing.
5.
Design delivery.
· Write the
component test memo as an individual assignment.
· Communicate
your team's bridge design by writing and presenting the final report as a group.
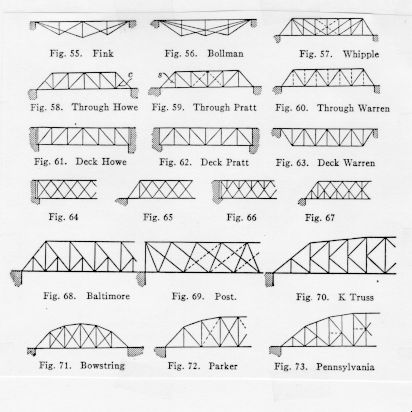
Truss bridges are an efficient way of making a small amount of material do a lot of structural work. They are made up of members which are simple beams that are joined with pins. Some common truss bridges are shown in Figure 3:

Figure 3. Examples of Truss Bridges
Trusses work by converting bending of the whole truss into tension and compression of its individual members. To visualize this transfer, imagine taking the whole truss structure in your hands and bending it into a U -shape (the same deformed shape that a heavy truck in the center of a flimsy bridge would cause). Next imagine that the whole truss is wrapped in rubber skin so it looks like a large rubber box. As you bend the box, wrinkles will appear on the top of the box, and the rubber on the bottom will be stretched. The rubber gives an indication of where tension and compression are occurring.
Thus by inspection, the truss members on the top will go into compression (squeezed together) and the members on the bottom with go into tension (stretched apart) as shown in Figure 4. The members in the middle of the truss will also either be in tension or compression, but require force analysis (engineering statics) to figure out. Because truss members are pinned at the joints causing the bending moment to equal zero (equilibrium), all members experience tension or compression, not bending!
(Compression on Top)

(Tension on Bottom)
Figure 4. Truss Analysis
**To learn more about the "engineering" behind bridge design and tips for designing and building your bridge, view the Power Point slide show.
**To design and test some truss bridges in virtual reality, download a free copy of West Point Bridge Designer Software.