![Engr100 Logo [13K]](engine_files/engr100Logo2.gif)
|
|
Engine |
1. Introduction
The goal of the Engine
Dissection Project is to discover how easily a complex device like an engine can
be understood. We will investigate the theory, design, and operation of a
four-cycle internal combustion engine by taking it apart and putting it back
together. Specifically, we will try to discover how the engine produces power by
disassembling it and examining how it works. Then we will verify the advertised
horsepower rating of the engine by applying some simple thermodynamic principles
to model the power-producing cycle. Finally, we will restore the engine to
working order and prove that it still runs.
2. Deliverables
You and your team are
responsible for delivering three things at the end of this project:
- The engine, fully reassembled and working
- A group report answering the questions posed
during the disassembly process (See below. Same questions are
found in Engine
Questions).
- An individual
Engine
report describing how
engines work - (See your section
website for details).
TIP: As you disassemble your engine, reason out the
answers to the questions by examining the parts and discussing them with your
team members.
3. Project
Schedule
- Day 1: Introduction, select and run your engine, begin
disassembly
- Day 2: Continue disassembly. Answer questions.
- Day 3: Continue disassembly; (take measurements for
performance calculations); begin reassembly.
- Day 4: Complete reassembly and restart the
engine.
Before
you start:
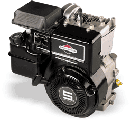
Useful Engine Specifications: (9000 Series)
Torque values
(when using torque wrench)
- Flywheel
= 660 in-lbs
- Head
bolts = 140 in-lbs
- Crankcase
bolts = 85 in-lbs
- Connecting Rods
(advanced teams only) – see engine manual
Other features:
- Armature
gap = 0.10 in.
- Spark
plug gap = 0.03
in
Briggs and Stratton Engines
- Old Engines - Model: 91202, Type: 1016 E1, Code:
980601FA
- New Engines - Model: 9123
At the start of each class:
- Unlock toolbox. Your team is responsible for any missing tools at the end of the day.
- Mount your engine on the mounting plate. It's ok to use just 2 or 3 bolts.
- Make sure you have a Masonite sheet over your worktable.
- Put rags over your work area too to absorb any oil.
- Get a copy of the engine manual from the TA or instructor.
- Locate the following tools in your toolbox:
- All three socket drives (big, medium, small)
- 1/4" socket
- 5/16" socket
- 3/8"socket
- 1/2" socket (long)
- 15/16" socket
- 13/16" spark plug socket
At the end of each class:
- Remove the engine from the mounting plate
- Make sure all tools have been returned to the box (i.e., no empty tool slots).
- Lock toolbox
- Replace the mounting plate and the bolts where you found them
- Put engine in the tray and on the shelf
- Wipe any oil off the table
Rules to live by:
- OPEN ONLY ONE DRAWER AT A TIME, or the toolbox could fall on you.
- WATCH FOR SHARP EDGES, especially around the open crankcase. You could get a nasty cut.
- USE NO METRIC SOCKETS, even if they seem to fit. They don't.
- KEEP TRACK OF YOUR TOOLS. They are your team's responsibility.
4. Procedure
- Choose two team members to take turns doing the
disassembly (the other two will record notes and follow directions on the
web).
- For the reassembly, switch roles, so that
everyone gets a chance to work with the tools on the engine.
- Follow
the instructions below
exactly.
4.1 Start the
Engine
- Get an aluminum plate and mount the engine on it.
Use at least two or three bolts. Don't mount it
wrong! The starting cord must be over the excess plate surface -- and the
shaft should be reaching out over open space.
- Note the manufacturer, model, and serial number
of your engine.
- What is the idle RPM and rated
horsepower for this engine?
- Start the engine:
- Take the engine to the parking lot outside the
main door of the building.
- If necessary, put a small amount of fuel in the gas tank
(about 1/4 cup).
- If necessary, put about a 1/2 cup of oil into the oil filler
hole.
- Engage the choke about
halfway and open the throttle all the
way (to the "rabbit" position).
- Two team members must hold the engine steady by
standing on each side of the plate.
- Then, a third member may
pull the cord to start the engine.
- Keep pants cuffs clear of the rotating
shaft!
- Allow the engine to run only a few seconds or
it will get too hot to handle!
- Keep pants cuffs clear of the rotating
shaft!
- Stop the engine. Drain the fuel back
into the red fuel container, then drain the oil into
the black oil container.
- Take the engine to the parking lot outside the
main door of the building.
- Return the engine to the lab.
4.2 Dissect the
Engine
Warnings, tips, and
recommendations:
- If you are wearing a watch, remove it and store
it somewhere. The strong magnetic fields around the armature can damage a
watch mechanism.
- Make notes and sketches to record the position of
parts that you think might be tricky to reassemble.
- Use nut drivers or sockets to remove all bolts.
Only use combination wrenches if absolutely necessary! (These tend to
wear down the hex-shaped bolt heads and make them impossible to remove. The
only place where these are really needed is for removing the carburetor
assembly.)
- When you remove a bolt, instead of just throwing
it in your parts bin, thread it back into the place where it came from (after
the mating part has been removed!). For example, after you remove the
carburetor, screw the two mounting bolts back into the engine block.
- Be extremely careful with the gaskets: We may be
able to reuse them and save some money (although if we were to use the engine
to mow a lawn, it would not be a very good idea).
Follow the list of steps
below. During each step, discuss the questions posed (in italics) with your team
members.
Disassembly |
Reassembly(start at bottom) | ||
1
|
Flywheel
Shroud (Blower
Housing), (1)
What is the purpose of the starter clutch? Explain from your examination
how it does its job. (2)
Why is there a cylinder shroud? What specific function does it
serve?
|
11
|
Replace the side
shroud, cylinder shroud, and flywheel shroud. Now Restart
the Engine (instructions at bottom of
page) |
2
|
Muffler, Air
Vane, and Fuel System The air
vane (or governor blade) is the plastic blade that is connected to the
armature. Remove it by very carefully bending the metal tab that holds it
in place. The fuel
system is a large assembly, held by only three bolts. Remove the entire
system in one piece. Do not disassemble the carburetor!
(3)
From reading the appropriate sections of the repair manual, describe in
general how the carburetor works. (4)
What is the function of the choke and how does it work? |
10
|
Replace the muffler,
then the air vane and the fuel system assembly. |
3
|
Valve Spring
Cover |
9
|
Replace the valve
spring cover. |
4
|
Spark
Plug |
8
|
Replace the spark
plug. |
5
|
Cylinder
Head
(5)
Describe in general how fuel manages to get ignited in your engine (i.e.
the ignition system).
(6)
At what point(s) in the four-stroke cycle does a spark occur? How often
does the spark plug spark? Does every spark result in
combustion?
(7)
Locate the intake and exhaust valves. Which one is larger?
Why?
|
7
|
Replace the cylinder
head (140 in-lbs per
bolt). BE
CAREFUL ON THIS NEXT STEP! IF DONE INCORRECTLY, THE BOLTS MAY BREAK
(which are very difficult to fix). Ask the instructor how to use the
torque wrench. If at any time you are having to pull with some
effort on the torque wrench - STOP - loosen the bolt and start
over. Use a
torque wrench to replace the bolts on the cylinder head (140 in-lbs). Follow the proper
tightening pattern, as shown in the manual. |
6
|
Crankcase
Cover After
removing the cover, turn the flywheel some more and look at what goes on
in the crankcase, particularly how the plastic camshaft interacts with the
other parts. (8)
Where are the timing marks on the camshaft and crankshaft gears? How can
you tell if the timing is correct? Why is this important? |
6
|
Before
proceeding:
Make sure
that everything works by rotating the engine (by turning the flywheel) and
checking the operation of the valves. Are the exhaust and intake valves
opening and closing at the right times, with respect to the position of
the piston? If not, check the alignment of the timing marks on the gears,
and try again. If all is
well, then replace the crankcase cover. Do not overtighten (85 in-lbs)! |
7
|
Camshaft
and Tappets *If
you have a new engine, you need to use the flywheel puller and wrench
(located in the brown toolbox) to remover the ball bearings
FIRST. Before
you remove the camshaft, try to find the timing marks on the
plastic gear and the metal gear that it meshes with. You will need to
realign these marks when reassembling! When you
remove the plastic gear, the tappets
will fall out.
(9)
Why is the cam shaft made of nylon? Refer to US Patent#
5,497,679 to find out. (10)
When was the nylon camshaft in your engine manufactured? How can you
tell?
(11)
What are tappets, and what is their function? (12)
On the camshaft there is a small metal piece, including a spring, that is
connected where the gear meets the shaft. Looking at the relation between
the tappets and cams, can you guess what purpose it might serve? Try
putting the tappets and the camshaft back into the engine, rotate the cam
through its motions, and see if you can figure it out. You can also refer
to the
patent.
|
5
|
Put the tappets back in and reinstall the plastic gear (camshaft). Pay close attention to the timing marks! **New
engines: Use the metal shaft and rubber mallet (located in brown toolbox)
to put the ball bearings back in place on the crank
shaft.
|
8
|
Flywheel
Nut |
4
|
Replace the flywheel
nut (55 ft-lbs). |
9
|
Flywheel (13)
What types of materials are used on the flywheel? Why does the flywheel
have one section made from a different material? (14)
What is the purpose of the flywheel? How much does it weigh? What would be
the advantages and disadvantages of making it heavier? Why does it have
fan-like vanes on it? |
3
|
Replace the flywheel. Don't forget the key! |
STOP(unless asked by
the instructor, stop here and start to assemble the
engine.)
Now, let's take a
moment and see if we can compute the horsepower of this engine using the
measurements we have taken.
| |||
Begin reassembly, but
first...
Begin reassembly
with Step 3 above (note questions 15 & 16
below) | |||
10
|
IF
REQUESTED (15)
What type of bearings does the crankshaft use? How do these bearings avoid
becoming worn out? |
2
|
Using a torque
wrench (100 in-lbs), reconnect the connecting rod to the
crankshaft. |
11
|
IF
REQUESTED (16)
What is the purpose of the rings on the piston and why is there more than
one ring? (if you did not remove the piston, look at one of the
disassembled pistons in the lab) |
1
|
Reinsert the piston
by using the piston ring compressor which should be in your toolbox. It
looks like a wide black cylinder of sheet metal. The ring compressor is
used to force the piston rings into their grooves, allowing the piston to
slide back into the cylinder. |
4.3 Re-start the
Engine
- Take your engine outside to the TA who will be
waiting to help you.
- Find the oil fill hole, unscrew it, and fill it
with oil to the bottom of the threads.
- Put about a half cup of fuel in the fuel tank.
- Start the engine using the same procedure you
used before.
- Did it start? Usually it will. If not, there are
several things that could be wrong:
- Choke or throttle may not be set to proper
position. Choke to halfway; throttle to "rabbit".
- Did you remember to add fuel?
- Did you connect the armature wires properly?
- See if the engine is getting fuel: put your
hand loosely over the muffler opening while another member pulls the cord
several times. If your hand smells like gasoline, then the fuel system is
working fine.
- See if the engine is getting a spark: remove
the spark plug wire and have someone crank the engine. If there is a spark,
you will see it or feel it. But be careful.
- Did you feel puffs of air leaving the muffler
as the engine was cranked? If not, the engine has no compression.
- As a last resort, remove the spark plug and ask
the TA to put just a few drops of gasoline
into the cylinder, then replace the spark plug. If it still doesn't start,
you probably have no spark or an intermittent spark.
- Sometimes somebody in the group fiddles with
the carburetor when they shouldn't have. This can also lead to
failure.
- Choke or throttle may not be set to proper
position. Choke to halfway; throttle to "rabbit".
- Let your engine cool.
- Drain the fuel into the fuel container.
- Drain the oil into the oil
container.
Final
checkout:
- Clean your tools;
- Inventory your tools;
- If you know of any missing tools, find them.
- If you have extra tools, find out who they
belong to and give them back.
- If you know of any missing tools, find them.
Acknowledgements
This project is based on a
module from ME/IE 497 Product Dissection, a one semester course at Pennsylvania
State University developed by John Lamancusa under the Manufacturing Engineering
Education Partnership.
The
On-Line Manual (Details section) was prepared by Greg Dufour, Gabrielle Chifor,
and Dr. P.R. Frise from University of Windsor, Canada. Permission
granted to use the on-line manual.
Reference
Materials
|