|
|
Project No. 2 (Field) Reconnaissance Gradeline
Location |
Forest Operations ESRM 468 Spring Quarter |
Phase Two: Reconnaissance and Gradeline
Location
Purpose: To establish a gradeline between
two control points.
Equipment Required:
hand compass
Abney/clino
flagging
(brush ax)
flashlight
100' cloth tape
Fieldnote book
altimeter
Procedure (Two-man Crew)
1. Select
the grade to be run from a topog map as the trial gradeline value.
2.
Starting at a given control point, set a double band of flagging on a tree at
eye-level (Height of-Instrument H.I.)
of abney man.
Note keeper records station
number, side slopes left and right, grade, and possibly compass bearing. Also notes soil condition (rock, soil depth,
timber stand, etc)
3. From
the double band, move ahead (Abney-man) at a paced distance of no more than 50
feet, moving up and down -hill until you are
"on-grade".
Tie flagging on a tree branch at
eye elevation. (HI) and mark information on ribbon.
Ribbon
information marked on ribbon
Station number
Grade
(ADV/FAV)
DATE
4. Move to next point, again pacing the distance
and repeat procedure. In heavy brush use
25 foot stations.
As soon as the Abney man ties the
ribbon, the note keeper moves up, brushing the sight-line if needed. When arriving at new station, record station
number, side slopes etc.
5.
Continue this procedure until the 2nd control point is reached. Make proper
adjustments of grade when running through creeks or sharp hollows or around
ridges by shooting level (zero percent grade) or lowering grade e.g. 5 percent)
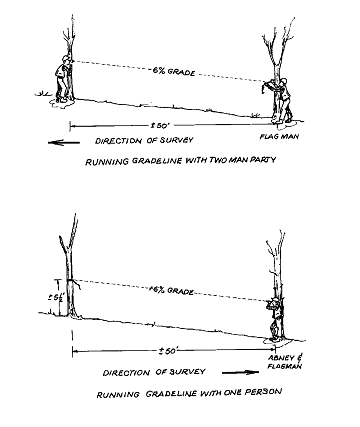
6. If intermediate control points
appear, step up or down the hill as necessary and adjust trial grade and
continue towards
Control Point #2.
Example of recon fieldnotes
Adjusting the Gradeline
If you run into lntermediate
control points, step up or down in elevation to place the gradeline where you
think the road CL should be, and continue running the trial gradellne. Later,
go back and re-run the abandoned gradeline, as shown below:
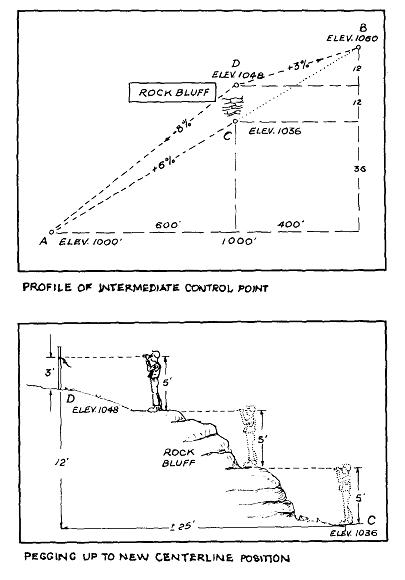
a. From Control Point #l to the Intermediate Control Point (Rock
Cliff) gradeline was run at -10%
for 1500' , thus, loss in elevation was
150' (15 stations @ -10 %).
b. But to get above the cliff an adjustment of + 15' was
required - so only 135' of elevational loss was needed.
To calculate the new grade
needed, divide 135' by 1500' which is 9% gradient (135'/1500' = 0.09), and run
a new gradeline from the intermediate control point at +9% back to Control
Point #1. Remove the original 10% line as you go.
By keeping track of the distances
flagged, you can make these adjustments.
Otherwise you are flying blind.
Avoiding or Reaching Intermediate
Control Points
If in order to tie into the
saddle or the county road you must exceed the allowable grade, or if in order
to properly hit the saddle or road, the trial grade has to be decreased or
increased make the necessary adjustments as set out below:
a Problem
Trial gradeline requires
exceeding the allowable grade limit.
Solution:
Increase length of gradeline with
switchback or additional line.
b.
Problem
Trial gradeline climbs too fast
or drops too fast.
Solution:
Lower or raise the grade on a
portion of the line, or measure the total difference in elevation for the total
distance between Control Point #l and 2 and calculate the constant grade
required to join them. Start at either end and run a new gradeline at this
percent of grade.
Miscellaneous
Comments
Start
your gradeline from the most difficult (most restricted) point and work towards
areas or points that are less critical
When
running gradelines near the maximum limit in the field, always use a grade of 1
percent less than used for paper location.
For example, if paper grade is 12 percent, use 11 percent in the field
to run gradeline.
Altimeters are
extremely useful during field reconnaissance.
If you have one, record elevation any time you cross a significant
topographic feature you can clearly identify on the map. For example, when crossing a creek, take the
elevation. You can then use those points
as fixpoints to plot out your gradeline on the map.
Checking
abneys or clinometers
Those instruments can be
out-of-adjustments. Every time you start
a project you have to check
them. Either sight on each other
and see if you get the same reading or use the method below
They can be verified by the 2-peg
method described below. Clinometers can
not be adjusted in the field. They need
to be sent in to the manufacturer for adjustments.