TDS WORKS 2000 – Software for Tripod Data Systems
HOW TO USE WITH SURVEY DATA
PREFACE:
TDS Works consists of two programs Foresight and Survey Link. Foresight is the program that merges AutoCad tools and layouts with survey data. Survey Link is the program used to import/export, manipulate and convert raw data so that it may be viewed in the necessary program. The initial data can come directly from the survey equipment, dedicated data collectors or many other file formats. For Forest Engineering purposes we use Foresight for preliminarily viewing the survey data obtained from the Laser Impulse by Laser Technologies or imputing handwritten survey traverses and survey topographies.
USING FORESIGHT GIVEN HANDWRITTEN SURVEY DATA:
OPEN FORESIGHT>CREATE NEW PROJECT>SELECT NO EXISTING DATA.
- CREATING CONTOURS FROM TOPOGRAPHIC SURVEY
1. Survey data must include horizontal angle, stadia readings (diff. in elevation), distance out to topographic point, starting elevation and any elevation if occupied point is changed.
2. Depending how the survey was conducted vertical angles could be included and adjusted elevation changes would have to be calculated. Or if you trust the survey data just subtract the existing elevation from the starting elevation. The vertical distance is needed with the horizontal angle and horizontal distance in order for Foresight to construct an XYZ point in an arbitrary coordinate system (example origin; x = 5000,y = 5000, z = starting elev.).
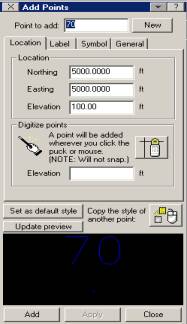
3. (Do this first) IF the coordinate system needs to be consistent with other work then a known point with specific coordinates and elevation can be used. Under the MAP menu > Select ADD POINT and enter in the known coordinate values . Point to add is the occupied point so specify 1. Press Add.
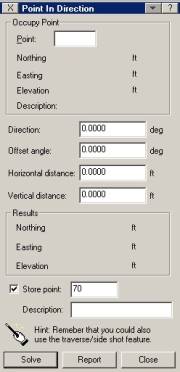
4. Once the point has been created you are ready to start filling in the topographic data by using a tool under the COGO menu called Point In Direction. Occupied point will be point 1 which you created in step 3 (either known or arbitrary). Fill in direction (3.2748 = 3deg27min48sec) and the Vertical and Horizontal distances. Store Point should be filled in as the next point (in our case 2). And finally fill in any description (KEEP IT BRIEF). Foresight will then calculate the new Northing, Easting and Elevation. This step is to be repeated for as many points as the survey dictates with the Occupied Point ALWAYS being point 1 and the store point incremented by 1. My experience was with a bridge survey so there was about 150 points, which takes a good half-day.
5. In the plan view of the program it will show you the new point and where it is relative to the occupied point. It will also appear to connect them with a blue line. This is known as a scratch line and can be removed with CTRL + E command. I recommend leaving them until the end so you can keep track of where you are. AT ANY TIME, A POINT CAN BE EDITED BY RIGHT CLICKING ON THE SPECIFIC POINT AND CHANGING THE ATTRIBUTES (i.e. coordinates, label, symbols, etc). I recommend changing the symbol to something noticeable with size 0.02. Using the Select button on the Edit Points tool under the MAP menu you can SELECT many points and allocate symbol descriptions, labels and the layer you want the points to be on.
6. Once all data has been entered you are ready to create the contour layer. It is very simple. Under the Contour menu > Generate contours. Create a new layer or use the layer provided. Under Lines define interval and labeling characteristics.
B. CREATING A TRAVERSE LAYER GIVEN TRAVERSE DATA. Page 254
1. Given traverse data, ideally you want to link it to the contours you just created or have it in the same coordinate system. To do this hopefully one of your points in the topographic survey corresponds with the traverse stationing. Otherwise, you will need to specify or make a coordinate to tie your traverse with your contours.
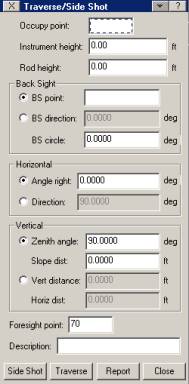
2. Once you have a starting point you can start your traverse using the Traverse/Sideshots tool under the COGO menu. This tool requires one fixed Backsight (in either direction (AZ) or point (coords) of which to reference the traverse. Foresights are also required to advance to the next point as well as instrument height, rod height, horizontal angles (in either right angle or Azimuth), and the vertical description in Zenith/Slope dist or Vertical distance/Horizontal distance. Finally, give the foresight a point number and a description (i.e. stationing, 4+50). Enter the information then press TRAVERSE. Once at any desired point one can enter sideshots in the same fashion then pressing SIDESHOT.
3.
Once the traverse is completed Foresight has additional
surveying utilities that may be used such as Closing Calculations, Connecting
the points to create a profile, viewing cross-sections or viewing your terrain
in 3D space by pressing ![]() .
.
a. Closing Calculations: Under COGO Page 249
b. Creating Profiles: Under CONTOUR Page 199 it is a suggestion if interested in profiles to read page 50-62 about P-lines. A P-line is a series of lines connected to data points.
c. Cross Sections: Under CONTOUR Page 225.
Additional Info:
The license on TDS needs to be updated every year. If not, then it will only run in demonstration mode or not at all, depending on if the time on the license has expired. If this comes up, just call up TDS and talk with one of the sales reps. They'll ask for the serial number and license of the program in question, then will issue new 1-year codes for each module.
When the demo mode warning is up, select "purchase software" and input the new codes into their respective fields.
TDS Business line: (541) 753-9322
TDS Fax line: (541) 757-7254
Web Site: www.tdsway.com