Introduction to ArcCatalog
Learning Objective:
- What is the safest and most appropriate method to transfer map documents from one location to another?
- How do I use ArcCatalog to move a folder or a document?
- Why is it important to use ArcCatalog to move documents? Why not just drag and drop the documents in Windows Explorer?
Due to the unique character of ESRI map documents, the best way to move map files and folders from one location to another is to use ArcCatalog. ArcCatalog is similar to Windows Explorer, except it was designed by ESRI to transfer ESRI and other database documents without corrupting their file structure. This program was specifically designed to recognize all the relevant files that must be transferred with shapefiles, coverages and all of the other types of map documents. For example, when one moves a shapefile (.shp) there are at least two other files (with file extensions .sbx and .shx) attached to the .shp that must move with the .shp file in order for the file to open correctly in ArcMap.
Directions for using ArcCatalog:
- Open
ArcCatalog. Click on the Start
menu and hover the pointer over ‘programs’. Now hover over ‘ArcGIS’ and double-click on
‘ArcCatalog’. It should look
something like this:

- ArcCatalog
will open and should look like this:
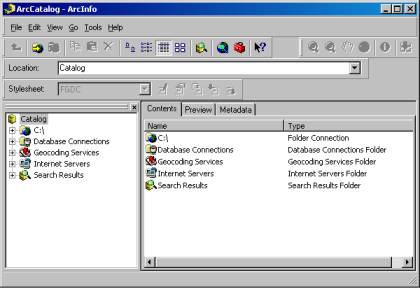
- The window on the left is called the ‘catalog tree’, and you can navigate through the catalog tree the same way that you would navigate through Windows Explorer.
- We will now copy a folder and a shapefile from the R:\ to your student folder on the P:\<your student id> for practice.
- Notice that neither the R:\ nor the P:\ show up in the catalog tree. This is because ArcCatalog has not been instructed to connect to those particular network folders. We will now connect to these folders.
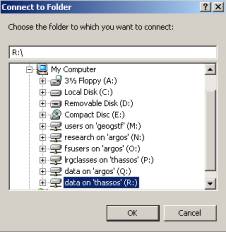
- Click
on the ‘Connect to Folder’ icon

- Now use the <+> signs to navigate to your personal folder on the P:\, highlight your folder by single clicking on it, than click ‘OK’.
- Now
connect to the R:\. Click the
‘Connect to Folder’ icon, highlight the R:\, and click ‘OK’. The window should look like this when
you click ‘OK’:
- We will now copy a shapefile of Washington Counties to your personal folder.

 In
the catalog tree navigate to R:\Avdata\Washco\Washco.shp by using
the <+> signs. Your window
will look like this:
In
the catalog tree navigate to R:\Avdata\Washco\Washco.shp by using
the <+> signs. Your window
will look like this: 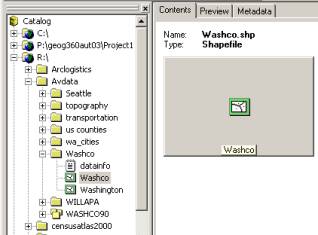
- Highlight the ‘Washco’ file (shown in light gray on the above image), right click on it, and choose ‘Copy’.
- Now use the <+> signs to navigate to your personal folder on the P:\, right click on your folder and choose ‘Paste’. This document is now in your folder.
- You
will now open ArcMap by using the ‘Launch ArcMap’ icon:

- Open a
new map and arrange ArcCatalog and ArcMap so that both display
concurrently on your screen. Make
sure that the map window in ArcMap is visible when ArcCatalog is
open. Your monitor should look
something like this:
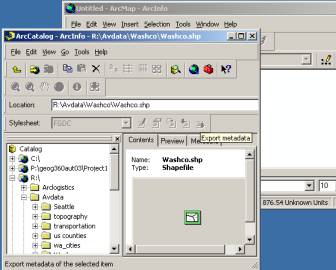
- Now you can highlight the ‘washco’ shapefile located in your P:\ student folder, hold down the left click on the mouse, drag the layer over ArcMap, and drop the layer in by letting go of the left click. Now that you have learned how to operate ArcCatalog, you can close ArcMap (don’t worry about saving the document).
- We will now see the magic of ArcCatalog. Open Windows explorer and navigate to your personal folder. Note that in your folder you now have 7 documents named Washco and each has a separate file extension (.shp, .shx, .sbx, .dbf, etc.). You can see that when you moved the shapefile using ArcCatalog the program also copied all of the relevant documents that were attached to the Washco shapefile.
- Congratulations, you now know how to use ArcCatalog to move documents, but before you close the program, use ArcCatalog to remove the Washco file from your personal folder by simply right-clicking on the document and deleting the file.