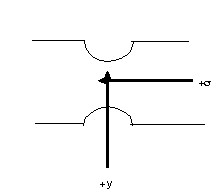
 (1)
(1)
MGJ 27 OCT 96
PURPOSE
The purpose of this exercise is to the study the effects of geometric
discontinuities on the stress states in structures and to use
photo elasticity to determine the stress concentration factor
in a simple structure.
EQUIPMENT
Un-notched beam of birefringent material (an epoxy).
Notched bend beam of the same birefringent material as the un-notched beam.
Four-point flexure loading fixture with load pan and suitable masses for loading
Circular polariscope with monochromatic light source
PROCEDURE
Part 1. Beam under Pure Bending to Determine the Stress-Optical
Coefficient of the Material
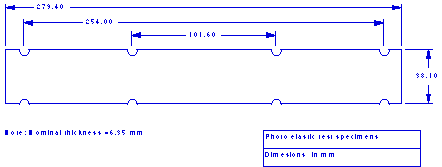
i) Install the un-notched beam (see Fig. 1) in the four-point flexure loading fixture
ii) Attach the load pan (Note: The combined pan/fixture mass/weight is ~1.204 kg=2.66 lbf)
iii) Apply 2 weights (~9.049 kg = 20 lbf each) one at a time to the load pan.
iv) With the polarizer and analyzer crossed (dark field), focus the camera, and record the image using the thermal printer
v) Determine the maximum fringe orders at the top and bottom of the beam including estimates of fractional fringes orders by counting the fringes.
vi) The stress-optical coefficient can be calculated using the following relation:
 (1)
(1)
where f is the stress-optical coefficient,  is the fringe order, t is the model thickness, and
  are the plane-stress principal stresses.
Part 2. Notched Beam under Pure Bending to Determine the Stress
Concentration Factor
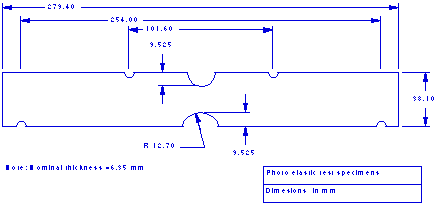
i) Install the notched beam (see Fig. 2) in the four-point flexure loading fixture
ii) Attach the load pan (Note: The combined pan/fixture mass/weight is ~1.204 kg=2.66 lbf)
iii) Apply 2 weights (~2.262 kg = 5 lbf each) one at a time to the load pan. (Note: Do not apply more than 2 of the weights at any one time).
iv) With the polarizer and analyzer crossed (dark field), focus the camera, and record the image using the thermal printer.
v) Determine the maximum fringe orders at the top and bottom of the beam and at the edge of the notch including estimates of fractional fringes orders.
vi) The stress distributions within the beam can be calculated using the relation:
 (2)
(2)
where f is the stress-optical coefficient determined previously,
 is the fringe order, t is the model thickness,
and
  are the plane-stress principal stresses.
* REFERENCES
Manual on Experimental Stress Analysis, J.F. Doyle & J.W. Philips, eds, Society for Experimental Mechanics, 1989
Experimental Stress Analysis, J.W. Dally and W.F. Riley, McGraw-Hill, Inc., 1990
Handbook on Experimental Mechanics,
A.S. Kobayashi, ed., Prentice Hall, Inc.,1992
Formulas for Stress and Strains, R.J. Roark and W.C. Young, McGraw-Hill, Inc., 1975
Stress Concentration Factors, R.E. Peterson, John Wiley and Sons, Inc., 1974
RESULTS
When loads are applied to a solid body, such as part of a structure
or a machine component, stresses which vary from point to point,
are set up in the body. At certain points, stress concentrations
(sometimes called stress raisers) occur and are potential weak
points in the body. Frequently, an alteration in the shape of
the body will lead to a reduction in the stresses at such points
and to a more even distribution over the whole body. An optimum
body is that of uniform load-carrying capability.
The mathematical theory of elasticity provides many valuable solutions
involving the stress distributions in bodies of simple geometries
and loadings. A common use of these solutions is the determination
of stress concentration factors ( ) resulting
from discontinuities or other localized disturbances in the stress
field of the body. In more complicated problems, commercially
available two- and three-dimensional computer programs for finite
element and boundary element analyses (FEA and BEM, respectively)
can be used to locate and quantify the stress concentrations.
These theoretical and numerical results are exact solutions to
problems which may or may not model the actual situations (usually
due to assumptions about loads, load applications and boundary
conditions). This uncertainty in modeling often requires experimental
verification by spot checking the analytical or numerical results.
A frequently cited example involves a threaded joint which seldom
produces uniform contact at the threads. Contact analyses based
on the idealized boundary condition of uniform contact will grossly
underestimate the actual maximum stress concentration at the root
of the overloaded thread. The uncertainty in the contact condition
requires a stress analysis of the actual threaded joint experimentally
despite the proliferation of FEA and BEM programs. Experimental
stress analysis is also necessary to study nonlinear structure
problems involving dynamic loading and/or plastic/viscoplastic
deformations. Available FEA programs cannot provide detailed stress
analysis of three-dimensional dynamic structures and the constitutive
relations for plastic/viscoplastic materials are still under development.
One such experimental procedure often applied to empirically determine
stress states is photoelasticity. Photoelasticity is a relatively
simple, whole-field method of elastic stress analysis which is
well suited for visually identifying locations of stress concentrations.
In comparison with other methods of experimental stress analysis,
such as a strain gage technique which is a point measurement method,
photoelasticity is inexpensive to operate and provides results
with minimum effort.
Photoelasticity consists of examining a model similar to the structure
of interest using polarized light. The model is fabricated from
transparent polymers possessing special optical properties. When
the model is viewed under the type (but not necessarily magnitude)
of loading similar to the structure of interest, the model exhibits
patterns of fringes from which the magnitudes and directions of
stresses at all points in the model can be calculated. The principle
of similitude can be used to deduce the stresses which exist in
the actual structure.
A disadvantage of photoelasticity is the necessity to test a polymer
model which may not be able to withstand extreme loading conditions
such as high temperature and/or high strain rates. Although photoelasticity
is generally applied to elastic analysis, limited studies on photo
plasticity and photo viscoelasticty indicate the potential of
extending the technique to nonlinear structural analysis. Further
details of photoelasticity can be found in listed references.
Show all work and answers on the Worksheet, turning this in as
the In-class Lab report.
MGJ 27 OCT 96
NAME______________________________________DATE______________
EQUIPMENT IDENTIFICATION______________________________________
1) The properties of two birefringent polymers often used
for photoelastic experiments are in Table 1.
Table 1 Selected Properties of Two Birefringent Polymers Used
in Photoelastic Experiments
Homolite 100 (polyester) Epoxy (Araldite, Epon)
Selected Properties (R.T.) Selected Properties (R.T.)
| Elastic Modulus,
E(GPa) | Elastic Modulus,
E(GPa) | |||
| Proportional Limit
| Proportional Limit
| |||
Poisson's ratio, 
| Poisson's ratio, 
| |||
| Stress Optical Coefficient, f (kN/m)* | Stress Optical Coefficient, f (kN/m)* | |||
| Figure of Merit
Q=E / f (1/m) | Figure of Merit Q=E / f (1/m) |
* in green light with wavelength 546 nm
2) For the two beams and loading fixtures, confirm the
following information. See Figs. 3 and 4 for nomenclature.
Un-notched beam Notched Beam
| Calibration load, Pc
=Pweight+Pfixture+Ppan (N) | Test load, Pc
=Pweight+Pfixture+Ppan (N) | |||
| Outer Span, Lo (mm) | Outer Span, Lo (mm) | |||
| Inner Span, Li (mm) | Inner Span, Li (mm) | |||
| Height, h (mm) | Height, h (mm) | |||
| Thickness, b (mm) | Thickness, b (mm) | |||
| Radius of Notch, R (mm) | Radius of Notch, R (mm) | |||
| Depth of notch, h1 (mm) | Depth of notch, h1 (mm) |
Note that the calibration and test loads must include
the mass of the fixture and pan as well as the masses of the added
weights.
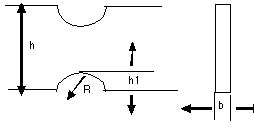
3) A unique aspect of the four-point flexure loading arrangement
is that the region of interest (the section of the beam within
the inner loading span) experiences a pure bending moment as shown
in Fig. 4.
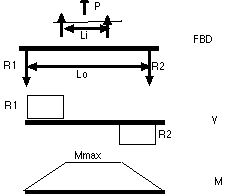
For the un-notched beam, determine the following:
Moment of Inertia for the rectangular cross section beam,  =_________________mm4
Maximum moment when the calibration load, Pc, was applied,  =_____________________N
mm
4) At the outer free edge of the beam (y=c=h/2) the stress
state is uniaxial and the photo elastic relation can be used to
determine the stress optical coefficient directly from the beam
bending relation.
The fringe value at the lower, outer edge of the beam recorded
at the calibration load,  =________________.
Maximum distance to the outer edge of the beam from the neutral
axis, c=h/2=___________mm
Maximum uniaxial bending stress at the outer free edge of the
beam  =__________MPa.
Calculated stress optical coefficient for the material,  =________N/mm.
Compare this value to that shown in the table. How do the values compare? Discuss any discrepancies and possible reasons.
5) At the free edge of the notch the stress state is uniaxial
and the photoelastic relation can be used to calculate the normal
stress using the relation between the fringe order at the free
edge, the stress optical coefficient for the material, and the
specimen thickness.
The fringe value at the free edge of the notch recorded at the
test load,  =______.
Calculate normal stress at the free edge of the notch,  =________MPa.
6) One way to define a stress concentration factor, kt,
is the ratio of the stress at the discontinuity in a body to the
stress that would have been at the same point in the body without
the discontinuity such that  .
.
The notched beam is symmetric, therefore the neutral axis is the
midpoint of the beam. The distance from the neutral axis to the
edge of the notch is,  =________mm
The moment in the beam at the test load, Pt,
is  =____________mm.
Stress in an un-notched beam at the same point at the edge of
the notch in the notched beam is  =_____________MPa.
The stress concentration factor is the ratio of the stresses at
the same location for the notched and un-notched beams,  =___________.
7) Several authors have compiled stress concentration factors
for simple geometries. The most "famous" compilation
is Peterson's book of stress concentration factor graphs. A curve
fit for a double-notched beam in pure bending (Roarke and Young)
is described as follows for 0.25² :²2.0.
In this case,
  =____________ and the stress
concentration factor is:
where  =___________
 =__________
 =____________
 =____________
such that:  =________________
Alternatively, kt can be "picked off" a plot such that kt =________________
8) Compare the kt measured from the photoelastic analysis
to that determined from a compiled handbook. Determine the percent
differences between the two values. Since many compiled stress
concentration factors were determined from photoelastic analyses,
discuss possible reasons for differences between the measured
and compiled values of kt.
9) Extra effort: Using the fringe orders across the notched
beam, assume the stress state is uniaxial, plot the stress across
the height of the beam. Compare this stress distribution to that
of the un-notched beam at the same load.
