Tutorial 1 - InDesign
InDesign is Adobe's replacement for PageMaker. In many ways, InDesign is very similar to PageMaker. It is a powerful application for desktop publishing and is available for both Windows and Macintosh users. The application allows you to manipulate features such as page size, text, graphics, and borders.
InDesign Work Environment
The work environment consists of Working Window, Menu Bar, Tools Window, Control Window, and a number of Palettes.
The Working Window
The Working Window contains many parts that work together to make creating a document easier.
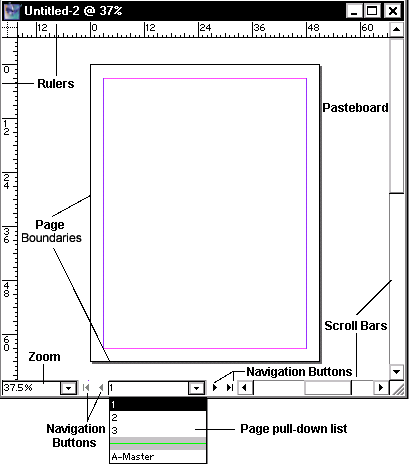
- Rulers - Two rulers running vertically and horizontally along the screen can be set to several measurements: points, inches, decimal, millimeters, and so on.
- Pasteboard - The pasteboard is the background behind the InDesign document. It is useful for temporarily placing text and graphic elements when deciding where to place items. Items on the pasteboard will not print.
- Navigation Buttons - The navigation buttons allow you to move between pages one-by-one or to the first or last page in your document.
- Page Pull-Down List - This list allows you to jump to a specific page in your document, including the document master pages.
- Margins - The colored lines represent the page margins. All the text and graphics are generally placed within the page margins.
- Page Boundaries - The page boundaries represent the edges of the paper. Any items outside or overlapping the page boundaries will not print.
Tip 2: use Tab key to switch off all the tools and manus on the screen.
The Menu Bar![]()
What you will find:
- File: New, Open, Close, Save, Save as, Save a Copy, Export, Document setup, Page setup, Print.
- Edit: Undo, redo, Cut, Copy, Paste, Clear, Color settings.
- Layout: Margins, Ruler Guides, Table of Contents, Styles.
- Type: Font, Size, Blocks, Wrap, Find, Check Spelling.
- Object: Transform, Arrange, Group, Lock, Flatten, Slice, Blend, Clipping Mask, Crop Marks.
- Table: Insert, Options, Delete, Merge Cells.
- View: Zoom, Fit in window, Actual size, Rulers, Grids.
- Window: Different windows.
- Help: In Design help.
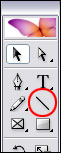
The Tools Window
If the toolbox does not appear on the screen when you open Adobe InDesign for the first time you will have to open it from the menu bar. To do this:
- Select Window from the menu bar.
- From the dropdown menu select Tools.
- The toolbox will then appear on the left hand side of the screen.
Positioning the mouse over a tool displays a tool tip that has the tool's name. You select a tool by clicking on its icon in the toolbox. A small triangle at the lower right of a tool icon indicates hidden tools. To use the hidden tools, click and hold down the mouse on the small arrows and then choose a tool from the menu that opens up.
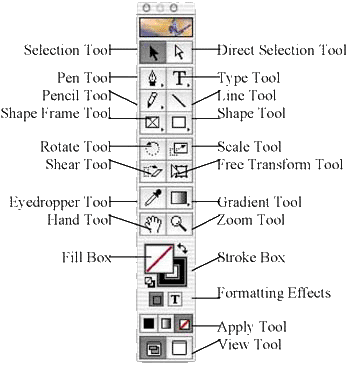
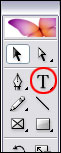
The Tools
- Selection Tool: Selects entire paths, objects, and groups by selecting any spot on them.
- Direct-Selection Tool: Selects individual anchor points or segments on a path.
- Pen Tool: Creates straight lines and smooth, flowing curves with great precision.
- Eyedropper Tool: Copy appearance and color attributes from any object.
- Pencil Tool: Draw open and closed paths as if you were drawing with a pencil on paper.
- Type Tool: Creates horizontal or vertical type anywhere in a file.
- Scissors Tool: Split an open path into two paths and split a closed path so that it becomes one or more open paths.
- Free-Transforming Tool: Distorts objects into different sizes and shapes.
- Rotate Tool: Rotates objects around a fixed point that you designate.
- Zoom Tools: Magnifies or reduces the display of an area in the file to 64 times actual size.
- Shear Tool: Slants, or skews object along its horizontal axis, and can also rotate both axes.
- Scale Tool: Enlarges or reduces object horizontally, vertically
The Palettes
Palettes contain different sets of options that allow you to format your documents.
Formatting Color
You can apply color to objects and text by using the Colors palette or the Swatches palette.
Applying Colors: Color Palette
When you use the Color palette, you can color two elements: the object you have selected and the text contained within that object. For each element, you can select a different color for the fill and stroke. Fill adds a color to the inside of the element; stroke adds color to the border. The Color palette changes depending on which element you are coloring.
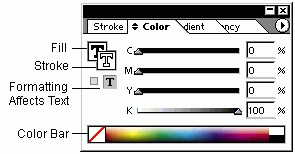
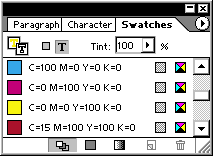
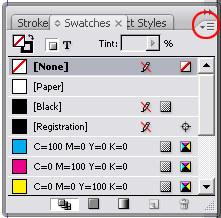
Applying Colors: Swatches Palette
The Swatches palette contains pre-defined color selections. You can select one of these colors to use rather than specifying your own.
Formatting Elements
Transform Palette
The Transform Palette is used to manipulate both text blocks and graphics. In each view, you can manipulate the text, paragraph, or object by adjusting the settings within the Transform Palette.
Transform View
Displays the x and y coordinates of the mouse as it moves around the working window. It also displays a selected object's width and height properties.
![]()
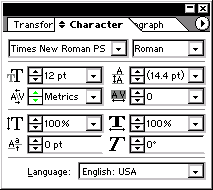
Character View - formatting type
Displays font, type style, and type size, leading, kerning, tracking, scale, and skew.
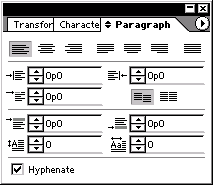
Paragraph View
Displays alignment, indentation, and space before and after paragraphs.
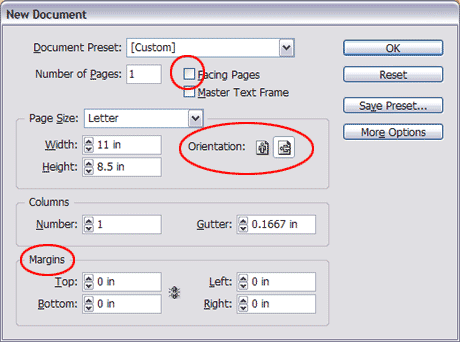
New Document
You have to first set up the initial format of your document when using InDesign.
Go to File menu and Choose New > Document
The window that appears lets you choose,
- the number of pages of your document
- the paper size of your document
- the number of columns
- the margins
- and the orientation of the page
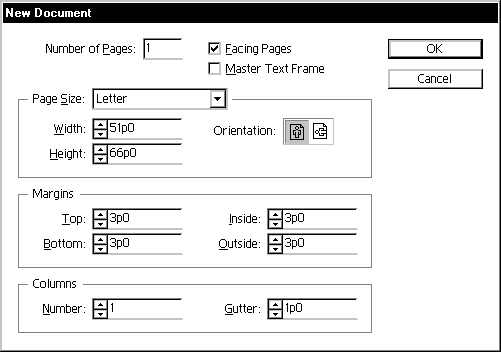
Options:
Pages can be set up single or facing. The following descriptions should help with your decision making:
Facing
Pages display two pages at a time on the screen (except page one, which is displayed alone). This selection is appropriate if you are setting up a magazine or booklet, because the pages are set up to face each other, just as they would in a book.
Master Text Frame
This option creates an automatic text frame on the master page.
Note:
When you open a file, you will see a horizontal and a vertical ruler. Those rulers at the top and left-hand side of your screen can help you align the different elements of your composition.
If you don't see the rulers, go to View > Show Rulers.
Working with Images
Inserting images
You import images using the Place command on the File menu. (You can also place a word document)
- Choose File > Place
- Your cursor will change to an angle symbol representing the upper left-hand corner of the image you want to place. Place the cursor where you want to insert the image and then click.
- To move the image around, simply click on the middle of the image, hold down, and drag it to another spot.
Note:
Once you have placed the image it is simply a link to the original, so if you make changes to the original in another program (like Photoshop) the changes will appear in InDesign.
You can actually place the image that you want to import in two different ways. The first way is the one just specified above; by this way, the element will appear as its actual size. The other way is to drag a box the size that you want it and the element will appear within that box.
Resizing
Simply click on one of the corners of the image, hold down the Shift + Ctrl keys (to ensure that the image is sized proportionally), and drag to make the image larger or smaller. If you only hold down the Shift key, only the image frame is resized, instead of the image itself.
Adding Text
To add text to your document, choose Type tool and move it to wherever you want your text to be. The cursor will appear as the upper left-hand corner of the text box.
You can also import text from outside text files. Go to File > Place, similar to image importing
Adding text by drawing a text box might be easier in terms of formatting the whole document. If you go with this way, choose the type tool and click the screen where you want the text to go and drag to create a text box, then you click inside the text box to begin typing.
Note:
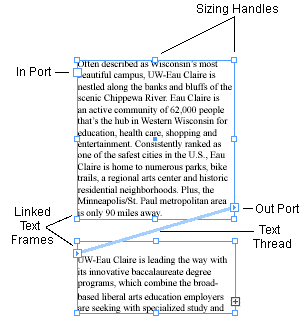
- There are a number of sizing handles that surround the text box, and you can see two of them are larger than the other ones. One is on the upper left (In-port handle) and another is near the lower right corner (Out-port handle). when your text cannot fit in the text box, a red plus sign will appear inside the box on the lower right side (Out-port), indicating the text is being cut off.
- You can either make the text box bigger or you can click on the red plus sign and then click on your document to continue the text within another text box.
- If you click on the in-port handle you will add a new text box before the existing one. If you click on the out-port handle you will add a new text box after the existing one.
Changing Type Specifications
The Transform palette allows you to alter your text's appearance. You can modify the font, size, and style of the text.
Formatting Styles
A style is simply a definition of the type, indents, color, or other settings for specified characters or paragraphs in your document.
Paragraph styles and Character styles are found on separate palettes. However, the palettes are nearly identical in appearance. When you type in text, the style that has been applied to that text (if any) is highlighted in the Styles palette. If you select a range of text covering multiple styles, no style is highlighted in the Styles palette.
To open the styles window:
- Select Type from the menu bar.
- From the dropdown select either Character styles or Paragraph styles.
A character style is a collection of character formatting attributes that can be applied to a selected range of text. Character styles is better used for small blocks of text.
A paragraph style includes both character and paragraph formatting attributes, and can be applied to a selected paragraph or range of paragraphs. Paragraph styles should be used for larger blocks of text.
Styles can save time when you apply and revise text formatting, and they give your documents a consistent look. When you change the formatting of a Style, all text to which the style has been applied will be updated with the new format.
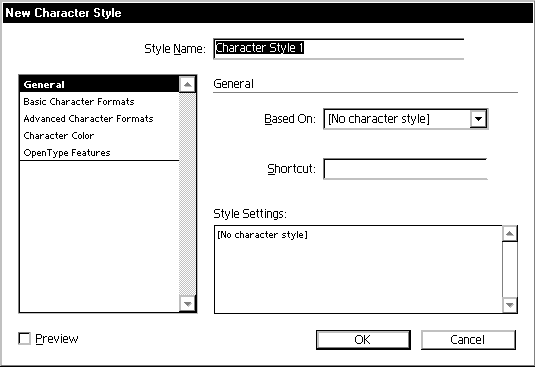
To create a new character style:
- Click on the new style button in the styles window.
- Double-click on the new style that appears in the styles window.
- The Modify Character Style Options window will appear.
- Type in a new name for the new style.
- From the menu list on the left choose Basic Character formats.
- Use the arrows in the fields to modify font type and size.
- To change the font color, select character color from the menu list.
- When you are finished modifying the character style, click ok.
- When you want to use this style, highlight the characters and click the style name from the styles window.
To modify or create new paragraph style, follow the procedures outlined above. You can also modify indentation and tabs.
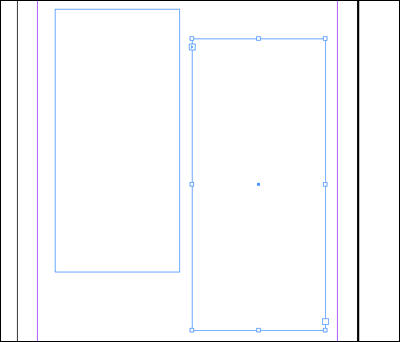
Graphic Objects
InDesign drawing tools enable you create simple graphics to which you can apply a stroke and fill, or you create frames to hold text or graphics objects.
To use any of the graphic drawing tools simply
- select the tool
- click anywhere on your document, and hold the mouse, drag the object to the desired size.
Editing lines and shapes
You can change the width of lines, and the width of borders around rectangles, ellipses, and polygons, as well as fill patterns.
To change fill and stroke attributes:
- Using the Selection tool, select an object.
- To change the fill pattern or stroke attributes, use the Color palette. For each element, you can select a different color for the fill and stroke.
Using Guides
Guides are great for lining up the edges of images or lining up text with the edge of images. For additional consistency and alignment, objects positioned near a guide can be "snapped to" the guide.
You can add guides to your document by simply clicking on either the horizontal ruler or the vertical ruler bar, holding down the mouse and dragging to wherever you want to have a guide.
You can lock guides after you have established the layout grid.
Go to View > Lock Guides
You can turn guides on and off via the View Menu. Notice the view menu is handy for turning on and off a lot of things, such as rulers, grids, guides, frame edges
Arranging Elements
You can control the stacking and order of objects in a document using the Arrange command. (very similar to the Order in MS Word)
To set the stacking order of objects:
- Select the object that you want to arrange.
- Choose Object > Arrange,
- Choose an option (Bring to Front, Bring Forward, Send Backward, or Send to Back ) depending on how you want objects to be stacked
Layers
Layers are another nice way to order objects in a document and they give you a powerful way to control the layout of your document. Layers in InDesign work the same way as they do in Photoshop, so just see the Photoshop section on layer use.
Go to Window > Show Layers to turn on the palette.
Note: Arrange command works to stack objects, but layers will give you much more control. A layer can be turned off, for instance.
Master Page
Master pages contain repeating objects that should appear on each page within your document. You can only edit and modify those repeating objects in master pages. Anything you add to the master page will appear on all of the pages of your document. You can add text, images, page numbers, etc
Some elements that might be useful to include on your master pages:
- a layout grid and/or ruler guides
- page numbers, headers and footers
- any graphic that you want to appear at the same location on every page
Formatting Master Pages
By default, the A-Master is applied to all pages in your initial publication. This includes basic default formatting options.
- If you are not using facing pages, in the Pages palette, double click the single A-Master page icon
If you are using facing pages, in the Pages palette, double click the left or right A-Master page icon
HINTS:
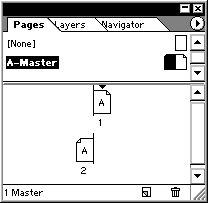
- If the Pages palette is not displayed, from the Window menu, select Pages.
- The left page icon corresponds to the even numbered pages.
- The right page icon corresponds to the odd numbered pages. - Add all text and graphic elements that you want to appear on each page of your document and create any necessary columns
- When finished, to view the results within your document, click the icon for any page(s)
Numbering Pages
To have InDesign automatically do the page numbering:
- On a master page, using the Type tool, create a text box
- From the Type menu, select Insert Special Character > select Markers > Current Page Number
In-class Demo-1
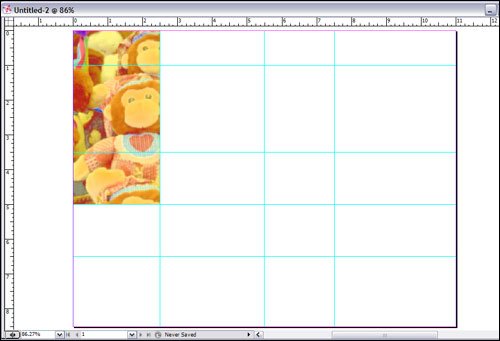
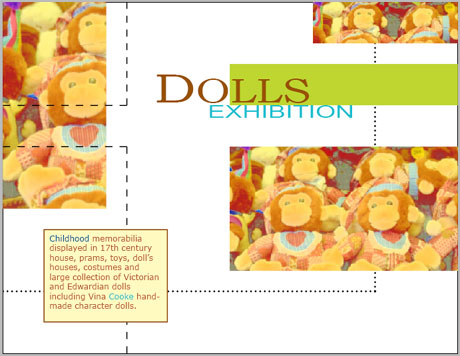
Let's make a small flyer for an exhibition.
Please copy the two files from U:/ to your PC (or directly download the following two files: 002.tif and dolls.doc). You may put them on the desktop.
First open a new document, go to File > New > Document.
Then in the dialog window, choose Letter size, uncheck Facing Pages (we are going to only make a single-page flyer), set orientation to Landscape, and set margins all to zero. Then hit OK. You should see a blank document appears on the screen.
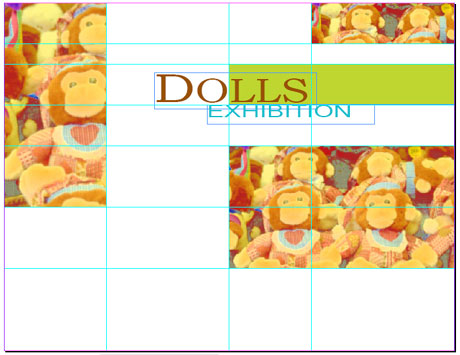
Let's put an image on the document. Go to File > Place, browse to find the file 002.tif, you will see that the cursor changes to a special icon, which allows you to place the image.
Move the icon close to the up-left corner of the document, and click the mouse to place the image. Now you should see the image, but it is too big, so you have to scale it down and also do some cropping.
First select Scale tool, then click and drag the handle on the lower-right corner of the image, while moving the cursor, pressing down the Shift key on the keyboard, that will keep the ratio of the image from being altered. Then use Selection tool, click and hold the mouse and drag the image back to the up-left corner. (or, you can use the resizing tips mentioned earlier.)
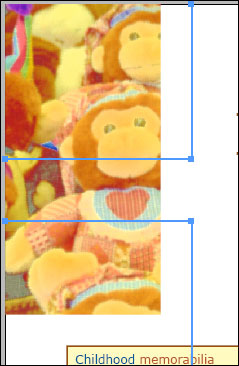
Now put some guides, which will help us align elements later on. Click and hold the mouse on the horizontal ruler and drag four horizontal guides at 1.0", 1.5", 2.5", 3.5", 5.0", 6.5" respectively. Now put some vertical guides (use vertical ruler this time) at 2.5", 5.5", and 7.5". OK, now crop the image by using the Selection tool and dragging the handles to the right and bottom. Use 2.5" vertical and 5.0" horizontal guides to help you align the image.
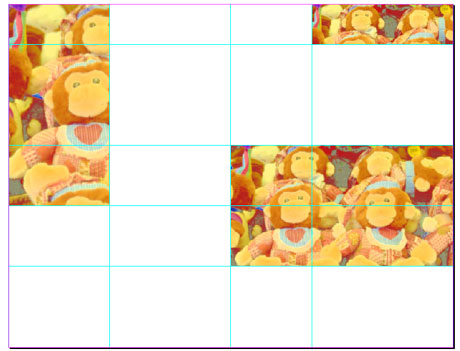
Now let's make a number of duplication on this image. Use Selection tool to select the image, go to Edit > Copy , then Edit > Paste twice to make two copies of the image. Then again use Selection tool and Scale tool to resize, move, crop, and align the two copied images as the picture shows, (use guides to help you align the images)
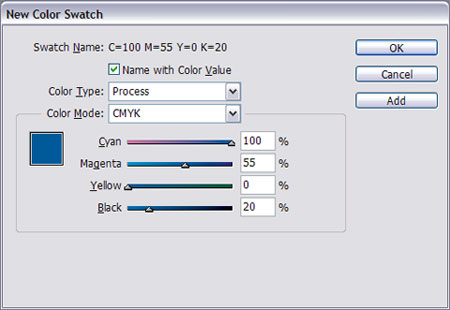
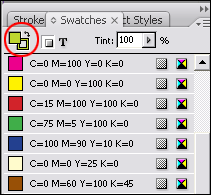
Now you are going to define some colors for this flyer. Go to Window > Swatches. Find a small triangle icon on the up-right corner in the Swatches palette, click the icon, choose New Color Swatch from the menu. In the dialog window, choose CMYK as Color mode. Then define five colors using the following values:
- C: 0 / M: 0 / Y: 25 / K: 0
- C: 0 / M: 60 / Y: 100 / K: 45
- C: 70 / M: 0 / Y: 20 / K: 0
- C: 30 / M: 0 / Y: 100 / K: 0
- C: 100 / M: 55 / Y: 0 / K: 20
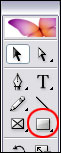
Let's make a rectangular box and use the guides at 1.5", 2.5" horizontal, and 5.5" vertical. Use Rectangle tool to do it. But you have to pick the color that you are going to apply to this rectangle. Again, pull out the Swatches palette. Then click on the small "Fill" icon near the top of the palette, then pick the color, Green for this time. You will see the small icon changes its color to Green, The Fill icon allows you to determine the color for "filling", the Stroke icon, on the other hand, allows you to pick a color for "framing" the object that is selected.
Now put some text in, use Type tool, and in the Options bar, choose Bookman Old Style, and set the size to 72 pt.

Then on the document, click and drag a text box close to the green box you just made. Then type in DOLLS. You can play with different options (Font styles or sizes) to change the text as your liking. Again, you can pick a color for the text you just typed in, use Type tool to highligh the text, then go to Swatches palette to pick a color, Brown this time for the text DOLLS.
Then type in another text EXHIBITION, and this time use 30 pt Arial and use light Blue as the color. As the picture shows.
Now create another rectangular box on the blank area near the lower-left corner, as the picture below shows. Use Light Yellow as Fill color, and Brown as Stroke color. You can go to View > Screen Mode > Preview, to see what your flyer looks like right now.
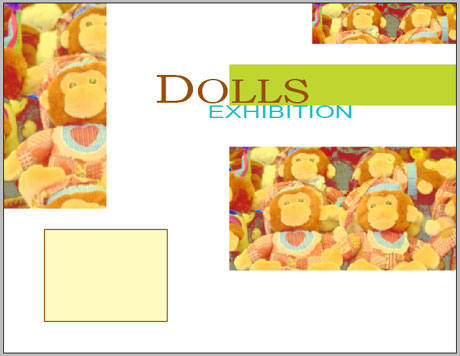
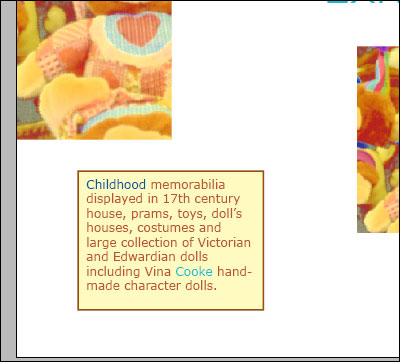
Then, you will put more text inside this yellow rectangular box. But instead of directly typing in, this time you will get text from a Word document outside the InDesign file you are working on now.
Go to File > Place, then find the file dolls.doc. then inside the yellow rectangular box, you click and drag the mouse to make a text box, make sure that the size of the text box is close to but a bit smaller than the size of the yellow rectangular box.
Now use Type tool to select all the text in the text box. (or hit Ctrl + A) Then enlarge them to 14 pt. You might want to change the font using Verdana, you can also play with colors to make the text a bit more interesting.
Switch back to normal view, View > Screen Mode > Normal
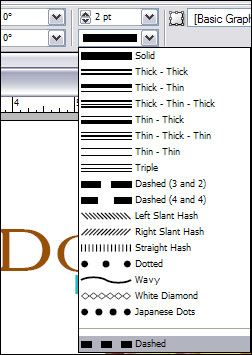
Add two more vertical guides at 3" and 9", and one more horizontal guide at 7", use Line tool to draw a number of lines (using the guides you just made). Before you do it, go to Swatches again, and set the colors for Fill and for Stroke to both Black. To draw lines, you click and hold the mouse and drag to make lines.

Now you can change the weights and the types for those lines you just created. Use Selection Tool to select the four lines to the left. Press Shift key while picking the lines will allow you to select multiple lines at one time.
With the four lines selected. Go to the Options bar near the top of the screen, set the weights to 2 pt, and the type to Dashed. Select the other two lines to the right, and set to 4 pt Japanese Dots.
Now those lines are all above the other objects created before (like images, text boxes), and we want to make those lines below the other objects. You can use Arrange (Object > Arrange) to change the order of objects.
First select all the lines, (Selection tool along with pressing Shift key), then go to Object > Arrange, then choose Set to back, You can play with Arrange function more, for example, you may want to move the image on the up-left corner to the back again, you can pick the image, and go to Object > Arrange and choose Set to back.
Ok, we are done.
In-class Demo-2
Using Master Pages
Please copy the three files from U:/ to your PC (or directly download the following three files:009.tif, 001.txt and 006.tif). You may put them on the desktop.
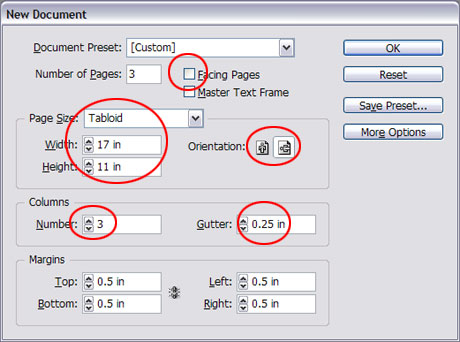
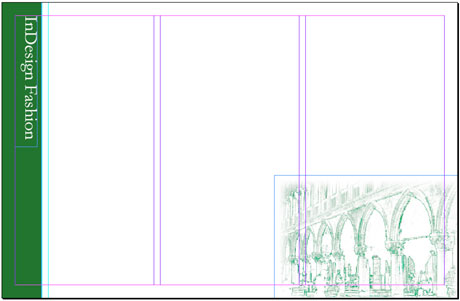
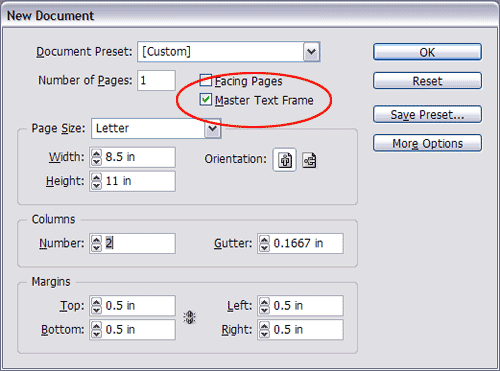
First open a new document, go to File > New > Document.
Then in the dialog window, choose Tabloid size, uncheck Facing Pages, and make 3 pages, set orientation to Landscape, and set margins all to 0.5 inch. And choose to create 3 columns and set gutter to 0.25 inch, Then hit OK. You should see a blank document appears on the screen.
In this exercise, we are going to learn how to use the master page.
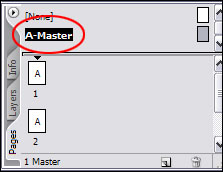
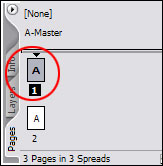
Go to Window > Pages to pull off Page palette. Double-click on A-Master. Now what shows on the screen is actually the master page A. whatever is put on this page will all be applied to those regular pages in this document.
First, define a new color, C75 M5 Y100 K40. Then pull off a number of vertical guides, as the picture shows below (on 1.5" and 1.75"):
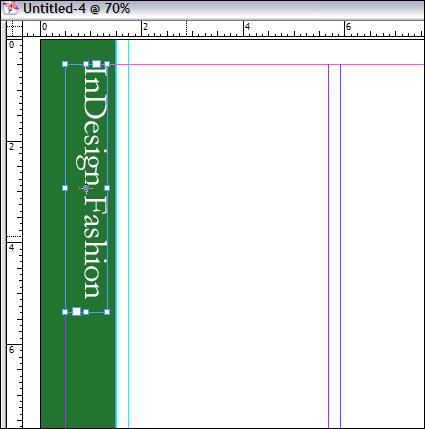
Now make a rectangle on the left-hand side of the page using the color you just defined.
Then type in the text using the font Garamond at 48 pt. then use Rotate tool to change the orientation of the text.
You can use the handle on the lower-right corner to rotate the text box. To make sure that you can rotate the text by 90 degrees, you can go to the Options bar, then type in "-90" in the box as shown below:
![]()
Then place the image 009.tif onto the lower-right corner of the page, you may use Scale tool and Selection tool to enlarge and move the image.
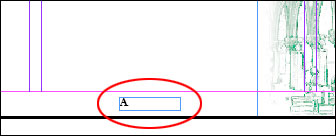
The use Type Tool to make a text box at the bottom of the Page. Then go to Type > Insert Special Character > select Markers > Current Page Number. Now you have just created an automatically inserted page number.
OK, now we have put all the needed elements for the document onto the master page, so if you pull out the Page palette again, and double-click on the page 1 icon, you will see all those elements have been applied to the page 1, same to the other two pages.
Now you can start to put in the main text content, go to File > Place, and look for 001.txt, then you will see a special icon that allows you to place the text, you first click (and hold) the up-left corner of the first column (to the left) on the page, then drag to the lower-right corner of the column to form a textbox. You will see some of the text has been pasted, but not all of them, and you can see a red plus sign shown in the Out-Port handle box, click on this red plus sign, and go to the second column to make another textbox,
Ok, you will soon find out that you actually have to create a number of textboxes in order to fully display all the text in the file.
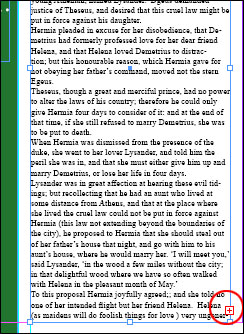
Now let's put in some images and make them embedded into the text. Go to place the image 006.tif. and you can see that this image is actually floating onto the text, and covers some of it, and that is not what you would like to see.
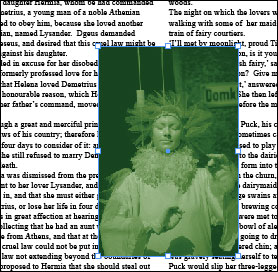
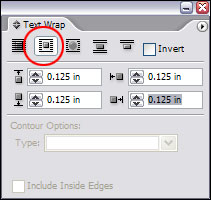
Let's change the way text wraps images. with the image being selected, go to Window > Text Wrap, and in the dialog box, set the text wrapping as the picture shows below, and you will now see the text just flow by the image, and no text is covered by the image. You can place another image 007.tif and try to adjust text wrapping for this image as well.

You may want to place other images and change the image wrapping setting for them as well, then you are done.
Flowing text
When you start a new document, you can select the Master Text Frame option so that an empty text frame is placed on the default master page. This frame has the column and margin attributes specified in the New Document dialog box.
To place your text and have all the text automatically flow into your document, go to File > Place to load your external text file, then you will see the pointer becomes a loaded text icon ![]() , make sure you are on Page 1 (not Master), position the loaded text icon over the text frame, parentheses enclose the icon
, make sure you are on Page 1 (not Master), position the loaded text icon over the text frame, parentheses enclose the icon ![]() , now press Shift key and the pointer changes again
, now press Shift key and the pointer changes again ![]() , now you can click the mouse (still pressing down Shift) and InDesign will add pages and frames until all text is flowed into your document.
, now you can click the mouse (still pressing down Shift) and InDesign will add pages and frames until all text is flowed into your document.
Using text frames on master pages
However, If your document requires more variation, such as pages with different numbers of frames or frames of different lengths, do not check the Master Text Frame option.
You can add text frames to a master page to act as placeholders. You can thread these empty placeholder frames together to establish a flow.
Make sure you are on the Master page, choose Type tool to make a text frame, if you want to make another text frame that is connected with the one just made, use Selection tool to select the first text frame, then click on the "out port" near the lower-right corner,
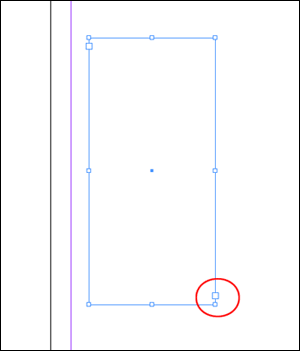
then drag another text frame, these two frames are connected. You can repeat the process to create another frame if necessary.
Then to add and flow the text, same process as the one applied to Master Text Frame option.
Last modified: 4/29/2009 12:13 PM