Tutorial 5.4 - SketchUp / Animation
Finally, let's create an animation for presentation...
But, first, let's learn how to control the camera.
There are a few different ways to do it.
- You can just zoom in/out and use Pan tool to find a good view angle.
- You can use the Look Around tool
 to look around, this simulates standing in one place and turning your head. You can enter a different eye height in the Value Control Box if you want to stand in a higher or lower point.
 - You can use Walk tool
 to walk through the model. This tool simulate moving and turning while exploring your model. To walk forward, just drag the mouse up. Dragging the mouse down allows you to walk backward. To turn left or right, just drag to either side, pressing the Shift key while walking or turning allows you to move the camera vertically or horizontally. Pressing Ctrl key allows you to move faster.
 - Another way is to position the camera in a specific place. Go to Camera > Position Camera, note that Value Control box shows the default Eye Height is set to 5' 6", this can be changed by just typing in a different number.
You click on any place in your model to place the camera, as soon as you click, the view changes and zooms in to the area near to the camera location. But you can see that you are still facing the same direction as before. If you want to be able to specify a particular viewing direction while placing your camera, then when you click the camera to locate it, you click and hold the mouse key, then drag it to create an inference line, which indicates the viewing direction, then you release the mouse.
Ok, let's move on to your final step: creating an animation.
Scenes
SketchUp uses a different term, Scenes, to specify different camera views. Scenes are just the equivalent of saving views.
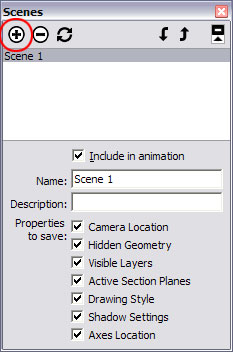
To create a scene, go to Window > Scenes, this opens the Scenes dialog, in which you can create and modify scenes. Click Add to create a new scene. You can also rename the scene, just typing in a new name in the Scenes dialog and hit the enter key. The scene is then listed as a tab at the top left directly above the modeling window,

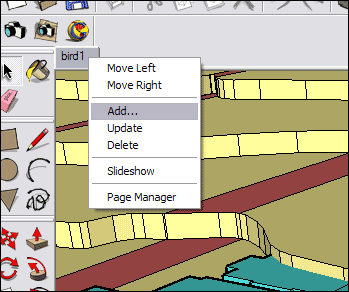
Now you can change to a different view angle, then right-click on the first scene tab (Scene 1), then in the menu select Add to add another scene, if you want to rename it, go to Scene Manager (the Scenes dialog).
When you create a new scene, you can actually not only change the view (camera angle or position), but also the way the model is displayed, including:
- display mode (wireframe, hidden line, or X-ray),
- with/without shadows, different lighting condition (morning, afternoon, July or October) , this is particularly useful if you want to do some sort of shadowing study.
- Turn on/off different layers. As we mentioned before, layers in SketchUp are used for display purposes-to show/hide objects, so that you can use layers to control the way you present your model. For example, you can have a layer only contains some planned constructions for the future and show the condition of the site in 2010 in the near future.
Now, assuming you have already created multiple scenes, now when you click on any of the scene tabs, SketchUp will smoothly change the view from the previous scene to the selected scene, just like a short animation clip.
Play Animation
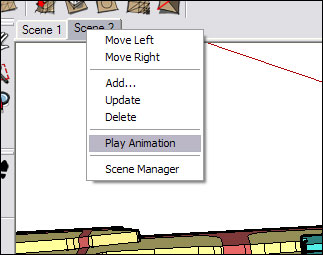
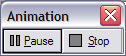
After you are done creating all the scenes you need, you can just right-click on any scene tab and select Play Animation, or go to View > Animation > Play. Either way will open the Animation dialog, in which you will find a Play/Pause button and a Stop button. You will see that each scene will appear on the screen in order starting from the active scene.
Export Animations
When you are done creating scenes and an animation for your model, you can now export the animation. This allows you to share your animation with those who do not have SketchUp.
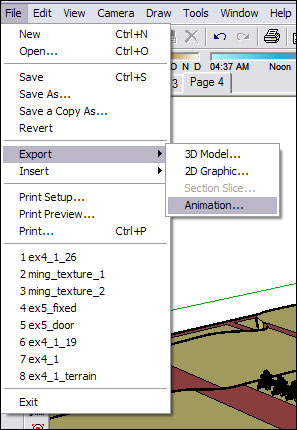
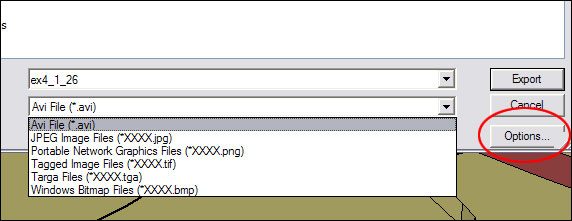
To create an animation file, go to File > Export > Animation. Select File type from the drop-down menu. .avi is the file format that you are going to select, which can be played by most of the movie players, like Windows Media Player.
To specify output parameters, click Options in the Export Animation dialog. This will open the Animation Export Options dialog.
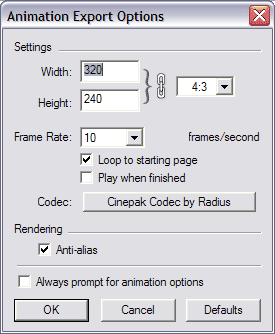
Some parameters you can adjust are listed below:
- Width/Height: these are frame size in pixels. 320 x 240 is a good size for CD-ROM and for transfer to videotape. 640 x 480 is considered a full screen frame size. You have to be aware that the bigger the frame size, the larger your file will be.
- Aspect Ratio: a 4:3 ratio is standard for television, most of computer screens.
- Frame Rate: a setting between 8 and 10 frame per second is considered the minimum required, between 12 and 15 is good for keeping file size down while providing smooth playback, and between 24 and 30 is considered full speed. Again, frame rate is another factor affecting your file size, choose a reasonable rate for your output.
- If you would like to view you video right away, you can check Play When Finished, SketchUp will start your default video player, and play the file immediately after it is created.
Last modified: 4/29/2009 12:32 PM