Download
source for Search_me - 12 Kb
Introduction
Dialog boxes are one of the primary methods that windows programs use
to display information and receive input from users. Therefore, in this
tutorial we are going to use a dialog base application to collect some
information from the user. In the real life project youwill use this
information somewhere else in the program or it will be stored in
database. But for this tutorial we are only going to display information
in a Message Box.
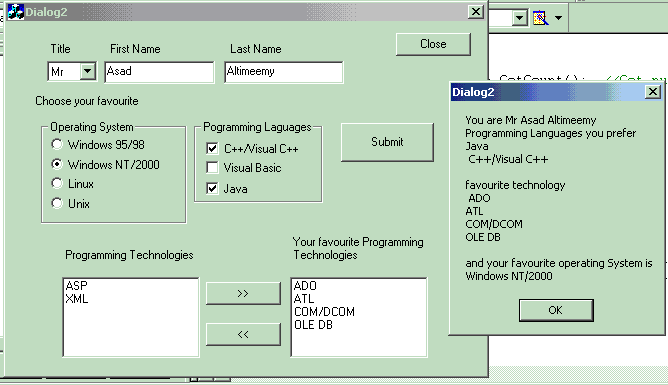
In this Project the user has to give his/her name and choose their
favourite operating system and programming language. The user selects
some of their favourite programming technologies and then submits the
information by clicking on the Submit Button.
The information will be displayed in a Message Box, see below.
Creating a new Project and designing the dialog
Create a new dialog base application project called Dialog2,
accepting the default settings in each step as we did in the last
tutorial.
Delete the Cancel button and the text (TODO: Place
dialog controls here), and change the Caption of
the OK button to Close.
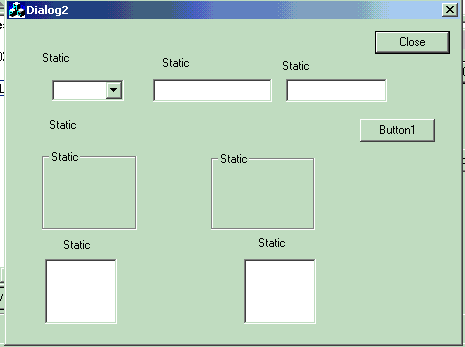
Drop a Button, Combo Box, two Edit Box controls,
two List Box controls, six Static text controls and two
Group Box into the dialog box and arrange the controls as shown
below.
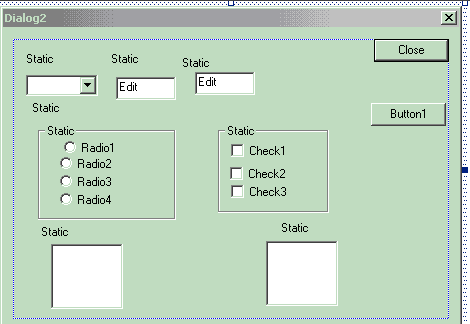
Drop four Radio Buttons inside the first Group Box. Make sure
to drop the Radio Button in sequence, one after another, and
don't drop any other controls in between.
Drop three Check Boxes inside the second Group Box as
shown below.
Customise the properties of controls
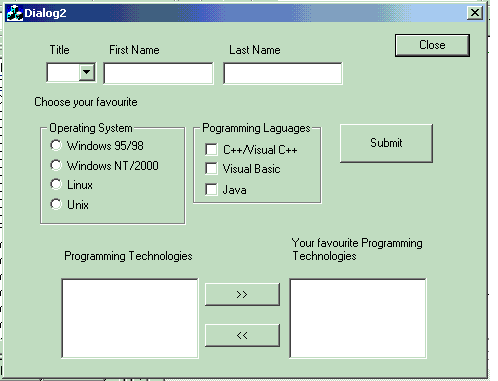
Change the Caption for each control as shown below.
Check the Beginners
Guide to Dialog Base Applications - Part One (previous tutorial) for
full details on changing the ID and Caption for
each control.
In the case of new controls Group Boxes, Radio Buttons
and Check Boxes the process of changing the captions and
ID is similar to other controls (right click the mouse on
the control and select Properties from the context menu).
Change the ID in Edit Properties for first
Edit Box control to IDC_FIRSTNAME and the second Edit
Box control to IDC_LASTNAME.
Change the ID in Combo Box Properties to
IDC_TITLE. Click on Data in Combo Box Properties
and populate the Data as shown below
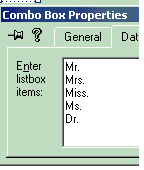
On Styles tab, change the Combo Box's Type to Drop List
to stop the user from adding new titles. Position your mouse over
the Combo Box button then click. Another rectangle will appear.
Use this rectangle to specify the size of the open Combo Box's List.
For the List Box on the left of the dialog box change the
ID to IDC_PROG_TECH and for the List Box on
the right change the ID to IDC_YOUR_FAVOURITE_TECH.
Check the Tab Stop option in Properties of the
group box with Radio Buttons (Specifies that the user can move to
this control with the TAB key)
Change the first Radio Button with caption Windows
95/98 Properties ID to IDC_WIN98
and check Group option (Specifies the first control of of
the group).
Make sure to check the Group option in the properties
of the first control you drop into the dialog after the last radio
button. This implicitly marks the previous control (the last radio
button) as the final one in the group.
Change the ID for the Windows NT/2000 Radio
Button to IDC_WINNT. Change Unix ID to
IDC_UNIX and Linux to IDC_LINUX.
For the second Group Box change the ID for the
Check Box with Caption Java to IDC_JAVA.
Change the ID of Visual Basic Check Box to
IDC_VISUAL_BASIC and change the ID of Visual Cpp
Check Box to IDC_VISUAL_CPP.
Change the ID for the Submit button to
IDC_SUBMIT and the ID of the button with the
Caption >> to IDC_SELECT and the ID of
<< button to IDC_DESELECT
Assigning Member variables to Controls
Press Ctrl + W to start ClassWizard, or from the
View menu select ClassWizard. Select the
Member Variables tab. Select the dialog class in the Class
name: combo box; select CDialog2Dlg.
Assign m_strFirstName of type CString to
IDC_FIRSTNAME, m_strLastName of type CString
to IDC_LASTNAME, m_nTitle of type
int to
IDC_TITLE.
Assign m_bJava of type BOOL
IDC_JAVA, m_bVisualBasic of type BOOL
BOOL to IDC_VISUAL_BASIC , m_bVisualCpp of type
BOOL to IDC_VISUAL_CPP.
Assign m_Win98 of type int to IDC_WIN98.
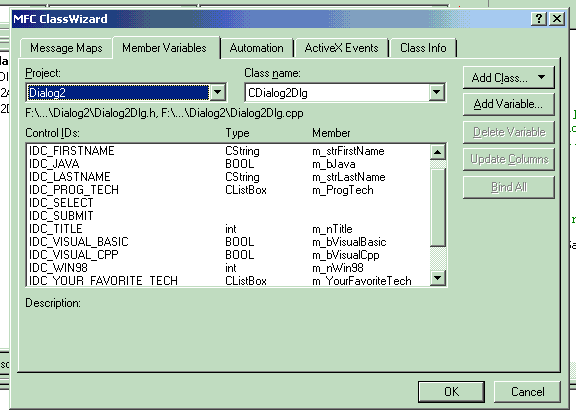
You will note that we only assign a variable to the first Radio
Button. That is because Radio Buttons work in group.
Therefore, we can access the rest of the Radio Buttons through
the first one. Each Radio Button represents one in list of
mutually exclusive options. When clicked, a Radio Button checks
itself and unchecks the other Radio Button in the group. That is,
of course, assuming that the Auto option has been checked
in the Style tab in the properties of the Radio Button.
The Auto option is checked by default.
Assign m_YourFavouriteTech of type CListBox to
IDC_YOUR_FAVOURITE_TECH and m_ProgTech of type
CListBox to IDC_PROG_TEACH.
In Class View tab Right click CDialog2Dlg class and
select Add Member Variable. An Add Member Variable
dialog box will appear. Add three member variables of type
CString: m_strFullInfo,
m_strOpertingSystem, m_strProgLanguage. Make
sure to choose the Protected Access option.
Initialising Variables
Now that the variables are added, they must each be initialized. The
ClassWizard has created code in the program that initializes the
variables in the class constructor.
But in case of m_nWin98 and m_nTitle these
values are initialised to -1, which means that if the program is built
and run at this point, none of the radio buttons will be selected and
the Title Combo Box will show an empty selection when the dialog
box is first displayed.
Therefore, we need to change the values to 0 to select the first
Radio Button and the first title. To do this we need to edit the
initialisation code created by the ClassWizard in
CDialog2Dlg class constructor. Double-click on the class
constructor, the constructor function is displayed as shown below.
Comment out m_nTitle and m_nWin98 which is
generated by the ClassWizard and assign new values to the
variables at the end of the constructor as shown below.
CDialog2Dlg::CDialog2Dlg(CWnd* pParent )
: CDialog(CDialog2Dlg::IDD, pParent)
{
m_strFirstName = _T("");
m_strLastName = _T("");
m_bJava = FALSE;
m_bVisualBasic = FALSE;
m_bVisualCpp = FALSE;
m_hIcon = AfxGetApp()->LoadIcon(IDR_MAINFRAME);
m_nWin98 = 0;
m_nTitle = 0;
}
Adding Member Functions
Right click CDialog2Dlg class and add member function
for the Function Type.
Enter void and for the
Function Declaration type PopulateProgTech(). Make sure
to choose Public option in Access as shown below.
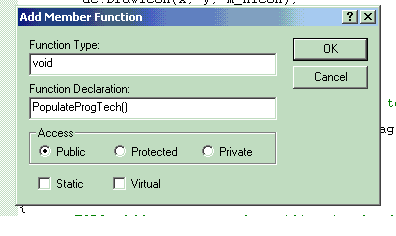
We are going to use this function to populate the Programming
Technologies List Box.
Type the code below.
void CDialog2Dlg::PopulateProgTech()
{
m_Prog_Tech.AddString("MFC");
m_Prog_Tech.AddString("COM/DCOM");
m_Prog_Tech.AddString("ADO");
m_Prog_Tech.AddString("OLE DB");
m_Prog_Tech.AddString("ASP");
m_Prog_Tech.AddString("ATL");
}
Remember we used AddString() which is
CListBox member function to add new text to List Box
in last tutorial.
Double click on the OnInitDialog() function in
CDialog2Dlg class and call PopulateProgTech()
member function just above the return statement as shown below.
BOOL CDialog2Dlg::OnInitDialog()
{
CDialog::OnInitDialog();
ASSERT((IDM_ABOUTBOX & 0xFFF0) == IDM_ABOUTBOX);
ASSERT(IDM_ABOUTBOX < 0xF000);
CMenu* pSysMenu = GetSystemMenu(FALSE);
if (pSysMenu != NULL)
{
CString strAboutMenu;
strAboutMenu.LoadString(IDS_ABOUTBOX);
if (!strAboutMenu.IsEmpty())
{
pSysMenu->AppendMenu(MF_SEPARATOR);
pSysMenu->AppendMenu(MF_STRING, IDM_ABOUTBOX, strAboutMenu);
}
}
SetIcon(m_hIcon, TRUE);
SetIcon(m_hIcon, FALSE);
PopulateProgTech();
return TRUE;
}
Open ClassWizard, select Message Maps tab.
In Class name select CDialog2Dlg, on Object
IDs. Select IDC_SELECT, then choose BN_CLICKED
from the Messages list, click on Add Function. Click
OK, then click Edit Code. Add the code below to
OnSelect()function.
void CDialog2Dlg::OnSelect()
{
int nSelectted=m_ProgTech.GetCurSel();
if (nSelectted != LB_ERR)
{
CString Sel;
m_ProgTech.GetText(nSelectted,Sel);
m_YourFavouriteTech.AddString(Sel);
m_ProgTech.DeleteString(nSelectted);
}
}
Assuming you selected an item from the Technologies list box,
clicking on the >> Button will transfer the selected item
to the Your Favourite Technologies List Box.
OnSelect() function checks for selection first. Copy the
text of the selected item into local variable Sel. Add this
text to Your Favourite Technologies List Box and then deletes the
selected item from Technologies List Box.
Double click on >> Button. As soon as you do this, the
Add Member Function dialog box will open as shown below.
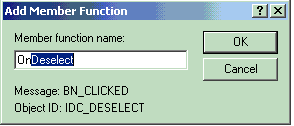
Accepting the default name OnDeselect()and type the code
below.
void CDialog2Dlg::OnDeselect()
{
int nSelectted=m_YourFavouriteTech.GetCurSel();
if (nSelectted != LB_ERR)
{
CString Sel;
m_YourFavouriteTech.GetText(nSelectted,Sel);
m_ProgTech.AddString(Sel);
m_YourFavouriteTech.DeleteString(nSelectted);
}
}
The function above transfers the selected item from Your
Favourite Technologies List Box back to Technologies List Box
(Deselected the item).
Double click on the Submit Button. Accepting the
default name OnSubmit() for new function and add the
code below.
void CDialog2Dlg::OnSubmit()
{
CString strTitle;
int nReturnValue;
m_strProgLanguage="Programming Languages your prefer \n" ;
UpdateData();
GetDlgItem(IDC_WIN98+m_nWin98)->GetWindowText(m_strOpertingSystem);
if(m_bJava)
m_strProgLanguage+="Java\n " ;
if(m_bVisualBasic)
m_strProgLanguage+="Visual Basic\n " ;
if(m_bVisualCpp)
m_strProgLanguage+="C++/Visual C++\n " ;
nReturnValue=GetDlgItemText(IDC_TITLE, strTitle);
m_strFullInfo = "You are "+strTitle + " "+m_strFirstName +
" "+ m_strLastName;
UpdateData(FALSE);
CString Sel;
m_strSelectedTech="";
int nCount = m_YourFavouriteTech.GetCount();
if(nCount > 0)
{
for(int i=0; i<nCount; i++)
{
m_YourFavouriteTech.GetText(i, Sel);
m_strSelectedTech+=Sel + "\n";
}
}
m_strFullInfo=m_strFullInfo+"\n"+ m_strProgLanguage +"\n"
+ "favourite technology\n "+m_strSelectedTech+
"\nand your favourite operating System is \n"
+m_strOpertingSystem;
MessageBox(m_strFullInfo);
}
OnSubmit() collect all user information and put them
into Message Box.
Build and run your program
So far you have learned how to:
- Add, edit and customise Button, Edit Box Control,
Combo Box, List Box, Group Box, Check Box,
Radio Buttons.
- Use a ClassWizard to assign member variables to controls.
- Add Member variables.
- Add Member Function.
- Use item data,
- Select items.
- Determine which item have been selected.
- Get item information.
- Handle CButton notification.
Multi-Internet Search Engine
Introduction
For this part of the tutorial we are going to build a simple but very
useful program a multi-Internet Search engine. Realistically it is only
a program which enables the user to access a number of internet search
engines like Altavista, Yahoo,... without the hassle of
remembering the address of each search engine. All the user has to do is
select a search engine and type what s/he is trying to find out about,
then click Search Button. Below the user tries to use
Altavista to find some information about Physics.

Creating a new Project, designing and custemising the dialog
Start by creating new Dialog based application called
Search_me as we did before.
Delete the Cancel button and the text (TODO: Place
dialog controls here). Resize your dialog box to about 300 x 70,
change the Caption of OK button to Close.
Drop Button, Edit Box, Combo Box and two
Static text controls into the dialog box. Change the Static text
Caption to Search Engine and Search for: Change
the ID for the Combo Box to IDC_ENGINE.
Click on Data in Combo Box Properties and populate the
Data as shown below. Remember to press Ctrl + Enter after each entry.
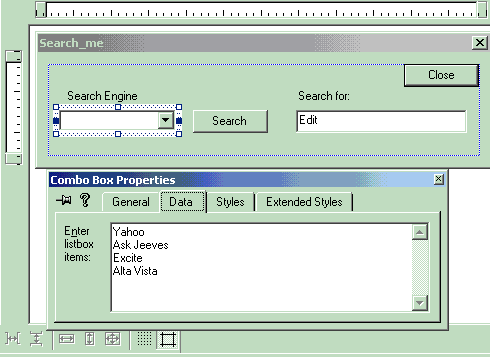
On the Styles tab, change the Combo Box's Type to Drop
List to make sure that the use can't add new search engine.
Position your mouse over the Combo Box button then click. Another
rectangle will appear. Use this rectangle to specify the size of the
open Combo Box's List.
Change ID for Edit Box to IDC_SEARCHFOR.
Change the Caption for button to Search and the ID to
IDC_SEARCH. Use the ClassWizard to assign member variables
m_strSearchFor of type CString for Edit Box
and m_nEngine of type int for the Combo Box.
Add member variable of type CString named
m_strSearch to CSearch_meDlg class.
Press Ctrl + W to start the ClassWizard, select
Message Maps tabs. In Class name select
CSearch_meDlg, on Object IDs select
IDC_ENGINE, then choose BN_CLICKED from Messages
list. Click on Add Function , accepting the default name
OnSearch(), then click Edit Code. Then type the
Code below.
void CSearch_meDlg::OnSearch()
{
CString strEngine;
int nReturnValue;
UpdateData();
m_strSearch = m_strSearchFor;
nReturnValue=GetDlgItemText(IDC_ENGINE, strEngine);
UpdateData(FALSE);
if(nReturnValue>0)
{
if(strEngine=="Yahoo")
{
m_strSearch = "http:
+ m_strSearch;
ShellExecute(NULL, "open", m_strSearch,
NULL,NULL,SW_SHOWDEFAULT);
}
else if(strEngine=="Altavista")
{
m_strSearch =
"http:
pg=q&what=web&fmt=.&q=" + m_strSearch;
ShellExecute(NULL, "open", m_strSearch,
NULL,NULL,SW_SHOWDEFAULT);
}
else if(strEngine=="Excite")
{
m_strSearch = "http:
+m_strSearch;
ShellExecute(NULL, "open", m_strSearch,
NULL,NULL,SW_SHOWDEFAULT);
}
else if(strEngine=="Askjeeves")
{
m_strSearch = "http:
+m_strSearch;
ShellExecute(NULL, "open", m_strSearch,
NULL,NULL,SW_SHOWDEFAULT);
}
}
}
We used the ShellExecute() function to open the
Internet Client Internet Explorer or any other default internet client
program. Check MSDN Library file for more information on
ShellExecute().
Edit the constructor of CSearch_meDlg class and change
the value of m_nEngine from -1 to 0 as we did previously to
make sure that when the Search_me dialog box is first displayed,
Altavista will be selected on Combo Box.
Build and run your program
If you like the idea of this program you could add more search
engines to Search_me program. The best way of adding new search
engines is to use Internet Explorer or any Internet Client to access the
particular search engine you wish to add to do a simple search. Then
copy the address from Explorer's Combo Box which is a
querystring (information that is passed to the server in form of a
name/value pair) appended to URL with a question mark, '?' . Use
the address from the Explorer's Combo Box which you just
copied into the program.
For example if you do a search for Books using excite search
engine the result page will have address of http://search.excite.com/search.gw?search=Physics
which is a URL (http://search.excite.com/search.gw?search=Physics),
'?' and querystring (search=Books). All you need to do is replace
Physics with m_strSearch.
I hope you found this tutorial enjoyable.
Further Reading
About Dr. Asad Altimeemy
 |
Asad is the Senior Software Developer dotNet
Software UK Ltd www.dotnetsoftware.com. He's been programming in
C/C++ for 12 years and Visual C++/MFC,WIN32 for 5 years. BSc, PhD
in Physics and Computational Plasma Physics.
Click here
to view Dr. Asad Altimeemy's online
profile. |
Other popular Dialog & Windows articles:

