Prepared By: Eric Farm Once the stand has been characterized and a payload is specified (See Stand Conditions), the yarding analysis can begin. To begin the LoggerPC analysis, you will need the following inputs:
IMPORTING PROFILE DATA Once you have compiled the necessary information, the next step is to extract the profiles from the DEM and import them into the LoggerPC. Luke Rogers has put together a set of user friendly AMLs that will accomplish this task. By running loggerpc.aml a series of widows and command prompts will allow you to digitize landing locations and output the profile information. This file will be in the .e00 lattice format. The e00ascii.aml will convert this .e00 file to an .lpc file. This file is now formatted for direct import into the LoggerPC program. Now that the data is ready for import its time to start up LoggerPC. Figure 1 is a screen capture of the profile editing window.
Figure 1: LoggerPC Profile Editing Window
By selecting the Profile drop down menu and selecting New the following dialog box will appear. Select the Import option.
Figure 2: New Profile Input Method Window
Next choose the PLANS (X,Y,Z Raw Data) Option from the following window.
Figure 3: Import Profile Source Window
Next navigate to the destination folder that you specified for the .lpc files. Choose the desired profile and click Ok.
Figure 4: Import Profile Selection Window Now all that is left to do is save the newly imported file as a .pro file.
YARDING ANALYSIS Once a profile has been selected, the yarding analysis can be performed. By clicking on the Analysis button in the profile editing window you will open the profile analysis window.
Figure 5: LoggerPC Profile Analysis Window
The first thing you must do is select the yarder and carriage you will use for your analysis. The equipment selection window can be accessed by selecting the Equipment button on the right of the profile analysis window.
Figure 6: Equipment Selection Window The desired equipment can be selected by using the drop down menus. A yarder and carriage must be selected for the analysis to be completed. It is important to make sure that the carriage will ride on the selected yarding system (i.e.: check to ensure the cable in the yarder will pass through the carriage.
After the equipment has been chosen, the interation process begins. The goal is to vary your inputs such that the payload that the program outputs is nearly equal to your design payload. You may be limited by other specifications such as full suspension requirements and tailhold tree requirements. Below is a profile analysis window capture from this project.
Figure 7: Profile Analysis Window
In order to determine if the limiting payload is greater than or equal to your design payload, you must choose a yarding system. As shown above, this program supports live, standing, running, and mutispan skylines. Once you have decided on a yarding system, the program will yard in a turn and show the maximum payload that is possible at each terrain point. These payloads are determined by the log clearance specified and the maximum safe working load of the skyline. What LoggerPC is trying to do is keep the turn at the user's specified log clearance. The program will pull tension and/or slack the lines as necessary to move the turn up to the landing. The following table shows this relationship:
Table 1: Relationship Between Skyline Tension And Payload Capacity.
The program calculates the maximum payload from every terrain point on your profile, beginning with the terrain point closest to the yarder. As it interates out to the yarding limit it compares the payload at TP (N) to TP (N-1). If TP (N) is greater than TP (N-1), TP (N) gets the value of TP (N-1). This makes sense, because if there is a particularly difficult point on your profile, all points beyond that difficult point must still pass through it. And therefore the payload at that point will limit all points beyond it. This can be seen in the "Payload to landing" column of figure 8.
North Beacon Analysis Results This section will state our parameters and the results of the LoggerPC analysis of the DNR's North Beacon Timber Sale. Parameters:
Results:
Table 2: Results of Payload Analysis
Problems Encountered When we first started running profiles through this process we were not entering the log diameter variable in a way that the program expected. It was expecting the diameters in feet and we were inputting this data in inches. As one might imagine, the results of this analysis were very strange and did not make sense. Once this error was discovered, the analysis took minimal time to complete. THIS PROGRAM EXPECTS ALL INPUTS TO BE MEASURED IN FEET. Another problem that we had to deal with is the flat terrain that characterizes this region. The road that was put into this sale made it very difficult to access some to of the timber by creating some blind leads. As a rule we tried to put our leave trees in these blind lead areas. To deal with this lack of deflection, we were required to rig the tailholds 30 feet off the ground. This was a less than ideal situation in our stand as the trees are not very big. According to the OSHA regulations we can rig 18 inch DBH trees for a 30 foot tailhold, but they have to have a minimum of two guylines. For this analysis we arbitrarily assumed 12 cable roads per landing. In the future I would suggest extracting at least twice that many cable roads. The reason being, you can pick out the roads that will allow you to look at best\worse case situations. Since this process is automated by loggerpc.aml, I see no problems associated with this method. As it was, we had to go with what we had which was somewhat limiting. So in future projects, I recommend extracting 25-30 cable roads per landing. I would also suggest that all the possible landings be digitized at the same time. The AMLs are set up to digitize multiple landings into the same coverage, and by doing them all at once you save yourself a file management headache. Back to outline
|

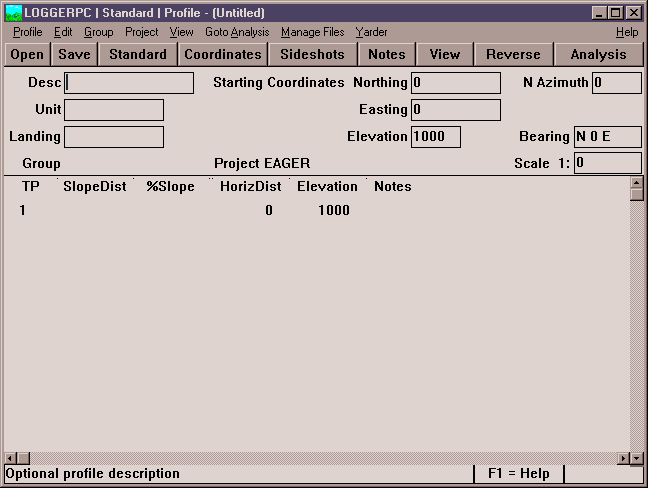
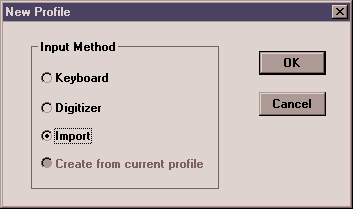
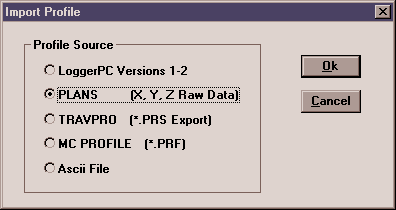
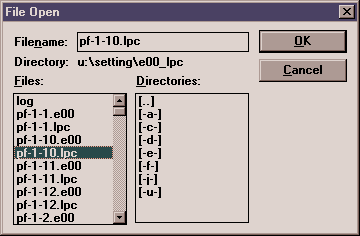
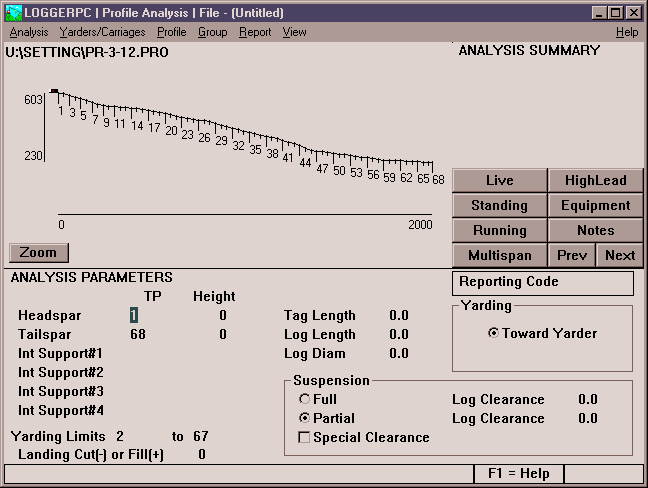
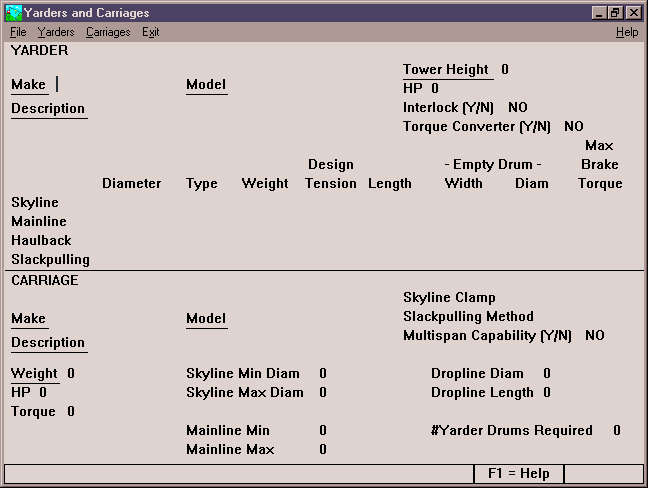
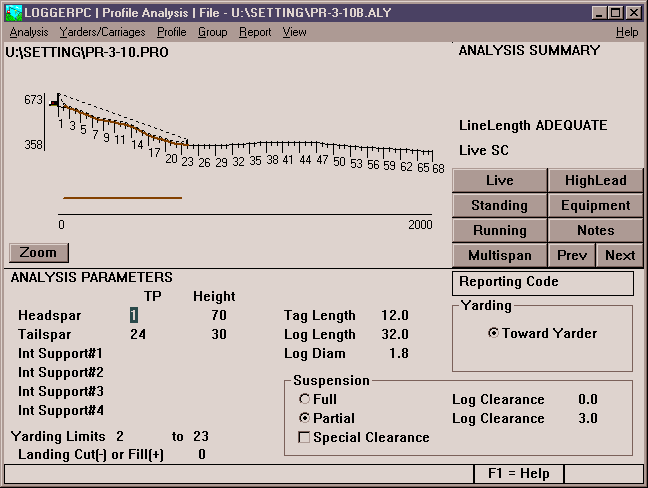
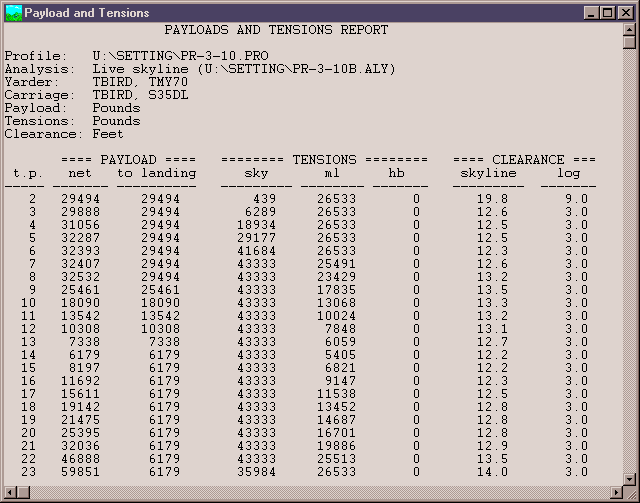 Figure 8: Payload and Tensions Report