GTCS1Lib:
Tutorial 2: Working With Primitives
back
to the main tutorial guide page .
Reference: This is the second tutorial on how to work with the GTCS1Lib library. It is assumed you have read and understand the first tutorial on the basics of GTCS1Lib application structure and simple utilities.
Goals : This tutorial concentrates on illustrating working with Primitives (circles and rectangles), the following are the important points to note when working with primitives:
- Circle and Rectangle primitives : each of these
primitive types has two important sets of functionality:
- Appearance: including
geometrical size and visual appearances:
- Center: of primitive
- Dimension: radius of
circle, and width/height for rectangle.
- Color: inside/outside
colors.
- Texture: image to be pasted
on the primitive.
- Label: annotation
label on the primitive.
- Behavior: including
control of the primitives and interaction between the primitives:
- Velocity: speed and
direction of primitive movement. A primitive will travel only if its Should
Travel flag is set to true. By default a primitive's velocity points
in the positive x-direction.
- RotateAngle: control
the rotation (in angle) of the primitive. Rotation affects the direction
of the Velocity . For example, initialy when RotateAngle is 0
Velocity of a primitive is pointing towards the positive X direction. If
RotateAngle is set to 90-degrees (right-handed-rotation), the Velocity
will point towards positive-Y direciton.
- Collide: determining
the collision between two primitives.
- Relative positioning:
whether a primitive is to the right/left/above/below of another
primitive.
- Application Window Bound testing: determine whether a
primitive has collided with the application window bounds, and/or clamping
a primitive to within the bounds of the application window.
- AutoDrawSet: The GTCS1Lib maintains an internal set of
primitives, the AutoDrawSet , where all member primitives of this
set are drawn in the application window. By default, all created
primitives are automatically associated with the AutoDrawSet and
thus are always drawn in the application window. As programmers, we can
manipulate the AutoDrawSet by:
- Removing membership
from AutoDrawSet: primitive will not be drawn in the application window
- Re-inserting primitive
into AutoDrawSet: primitive will show up once again in the application
window.
- Raising drawing order:
a primitive will be drawn on top of all other primitives in the
application window.
1. Obtain the example code
- Here is the zip file
to the source files and compiled executable of this example.
- Here is the keyboard
mapping for the XBOX 360 controller.
- Here is the main
tutorial page for working with GTCS1Lib, and here is the complete
documentation of the library: html-page.
Download
and unzip the zip file and you will see an ExampleProgram folder. Open
the ExampleProgram folder, the EXE folder contains the compiled
program and you can double click on the .sln file to work with
the source code.
If
you double click and run the executable program, you will observe:
|
|
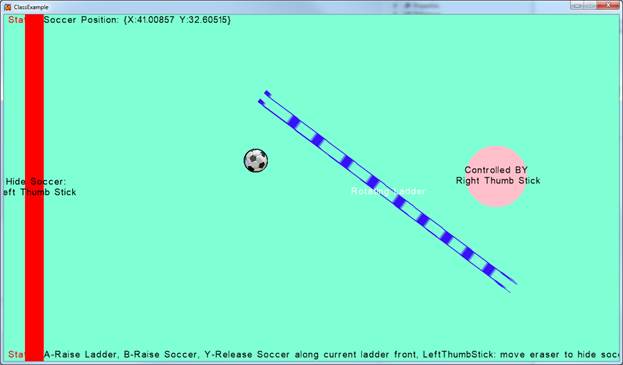
Notice:
- A: The rotating ladder.
- "Y"-button
will shoots the soccer ball from the center of the ladder towards the
ladder's current "top" diretion.
- B: The soccer bouncing around within the bounds of the
application window (or the bounds of the defined coordinate system) and
against the ladder.
- C: The Pinkish circle to the right is under the
control of the right-thumb-stick (or the keyboard correspondence ). Notice
that the movement of this circle is clamped to the bounds of the
application window (you cannot move the circle off the application
window). Move the pink-ish circle to such that it covers the center of the
ladder. Now notice:
- "B"-button
will raise the ladder to cover the circle, while
- "A"-button
will, once again, raise the circle to cover the ladder
- D: The horizontal position of Purple rectangle to
the left is under the control of the left/right movement of the
left-thumb-stick. Notice that:
- Unlike the pink-ish
circle, it is possible to move the purple rectangle completely off the
application window.
- The soccer ball
disappears when it travels to the left of this purple rectangle. Try moving
the purple rectangle towards the right, notice the soccer ball will
disappear (and it will stop traveling). Move the purple bar to the
left of the soccer ball and the soccer ball will continue to travel.
In
this tutorial, we will examine in details of the implementation of each of the
above functionality.
2. The Source Code Files/Structure
Take a look at the ExampleProgram folder that you have unzipped and you will see a structure almost identical to that of previous tutorial. The only notable difference is a new Textures subfolder in the Content/Resources folder:
|
Folders/Files
|
Purposes
|
|
Content/Resources/Textures/ |
These
are texture files ( images ) that we will paste on primitives in our
application. |
These
images can be added into the project in one of two ways:
1. simply dragging the files from the Explorer over to the Textures
folder
2. Right-Mouse-Click over the Textures
folder to "Add Existing item"
In
both cases, do not forget to open
the associated properties and change the Build
Action to Content, and Copy to Output Directory to Copy if newer.
3. Examine Game1.cs Structure:
Now double click on the Game1.cs file in the SolutionExplorer ,
and you will observe the familiar structure:
|
#region Reference
to libraries public class Game1 : XNACS1Base { #region Instance Variables protected override void InitializeWorld() protected override void UpdateWorld();
} |
In this case, we have defined " Instance Variables". The rest of the tutorial, we will examine each of: Instance Variables , InitializeWorld() , and UpdateWorld() in details and understand how to implement the behaviors we have observed.
5. Examine Instance Variables of Game1.cs:
Now expand the Instance Variables region and you will observe:
|
#region Instance
Variables |
The const SPEED is the speed of the bouncing soccer ball. There are four primitives and a velocity defined:
- A: ( m_RotatingLadder ) This is the rectangle that
will be covered with the Ladder image to represent the rotating
ladder. This primitive demonstrates:
- Texture: pasting of
image on primitive.
- Rotation: rotation of
primitive.
- Velocity direction:
Front direction of a rotated primitive.
- B: ( m_SoccerBall ) This is the circle that will be
covered with the SoccerBall image to represent the bouncing soccer
ball. The m_SoccerVelocity defines the speed and direction of the
soccer ball. This primitive demonstrates:
- Bouncing off
application window bounds: bouncing within the application window.
- Relative Position Between
Primitives: testing of relative positions between primitives (soccer and
purple rectangle).
- Membership control to
the AutoRedrawSet: removing/adding primitive from/to the AutoRedrawSet
for hiding/showing a primitive.
- C: ( m_RightThumbCircle ) This is the pink-ish
circle that is controlled by the right-thumb stick. This primitive
demonstrates:
- Clamping to Application
Window Bounds: ensuring the primitive is always within the bounds of the
application window.
- Drawing Priority:
adjusting which primitive should be drawn on the top.
- D: ( m_Eraser ) This is the purple rectangle that
will erase (hide) the soccer ball when the ball is to the left of this
rectangle. This primitive demonstrates:
- Relative positions of
primitives: comparing to the soccer.
- Application Window
Bounds: without checking, you can move primitives off the application
window.
6. Examine InitializeWorld() function of Game1.cs:
When examining the InitializeWorld() function:
|
protected override void InitializeWorld() { |
We notice:
- Setting coordinate and background color: as in the first example,
we define a convenient coordinate system and the application background color.
In this case, we define the coordinate system with the lower-left corner
to be coordinate position (0,0), and the width of the window to be 100
units. Once again, notice we do not need to be concerned with the actual
window pixel-resolution.
- A: The rotating ladder ( m_RotatingLadder ).
The first three lines under A create the ladder rectangle: :
Vector2 aPos = new Vector2(50.0f, 50.0f);
Vector2 bPos = new Vector2(75.0f, 5.0f);
m_RotatingLadder = new XNACS1Rectangle(aPos, bPos, 3.0f, "Ladder" );
Notice that there are two versions of rectangle constructer (the other one will be explained later when we create the purple rectangle in D ), in this case, the constructor is:
XNACS1Rectangle(Vector2 aPos, Vector2 bPos, float width, string tex);
The following figure explains the constructor parameters:
|
|
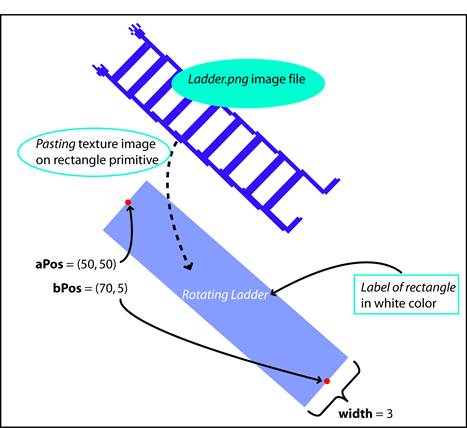
- As illustrated in the above figure, the aPos and
bPos are the two end points and width is the of the
rectangle. The last parameter identifies the image to be pasted on
the rectangle. Notice that the string " Ladder " is the
texture file name " Ladder.png "
without the " .png " extension. This is always true that
when working with textures:
- Create Textures Folder:
The Textures subfolder must be created under the Content/Resources
folder.
- Insert Texture File:
images files of " jpg ", " png ", or
" gif " format must be inserted into
the Textures folder.
- Identify Texture:
textures are always identified by its file name without the
extension.
After creating the ladder:
m_RotatingLadder.Label = "Rotating Ladder" ;
m_RotatingLadder.LabelColor = Color
.White;
we set the ladder's Label to "Rotating Ladder" in white color.
- B: The bouncing soccer ball (m_SoccerBall ):
first is the SoccerBall constructor:
m_SoccerBall = new XNACS1Circle(new Vector2(20.0f, 20.0f), 2.0f, "SoccerBall" );
The soccer ball's (circle) constructor is:
XNACS1Circle(Vector2 center, float radius, string tex);
with center and radius are of the circle. In this case the texture of " SoccerBall " is defined to identify the " SoccerBall.png " image file in the Textures subfolder to be pasted on the circle to resemble a soccer ball. The next three lines initialize the circle primitive velocity ( Velocity ):
m_SoccerBall.VelocityDirection = new Vector2(5.0f, 3.0f);
m_SoccerBall.Speed = SPEED;
m_SoccerBall.ShouldTravel = true;
here we initialize the direction of the soccer ball to be (5,3): 5 units to the left, and 3 units upwards and set the speed of the velocity. The speed of the soccer ball is set to SPEED. And finally, the ShouldTravel flag is set to true. From this point on, as long as the circle is visible, it will travel at the set velocity.
- C: ( m_RightThumbCircle ) This is the pink-ish
circle that is controlled by the right-thumb stick:
m_RightThumbCircle = new XNACS1Circle(new Vector2(80.0f, 30.0f), 5.0f);
In this case, the constructor of the circle is:
XNACS1Circle(Vector2 center, float radius, string tex);
we see that we can create a circle without texture image. The next two lines:
m_RightThumbCircle.CenterColor = Color.White;
m_RightThumbCircle.OutsideColor = Color.Pink;
specifies the center and the perimeter colors for the circle. Notice that the color changes gradually from that of the center towards that of the perimeter. Finally, we set the Label of this circle to be:
m_RightThumbCircle.Label = "Controlled BY\n Right Thumb Stick" ;
Notice the " \n " allows multiple-line label. - D: ( m_Eraser ) This is the purple rectangle that
will erase (hide) the soccer ball when the ball is to the left of this
rectangle:
Vector2 pos = (World.WorldMax + World.WorldMin) / 2.0f;
m_Eraser = new XNACS1Rectangle(new Vector2 (5.0f, pos.Y), 3.0f, 65.0f);
In this case, the constructor of the rectangle is:
XNACS1Rectangle(Vector2 center, float width, float height);
we have created a rectangle located at 5 units from the left of the window boundary and centered vertically.
7. Examine UpdateWorld() function of Game1.cs:
Now expand the UpdateWorld() function region and we observe:
|
protected override void UpdateWorld() { #region A. Update the Rotating ladder
#region C. Update the right
thumb circle (clamp to the window bounds) #region D. Update the eraser, hide/show soccer ball based
on relative position
#region F. Collide the soccer with the
rotating ladder
EchoToTopStatus("Soccer Position: " +
m_SoccerBall.Center); |
We have examined and understand the checking for "ButtonBackClicked", and the echoing to top and bottom status areas. Now let's examine the details of each of the A to E regions, in each of the following discussion, functions of special interests are highlighted :
Region A: Update the rotating ladder:
|
m_RotatingLadder.Rotate = (m_RotatingLadder.Rotate + 0.5f) % 360; |
The first line increases the degree of rotation by 0.5 and makes sure the eventual rotation is within 0 to 360 degrees. The B-button is clicked ("ButtonBClicked" becomes true), we call "TopOfAutoDrawSet()" to raise the drawing priority of the ladder to the top.
Region B: Update the soccer ball, make sure it bounces off the window
bounds:
|
BoundCollideStatus collideStatus = World. CollideWorldBound (m_SoccerBall); |
Notice we do not need to change the soccer ball's center position by its velocity. Once again, as long as a primitive's ShouldTravel flag is set to true (which is in this case), the primitive will travel by its velocity as long as the primitive is visible (invisible primitive will not travel). The "CollideWorldBound()" function returns a " BoundCollisionStatus ". When there is a collision, we "ClampAtWorldBound()" to ensure the soccer ball does not shoot outside of the application window, and change the direction of the velocity accordingly.
Region C: Update the right thumb circle (clamp to the window bounds):
|
m_RightThumbCircle.Center = m_RightThumbCircle.Center +
GamePad.ThumbSticks.Right; |
The first line changes the RightThumbCircle center according to the rightThumbStick. To ensures that the circle never leaves the window bounds, we always perform "ClampAtWorldBound()" on the circle. When the A-button is clicked ("ButtonAClicked" becomes true), we call the "TopOfAutoDrawSet()" to raise the drawing priority of the RightThumbCircle to the top. In this simple application, the drawing priority of the AutoDrawSet is most obvious when the RightThumbCircle overlaps the ladder where A-button will "raise" the circle, and the "B-button" will "raise" the ladder to the top.
Region D: Update the eraser, hide/show soccer ball based on relative
position:
|
m_Eraser.CenterX += GamePad.ThumbSticks.Left.X; |
The first line changes the X-position of the eraser-rectangle. When the eraser-rectangle is to the "RightOf()" the soccer ball, we inquire if the soccer ball is in the AutoDrawSet with "IsInAutoDrawSet()", and if so, we hide the soccer ball from being drawn by "RemoveFromAutoDrawSet()". Conversely, when the eraser-rectangle is not to the right of the soccer ball, we show (un-hide) the soccer ball by "AddToAutoDrawSet()".
Region F: Collide the soccer with the rotating ladder:
|
bool collided = m_SoccerBall.Collided (m_RotatingLadder); |
The first line test for collision between the soccer ball and the ladder with the "Collided()" function call. Notice that the "Collided()" function only returns a true/false status. This function does not return the position where the collision happens. If collision is true, the soccer ball bounce away from the center of the ladder. Notice that VelocityDirection only change the direction of the soccer ball and not how fast it is moving! The second if statement changes the soccer direction by the Velocity of the ladder. Notice that although the ladder is not moving, its velocity is updated by the RotateAngle. In the application, whenever the "Y" button is pressed, notice the soccer ball travels towards the "front" of the ladder.
Project
home page: The
Game-Themed Introductory Programming Project.
|
Kelvin Sung |
Michael Panitz |
|
|
This work is supported in part by a grant from Microsoft
Research under the Computer Gaming Curriculum in Computer Science RFP, Award
Number 15871 and 16531. |
|
|
|