MFC Step-by-Step Guide
MAIN MENU » TUTORIAL 1 | TUTORIAL 2 >
Tutorial 1
Simple Dialog Based MFC Application
GOAL: To gain understanding of the GUI API and basic MFC Dialog Window
PREREQUISITES: none
- Open Microsoft Visual Studio .NET IDE
- Click the menu item >> >>
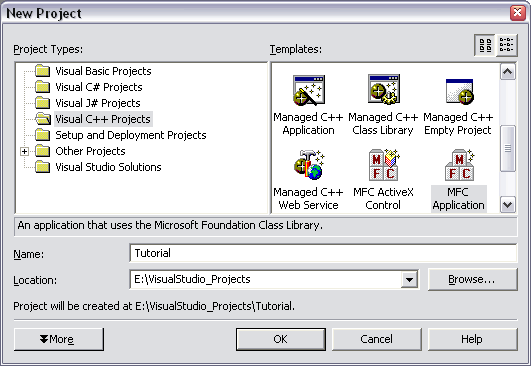
- In the 'New Project' Window, select
- Project Types:
- Templates:
- Select a Name and Location for the application. (We will name ours Tutorial inside a project created folder)

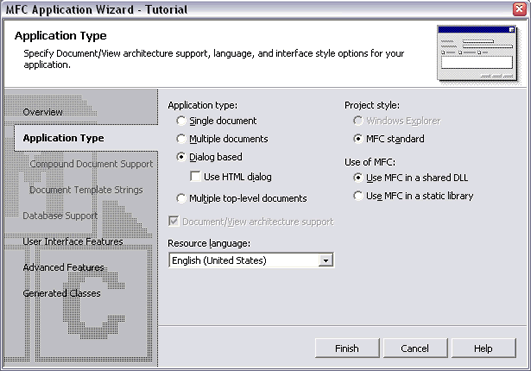
Figure 1.1 - New Dialog Project - In the 'MFC Application Wizard' window,
- Under Application Type select
- Under User Interface Features: un-check all boxes
- Under Advanced Features: un-check all boxes
- Click

Figure 1.2 - Application Wizard - Under Application Type select
- In the Visual Studio project window, click
- >>
- >> to run
» Written by William Frankhouser (wjf2@washington.edu)
» Advised by Kelvin Sung (ksung@washington.edu) as part of the project sponsored by the National Science Foundation under Grant No. 0442420. Any opinions, findings, and conclusions or recommendations expressed in this material are those of the author(s) and do not necessarily reflect the views of the National Science Foundation.
» Produced in the "Essential Concepts for Building Interactive Computer Graphics Applications", A.K. Peters, Ltd.