1. Obtain the example code
- Here is the zip file to the source files and compiled executable of this example.
- Here is the keyboard mapping for the XBOX 360 controller.
- Here is the main tutorial page for working with XNACS1Lib, and here is the complete documentation of the library: html-page or compiled html help file.
If you double click and run the executable program, you will observe:

|
2. The Source Code Files/Structure
Take a look at the ExampleProgram folder that you have unzipped and you will see:
- XNACS1Lib_Start.sln : You can open the XNA project by double clicking on this file.
- XNACS1Lib_Start folder: this is the folder that contains all the source code and necessary supports to the project. The content of this folder looks like:
| Folders/Files | Purposes |
| XNACS1Lib_Start.csproj | GSE project description file. We will not need to edit or change this file. |
| Game1.cs | This is is the file that contains the source code to our project. This document will only refer to the source code in from this file. |
| Program.cs | A dummy container. We do not need to be concerned with the content of this file. |
|
Game.ico
GameThumbnail.png |
Image of the top-left corner of the title bar of the application window and when the application window is iconized. |
|
SupportFiles
/XNACS1Lib_PC.dll
SupportFiles /XNACS1Lib_XBOX.dll |
The DLL library file that contains the XNACS1Lib classes and utilities. |
| Properties /AssemblyInfo.cs | Contains miscellaneous information on the application. We will not work with this file. |
| Content /Content.contentproj | GSE content project description file. We will not work with this file. |
| Content/Resources/Fonts/ Arial.spritefont | The font used by our applicaiton. This folder and the font file must exist for all of the XNACS1Lib projects. |
3. The Solution Explorer:
Now double click on the
*.sln
file in the
ExampleProgram
folder, to start the
project in the IDE. Notice the structure of the
SolutionExplorer
follows the source code folder structure we have examined ealier:

|
- The top blue box to the left shows that the Resources/Fonts folder is under the Content project.
- The bottom blue box to the left shows the highlighted Game1.cs file, in almost all of the cases this is the source file that contains all the source codes that we will examine.
- The red box to the right shows we have included the XNACS1Lib_PC.dll file from the SupportFiles folder.
4. Examine Game1.cs:
Now double click on the Game1.cs file in the SolutionExplorer , and you will see this structure:
|
#region Reference to system libraries
//
Label A: Reference to XNACS1Lib
namespace
XNACS1Lib_Start {
// Label C: InitializeWorld() function
// Label D: UpdateWorld() function
}
|
- Label A: this is the reference to the XNACS1Lib library.
- Label B: Game1 is our application, and we always subclass from the XNACS1Base base class.
- Label C: InitializeWorld() function is override. This is where our application initializes the game world . This function is called once (and only once) at the beginning of the application.
- Label D: UpdateWorld() function is override. This is where our application updates the world by interacting all objects and reacting to user's input. This function is called by the XNACS1Lib library 40 times second.
5. The InitializeWorld() function:
If we examine the InitializeWorld() function, this is what we will observe:|
// Label C: InitializeWorld() function
// 1. Set the coordinate system to work with
// 2. Set the background color
|
-
SetWorldCoordinate()
: defines the coordinate position for the lower-left corner
and the width of the application window. As illustrated in the following figure,
in this case, we define the lower-left corner to coordinate location
(-1,
-1)
, and the width of the application window to be
15
units wide.
Notice three important points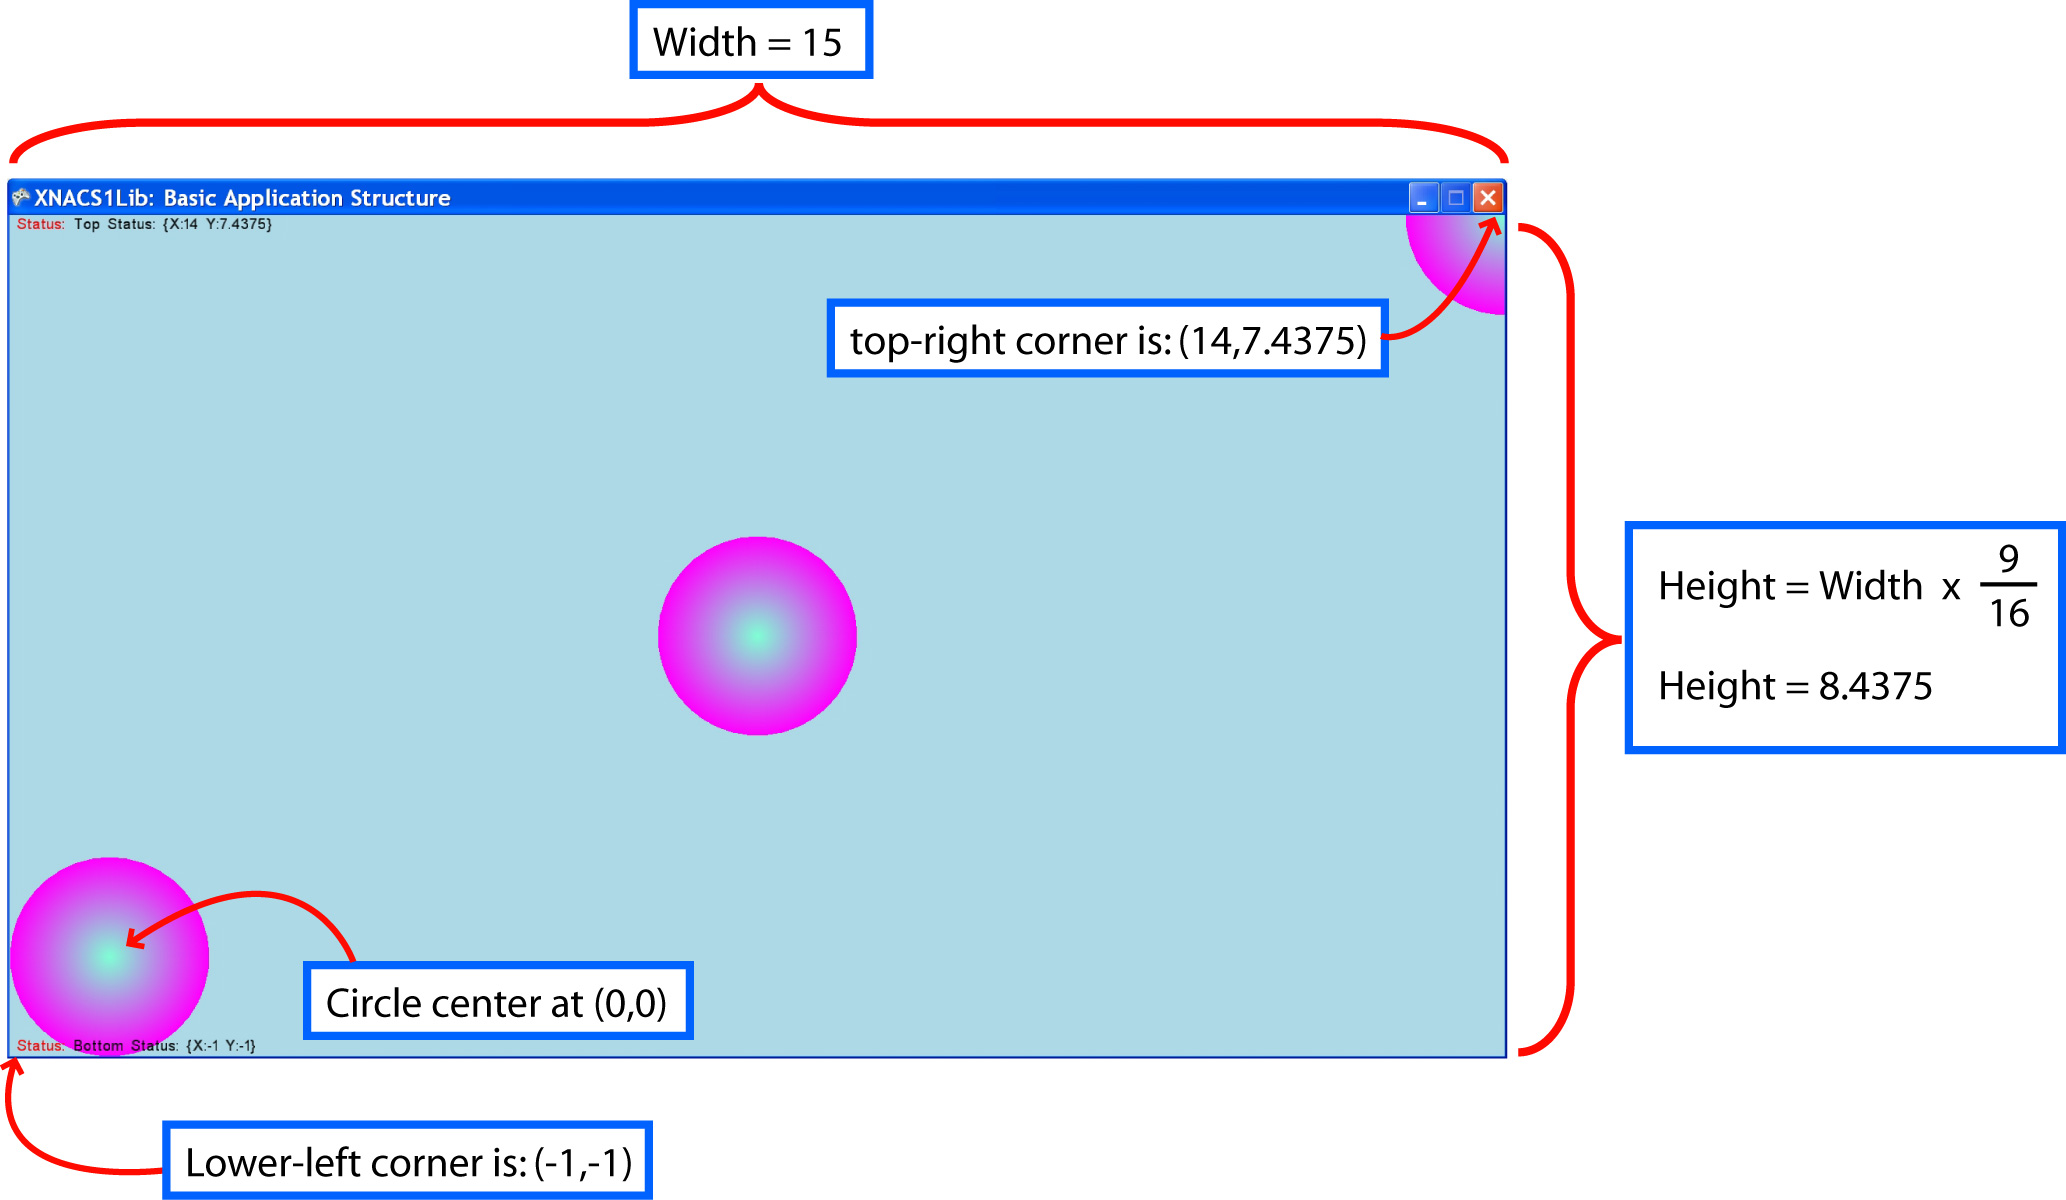
- Pixel-independent coordinate system : Notice that as programmers, we will operate with in the coordinate system we defined and we do not have to be concerned with the underlying pixel-resolution of the application window. For example, in this case, independent form the pixel-resolution of the application window, we can simply work in an area where the lower-loft corner is (-1,-1) with a width of 15.
- Fixed aspect ratio : To properly support HDTV (for running on the XBOX 360 gaming console), the aspect ratio of the application window is always 16:9. This means we do not have the option of defining the height of our coordinate system. In the given example, as illustrated in the above figure, we defined the width of the application window to be 15 units, and because of 16:9 aspect ratio, the height will be 8.4375 units.
- Fixed application window size : For sake of simplicity, the application window's dimension is defined with respect to the PC's screen: our application window always occupies 95% of the entire PC's screen width.
- SetBackgroundColor() : Sets background color for the application. In this case, the background color is set to light blue.
-
Define circles
: Here we define three circles with the
XNACS1Circle
XNACS1Circle
utility class. We will learn about this circle class in much more details in
the next tutorial. For now, we just need to know that the the XNACS1Circle
constructor expects the center position and radius of the circle. Notice
that:
-
WorldMax
and
WorldMin
properties
returning the lower-left and upper-right coordinate positions. In
this case, notice the center position of the first circle is defined as,
pos:
pos = ( World. WorldMax + World. WorldMin) / 2.0f;
in this way, the first circle being defined is located at the x- and y-middle of the application window and has a radius of 1.0f. Recall that the coordinate system we define has a width of 15 unites. Notice that the radius of the circle occupies 1/15 of the width of the application window.
XNACS1Circle center = new XNACS1Circle (pos, 1.0f);
-
The second circle being defined:
pos = new Vector2 (0, 0);
is centered at (0,0) position with radius of 1.0f. Given that the coordinate system we defined has lower-left corner of (-1, -1), we know the circumference of this second circle will touch the lower and left boundaries of the application window. The second circle created is the one located at the lower left corner.
XNACS1Circle LowerLeft = new XNACS1Circle (pos, 1.0f); -
The third circle being defined:
pos = World. WorldMax;
is centered at WorldMax , or top-left corner of the application window with radius of 1.0f. This is the top-left quarter-circle where the center is the top-left corner with three-quarter of this circle outside of the application window.
XNACS1Circle UpperRight = new XNACS1Circle (pos, 1.0f);
-
WorldMax
and
WorldMin
properties
returning the lower-left and upper-right coordinate positions. In
this case, notice the center position of the first circle is defined as,
pos:
6. The UpdateWorld() function:
If we examine the InitializeWorld() function, this is what we will observe:|
//
Label D: UpdateWorld() function
EchoToTopStatus(
"Top Status: "
+
World.
WorldMax);
|
- GamePad: we poll the Back button and quits when this button is clicked. Please refer to gamepad to keyboard mapping , the back-button on the gamepad is the "b"-key.
- EchoToTopStatus() and EchoToBottomStatus() functions: print out text messages to the top and bottom status echo areas. These are the two text output functions of the XNACS1Lib library.
Project home page: The Game-Themed Introductory Programming Project.
| Kelvin Sung Computing and Software Systems University of Washington, Bothell ksung@u.washington.edu |
Michael Panitz Business And Information Technology Cascadia Community College mpanitz@cascadia.eduu |
|
|
This work is supported in part by a grant from Microsoft Research under the Computer Gaming Curriculum in Computer Science RFP, Award Number 15871 and 16531. |
| 2/8/2010 | |