TAPESTRY: The Art of Representation and Abstraction
Data Exchange
This page was originally developed to describe data exchange from form-Z to Stratavision. It is currently being generalized to describe how to approach this problem for any pair of programs.
New versions of StrataVision and form•Z may share additional import and export formats for data exchange, in addition to DXF. The completeness of the exchange is related to what file format you are able to use. DXF files, while common, provide a relatively crude transfer. If you have invested significant time in establishing textures and/or light sources in your model you should check the particular versions of the software which you are using to see if a more complete transfer is possible. Check for the 3DS, VRML and 3DMF formats, any of which may provide a better transfer.
DXF files themselves are not identical from one version of AutoCAD to another. They are generally "upward compatible" but not "downward compatible". This means that a program that knows how to read an "old" DXF file may not know how to read a new one, but a program that knows how to read a new file will probably be able to read an old one. So, if you have problems with DXF transfers, one thing to look for is some sort of "version" setting. Form•Z has such a setting. Stratavision may need a file in the release 9 or 10 format to process it correctly.The exchange of data via DXF format involves representing the geometry with a very limited set of primitives which have only simple attributes and exist in an unordered list.
Data and Attribute Transfer to StrataVision
| This form•Z attribute | becomes | this StrataVision attribute |
| Topological Level | --> | (not transferred) |
| Layer | --> | submodel "shape" |
| Surface style | --> | simple color by # |
| Smoothing | --> | (not transferred) |
| Saved Views | --> | (not transferred) |
| Light sources | --> | (not transferred) |
Do This In form•Z
- Open the form•Z model.
- Assemble the polygon data into collections that make sense for coloration or texture variation, such as "posts" and "rafters", or "walls" and "windows", or "brick wall", "Gyp Walls", etc. It is not enough to rely on form•Z's topological "objects" since the DXF file format, which we will be using to transfer the drawings to StrataVision, doesn't support topology information (for that matter, neither does StrataVision). You do this by placing the information in separate layers, using each layer to represent objects with different materiality. This will make it easier to manipulate and color the model in StrataVision.
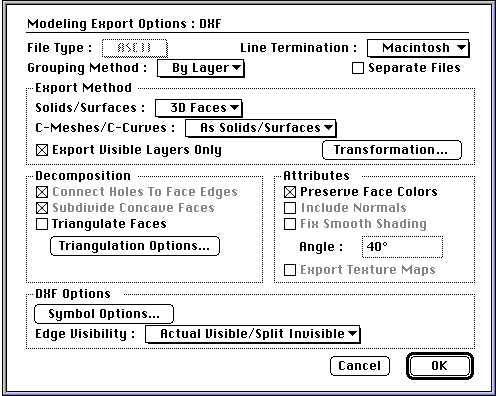
- SAVE AS it to a new file, changing the file format to DXF (In most cases you'll want the DXF export settings shown here, except you may want to "Export Visible Layers Only" if you aren't transferring the whole model). You may also want to apply a Transformation... (see next paragraph). When you click on OK, form•Z will begin writing the file.
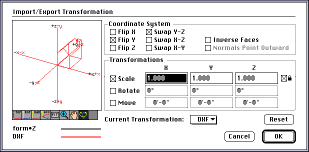
form•Z is a "z-up" program and StrataVision is a "y-up" program, a reference to the axis which is pointing up in perspective and axonometric views. The result is that a Top view in form•Z is a Front view in StrataVision. Under these circumstances, navigating the views becomes cumbersome. It is possible to "stand the model up" in StrataVision, but this proves awkward in a multi-layer file. The best choice is to apply an Export Transformation to the data as it is being saved to the DXF file. In particular, the options shown here (Flip Y and Swap Y-Z) produce the desired result.
- Quit form•Z.

Do This In StrataVision
- When you first launch StrataVision it will display an "Untitled" document window. Close this window. Now select OPEN from the File menu, and use the dialog box to select the DXF file which you created with the form•Z SAVE AS command. If necessary, the OPEN AS command can be used to specifically indicate that it is a DXF file.
This will read in the form•Z data. A natural consequence of this is that data residing on the same layer in the DXF file is clumped together into what Stratavision calls a "SHAPE", which will have the same name as the layer. When the DXF data has been imported it will be displayed in the Stratavision Modeling window.
- Set the "camera lens" to "Orthographic". This allows Stratavision to display rulers along the right and bottom edges of the modeling window.
- Check the dimensions of the model by examining these coordinates as you point, first at the left edge of the model, and then at the right. Check them against the form•Z model to make sure that the dimension of the model is unchanged. This is necessary because DXF files store only coordinates, not the units in which the coordinates are measured.
To activate the rulers in StrataVision, use the EDIT menu's, Set Ruler command to set the ruler to feet or inches, as appropriate to your original model. This sets the correct unit of measure for the rulers, but the model coordinates, as imported, may be variously interpreted, so check to make sure things are the right size. (For example, what is entered as feet in the program called Super3d imports as "pixels" (1/72s of an inch) in StrataVision, which makes a tiny little model!)
It may seem that the dimensional size of the model doesn't really matter, and in some ways this is true. However, if you have "tiny model syndrome" it will be difficult to place textures on it, to view it correctly, etc.. It is recommended that you blow up the model to a size we can work with.
- Select All, make a Group of it, and then Transform (Modeling Menu) the model, scaling it by 72 (if it should be "inches") or 864=12*72 (if it should be in "feet"), or whatever. It won't look any different if you zoom to the extents of the model, but it will be easier to work with.
Last updated: April, 2014
