Eclipse Installation Guide
Contributing Members
| Andrew Sloss: | asloss@u.washington.edu |
|---|---|
| Mitch Ishihara: | dmi@u.washington.edu |
| John Hatch: | jdhatch@u.washington.edu |
Acknowledgements
James Lynch for his excellent documentation on Eclipse installation
Objective
Install an Integrated Development Environment (IDE) for embedded development that allows you to edit source code, build projects, transfer images, and debug images on the Olimex LPC2378-STK board. The IDE for this project is based around an Open Source project called Eclipse. The compiler tool chain is based on GNU tools. Note: the GNU tool chain has a long history in the Embedded Industry.
Scope
This document covers the installation and setup of IDE and includes one example on how to create a project and download it onto the board for verification purposes. This document only covers installation on the test platforms, listed in section [1.1.1]. Estimated time for completion of this activity is roughly 1-2 hours.
Feedback
Please provide any feedback to dmi@u.washington.edu with “Feedback - IDE <date>” in the title.
References
- [LYNCH2006] ARM Cross Development with Eclipse; written by James P. Lynch
- [GNUARM2007] Home page for GNUARM is http://www.gnuarm.org
- [ECLIPSE2007] Home page for Eclipse http://www.eclipse.org
- [YAGARTO] Home page for Yagarto http://www.yagarto.de
Glossary
- CDT C Development Toolkit; plug-in for Eclipse for C development
- Cygwin Unix-like environment for using the standard Unix tools on a Windows based platform.
- Eclipse Is an Integrated Development Environment developed by IBM. Originally for Java projects now used extensively in a number of areas.
- GNU Stands for GNU’s Not Unix
- OpenOCD (Open On-Chip Debug) Is an open standard JTAG solution for ARM7 and ARM9 based parts
- Yagarto Release Release of the GNU tools (without Cygwin), Eclipse IDE 3.3 with Zylin CDT
Requirements
The requirement section outlines what is needed to continue building the IDE.
Software
You are required to have the latest Embedded System Package (ESPx.zip) downloaded from the UW web page. This may take some time since it is a large package. If possible make sure you are on a fast connection.
Hardware
You are required to have the University of Washington Development Kit based on the Olimex LPC2378-STK starter kit. Host Computer
- Windows 2000 SP4, XP SP2/SP3, Vista 32-bit, or Win7
- 1 GB Hard Drive Space
- Two available USB 1.1 or 2.0 ports (preferably 2.0)
Note: the entire installation takes a significant amount of storage (<400 MB)
Tested Platforms
- Microsoft Windows XP SP3
- Microsoft Windows Vista Ultimate 32-bit SP1 (see Vista Setup Addendum document)
Installation
In this section you will install the Java Runtime, Yagarto tool chain (i.e. GNU tool chain for ARM), Yagarto IDE (i.e. Eclipse IDE + Zylin C Development Toolkit), OpenOCD drivers, and Flash Magic onto your local machine.
Creating a home/work directory
This directory is where the UW environment will be stored.
- Create a new directory with no spaces or non-alpha-numeric characters such as. c:UW. This will be referred to as <UW PATH>.
- Extract ESPn.exe split-RAR files into <UW PATH>
- Check you have the following directories in <UW PATH>documents packages source
- Check you have the following files in the <UW PATH>packageseclipse-cpp-galileo-SR1-win32.zip
- FlashMagic_5.36.exe
- jre-6u16-windows-i586-s.exe
- OlimexOpenOCDDriver.zip
- openocd-r717-20080619.exe
- TERATERM.INI
- TeraTermPro2.34.msi
- yagarto-bu-2.19.1_gcc-4.4.1-c-c++_nl-1.17.0_gi-6.8.50_20090817.exe
- yagarto-bu-2.19.1_gcc-4.4.1-c-c++_nl-1.17.0_gi-6.8.50_20090817.md5
- Extract the OlimexOpenOCDDriver.zip into “<UWPATH>packages” It should result in the files populating: “<UWPATH>packagesOlimex OpenOCD Driver”
Installing OpenOCD Drivers
OpenOCD provides the software link between the Olimex ARM-USB-OCD hardware unit and the GNU debugger (GDB). You will have to install three drivers.
If you are installing into Windows Vista, see the supplemental Vista setup document for the driver installation. The process is similar but the dialog boxes are different.
- First, install OpenOCD using the defaults. Double click on:
- <UW PATH>\packages\openocd-r717-20080619.exe
- Move the Olimex Open OCD Driver folder to the OpenOCD driver install directory.
- C:\Program Files\openocd-r717\driver
- Bring-up the Control Panel double click on System (you may have to change to Classic View)
- Select the Advance tab
- Click on Environment Variables...
- Under System variables, locate Path and check that it has the following:
- C:\Program Files\openocd-r717\bin;
- C:\Program Files\openocd-r717\utils\bin;
Connect the JTAG ribbon cable from Olimex board to the ARM-USB-OCD unit
Connect the Olimex ARM-USB-OCD to the host computer using the USB cable provided.
Set the LPC-2378-STK PWR_SEL jumper to position 3 +5V_USB.
Note that the silkscreen legend number order is reversed (reading downward 1, 2, 3 vs. 3, 2, 1). In any case, place the jumper on position 3.
Connect the Olimex LPC-2378-STK’s USB to the host computer USB using the USB cable provided.
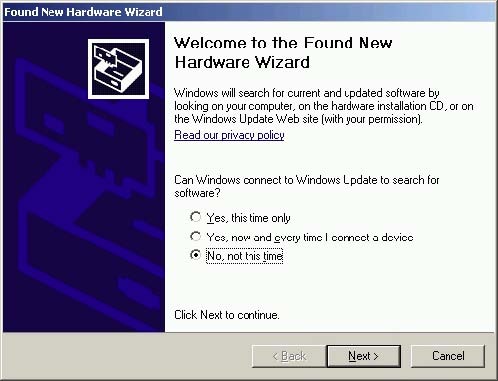
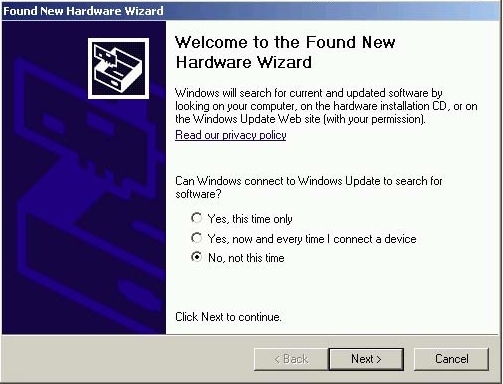
The Found New Hardware Wizard should open. Choose No, not at this time and click Next.
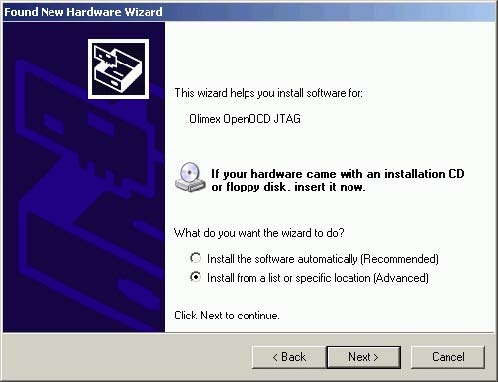
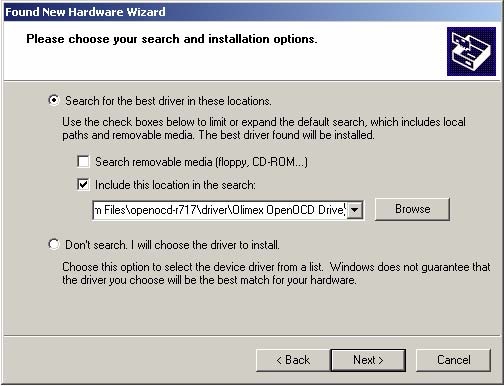
Select “Install from a list or specific locationv[Advanced]” - see below
Click Next
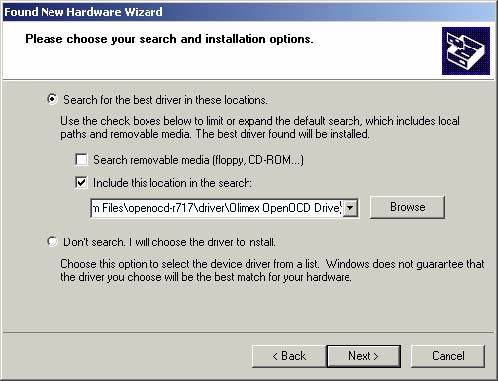
Deselect “Search removable media...”
Select “Include this location in the search”
Use the browse button to pick the OpenOCD path:
- C:\Program Files\openocd-r717\driver\Olimex OpenOCD Driver
Click Next
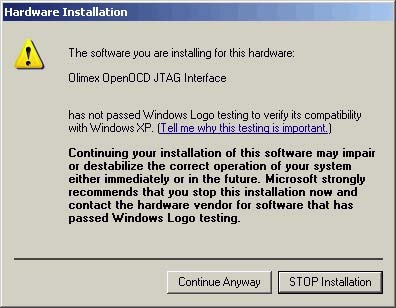
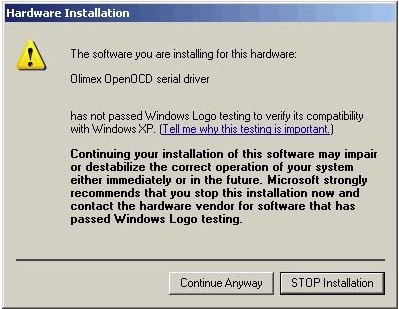
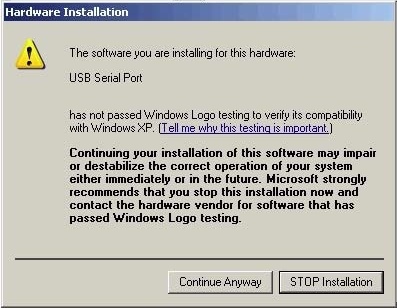
Click Continue Anyway
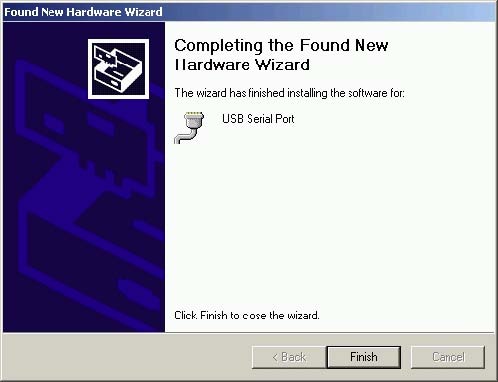
Click Finish
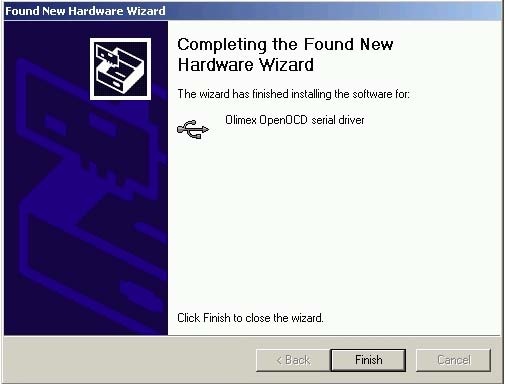
Note: this has installed Olimex OpenOCD interface
After clicking Finish another dialog box should appear
Follow the same procedure
Select “Install from a list or specific location [Advanced]” - see below
Click Next

Select “Include this location in the search”
Use the browse button to pick the OpenOCD path:
C:Program Filesopenocd-r717driverOlimex OpenOCD Driver
Click Next
Click Continue Away
Click Finish
A third Found New Hardware Wizard should pop up. Follow the same procedure
Select “Install from a list or specific location [Advanced]” - see below
Click Next
Select “Include this location in the search” 32. Use the browse button to pick the OpenOCD path:
- C:\Program Files\openocd-r717\driver\Olimex OpenOCD Driver
Click Next

Click Continue Anyway
Click Finish
Note: This process should have installed the following drivers
- Olimex OpenOCD JTAG
- Olimex OpenOCD serial driver
- USB Serial Port
- If you choose to plug the ARM-USB-OCD into a different USB port on your host computer you will be prompted for the above driver install again. Repeat the driver installation above for every USB port that you will plug the ARM-USB-OCD into on your host computer. It may be preferable to use only one USB port to keep Windows Registry changes to a minimum.
Copy the LPC2378 ARM-USB-OCD OpenOCD Configuration File
Create a directory lpc2378 in:
C:\program files\openocd-r717\bin\scripts\
Finally copy:
<UW PATH>\\source\\lpc2378_armusbocd.cfg
to:
C:\program files\openocd-r717\bin\scripts\lpc2378\lpc2378_armusbocd.cfg
Installing YAGARTO GNU ARM toolchain
Double click on:
<UW PATH>\packages\yagarto-bu-2.19.1_gcc-4.4.1-c-c++_nl-1.17.0_gi-6.8.50_20090817.exe
Follow the installer instructions, taking the defaults. Wait for the installer to finish.
Bring-up the Control Panel
double click on System
Select the Advance tab
Click on Environment Variables...
Under System variables, locate Path and check that it has the following:
C:\Program Files\yagarto\bin;
Installing Java Runtime Environment
Java is required by the Eclipse IDE.
Double click on:
<UW PATH>\packages\jre-6u16-windows-i586-s.exe
Accept the terms, and use the default simple install. Use the defaults since we don’t want to deviate from what has been tested, except maybe you don’t want to install MSN Toolbar or other “free” non-essential offering.
Installing Eclipse IDE
Extract:
<UW PATH>\packages\eclipse-cpp-ganymede-SR1-win32.zip
To:
C:\eclipse
Create a shortcut to eclipse.exe located in the extracted directory on your desktop, Start Menu, and/or Quick Launch Menu.

Double-click the shortcut to launch Eclipse.
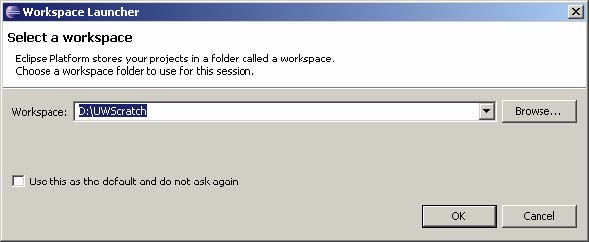
Select the location where you want to store your projects.
Close Eclipse and reboot machine.
Creating a new project
Now we are is a position to attempt to build a small Embedded Hello World program.
Open Eclipse
Menu Windows/Open Perspective/Other and select C/C++
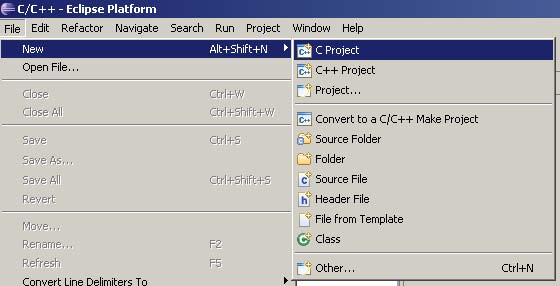
Menu and select File/New/C Project
Enter in “HelloWorld” for the Project name Uncheck “Show project types and toolchains only if they are supported on the platform”
Select “Makefile project”, “Empty Project”, and “–Other Toolchain–”
Click Finish

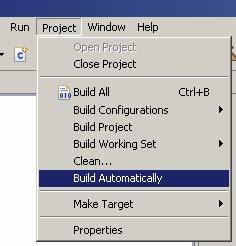
Uncheck menu Project | Build Automatically
If Eclipse opened in the Welcome screen click on the “Workbench Go to the workbench” icon.

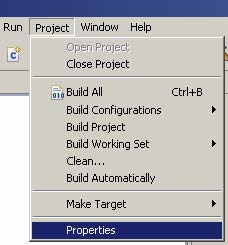
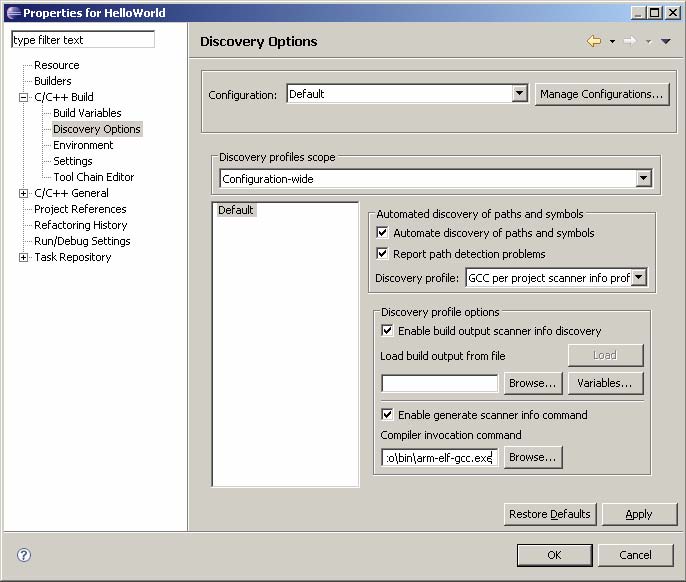
Select menu Project | Properties...
The Properties for HelloWorld will open
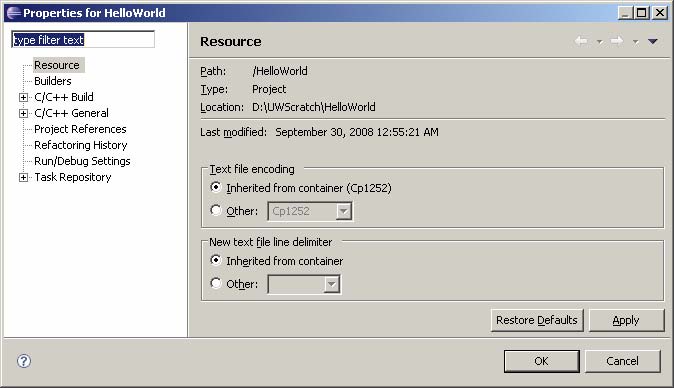
Select “C/C++ Build”, go to the “Discovery Options”, and change the Compiler invocation command to your YAGARTO compiler executable arm-elf-gcc.exe. The default is C:Program Filesyagartobinarm-elf-gcc.exe
Select the “Settings”
select “GNU Elf Parser” checkbox
click to highlight “GNU Elf Parser”
change the path and executable command for addr2line and c++filt to the YAGARTO installed arm-elf-addr2line.exe and arm-elf-c++filt.exe.
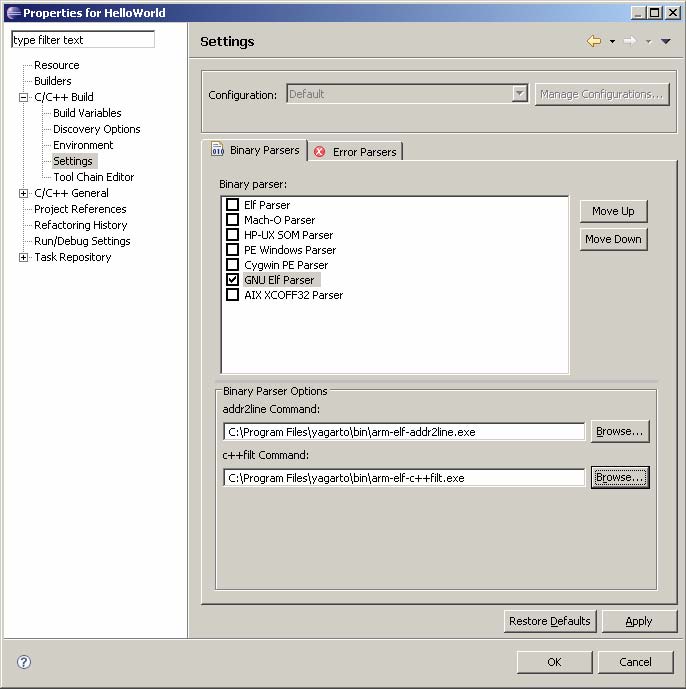
Click Apply and OK.
Importing project files into Eclipse
At this point the project is created but empty.
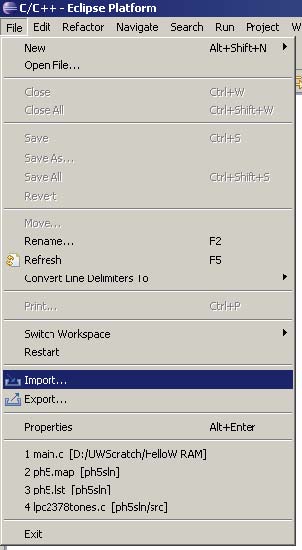
Click on menu File | Import
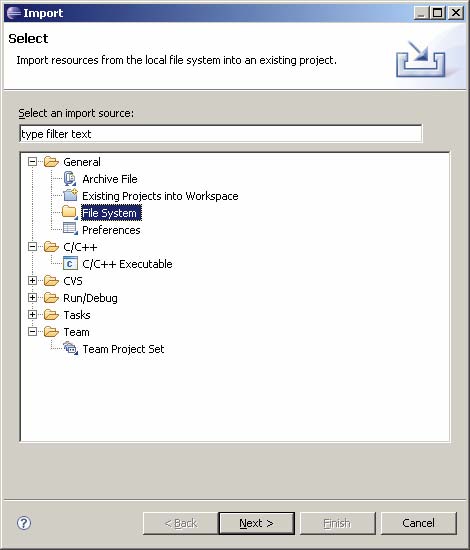
Select “File System” as the input source and click Next.
From directory:
<UW PATH>\source\LPC2378HelloW
Into folder:
HelloWorldSelect the checkbox for “LPC2378HelloW”.
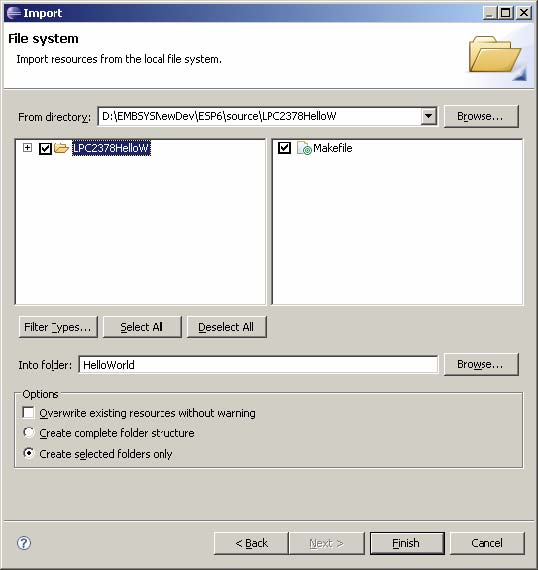
Click finish will copy the files into <WORKSPACE PATH>\HelloWorld
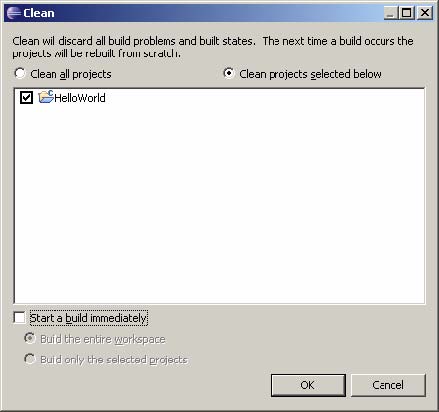
Select the menu option Project | Clean... Select Clean projects selected below (unless you want to clean all projects)
Uncheck “Start a build immediately” (unless you want it to do so)
Click the Eclipse Console window to display the output of the command. It should look something like:
**** Clean-only build of configuration Default for project HelloWorld ****
make clean
rm -f ./src/crt.o ./src/main.o ./src/init.o ./src/print.o
rm -f LPC2378HelloW.elf
rm -f LPC2378HelloW.map
rm -f LPC2378HelloW.hex
rm -f LPC2378HelloW.bin
rm -f LPC2378HelloW.srec
rm -f LPC2378HelloW.lst
rm -f ./src/main.c.bak ./src/init.c.bak ./src/print.c.bak
rm -f ./src/main.lst ./src/init.lst ./src/print.lst
rm -f ./src/crt.s.bak
rm -f ./src/crt.lst
rm -fR .dep
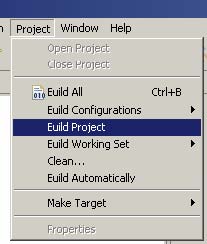
To build the project, select menu Project | Build Project.
You should see something like this appear in the console window:
**** Build of configuration Default for project HelloWorld ****
make all
arm-elf-gcc -x assembler-with-cpp -c -mcpu=arm7tdmi -g -gdwarf-2 -Wa,- amhls=src/crt.lst src/crt.s -o src/crt.o
arm-elf-gcc -c -mcpu=arm7tdmi -O0 -gdwarf-2 -mthumb-interwork -fomit-frame-pointer -Wall -Wstrict-prototypes -fverbose-asm -Wa,-ahlms=src/main.lst -MD -MP -MF .dep/main.o.d -I . -I./inc src/main.c -o src/main.o
arm-elf-gcc -c -mcpu=arm7tdmi -O0 -gdwarf-2 -mthumb-interwork -fomit-frame-pointer -Wall -Wstrict-prototypes -fverbose-asm -Wa,-ahlms=src/init.lst -MD -MP -MF .dep/init.o.d -I . -I./inc src/init.c -o src/init.o
arm-elf-gcc -c -mcpu=arm7tdmi -O0 -gdwarf-2 -mthumb-interwork -fomit-frame-pointer -Wall -Wstrict-prototypes -fverbose-asm -Wa,-ahlms=src/print.lst -MD -MP -MF .dep/print.o.d -I . -I./inc src/print.c -o src/print.o
arm-elf-gcc ./src/crt.o ./src/main.o ./src/init.o ./src/print.o -mcpu=arm7tdmi -nostartfiles -T./prj/lpc2378_ram.ld -Wl,-Map=LPC2378HelloW.map,--cref,--no-warn-mismatch -o LPC2378HelloW.elf arm-elf-objcopy -O ihex -S
LPC2378HelloW.elf LPC2378HelloW.hex arm-elf-objcopy -O binary -S
LPC2378HelloW.elf LPC2378HelloW.bin arm-elf-objdump -dSst
LPC2378HelloW.elf > LPC2378HelloW.lst
Expand the HelloWorld project tree. The Project Explorer window should have updated showing the elf file:

Ignore the other closed projects.
Install Zylin CDT plugin
At this point we have to install the Zylin CDT plugin within Eclipse.
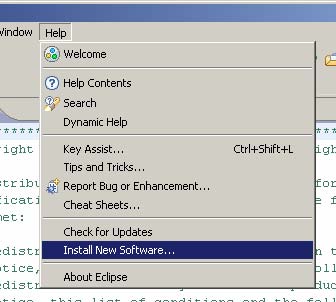
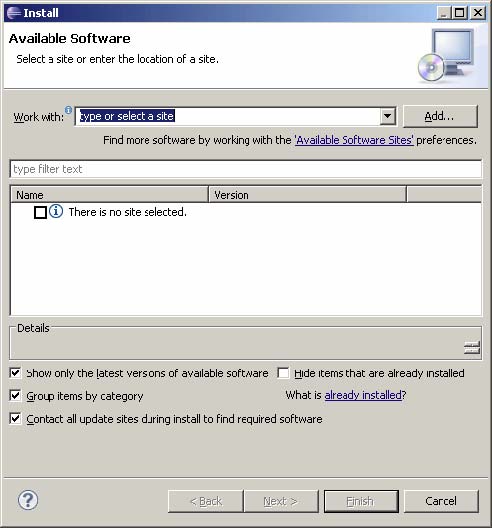
Within Eclipse, go to menu Help | Install New Software..Page
Click the Add... button
Set the Location as http://www.zylin.com/zylincdt
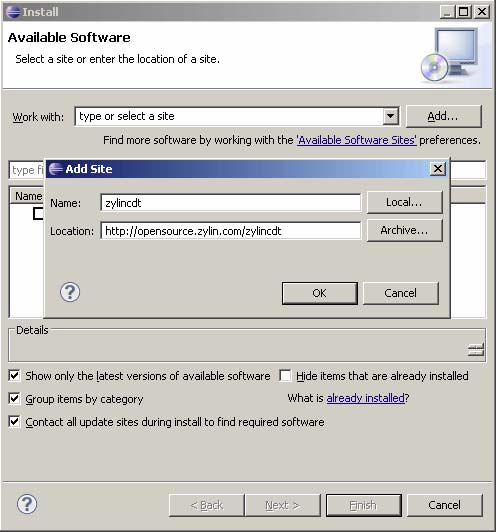
Click OK.
Select Zylin Embedded CDT and Press the Next button.
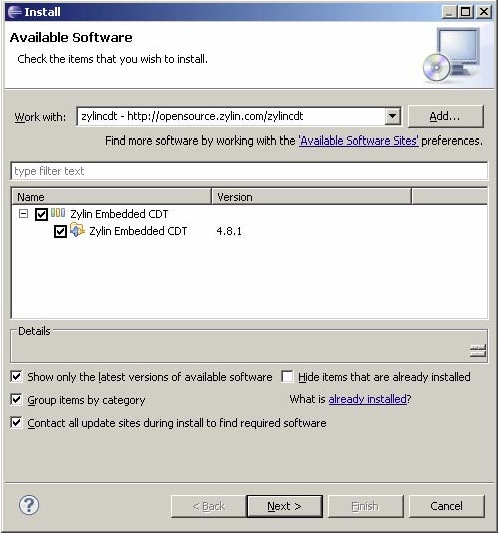
Click Next
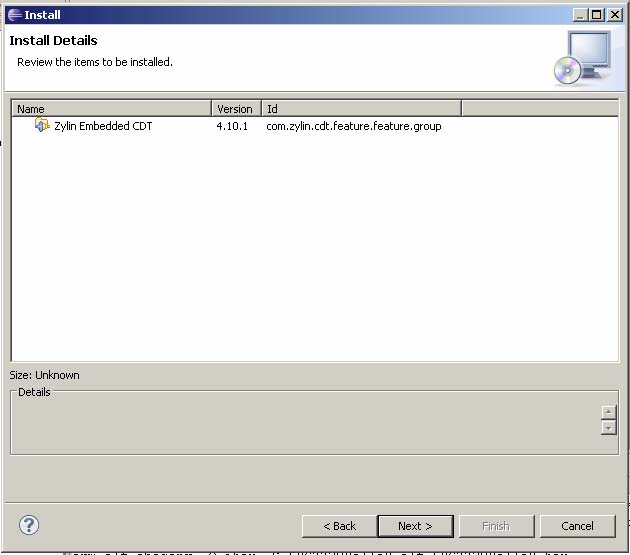
Accept the terms and click Finish.
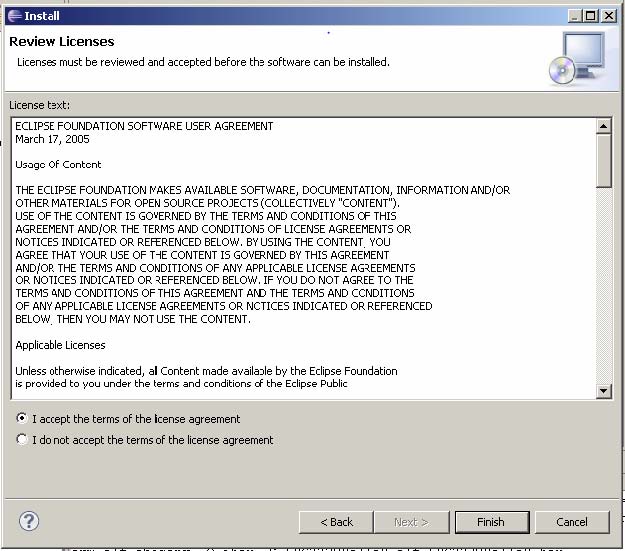
Click OK.
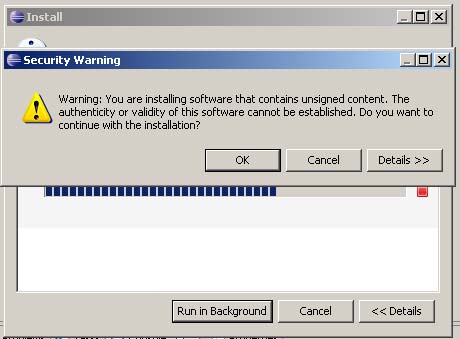
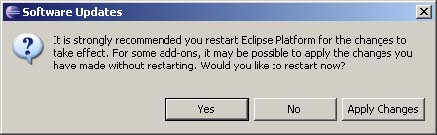
Click Yes to restart Eclipse.
Configuring the debugger
At this point we have to set up Zylin CDT plugin within Eclipse. To debug, we will change to the “Debug Perspective”. Eclipse has different perspectives that save the state of the IDE which makes it convenient to switch between different perspectives while maintaining independent window states for each one.
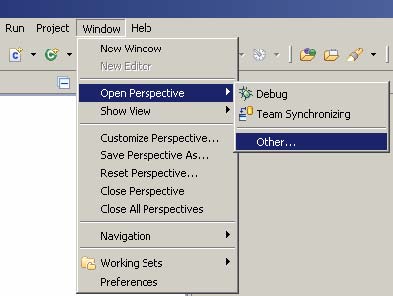
In Eclipse, click menu Window | Open Perspective | Other...
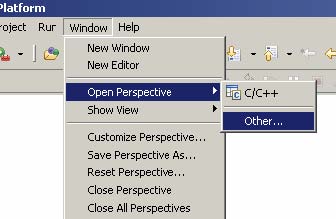
Choose Debug perspective to open it.

TIP: You can also click the quick tabs in the upper right corner to quickly change perspectives.
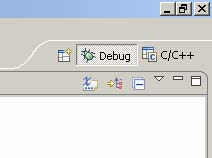
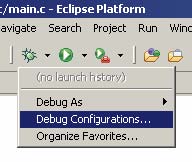
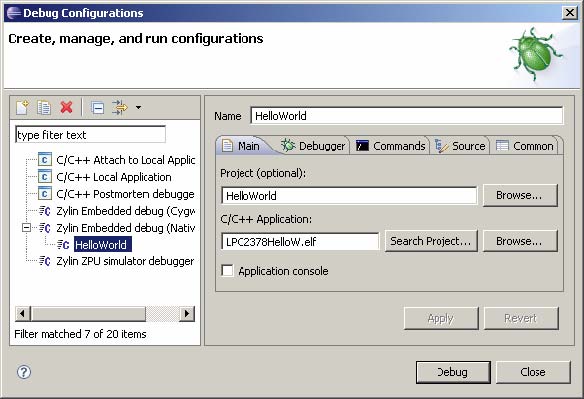
To configure the debugger, click the down arrow to the right of the insect icon and select Debug Configurations..
The Debug dialog will open. Select the Zylin Embedded debug (Native), and click the New icon

Select New_Configuration(1)
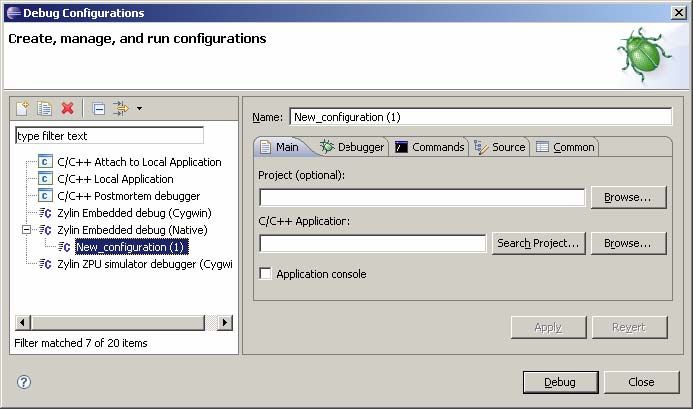
Change the Name, and Click Browse... to select the Project
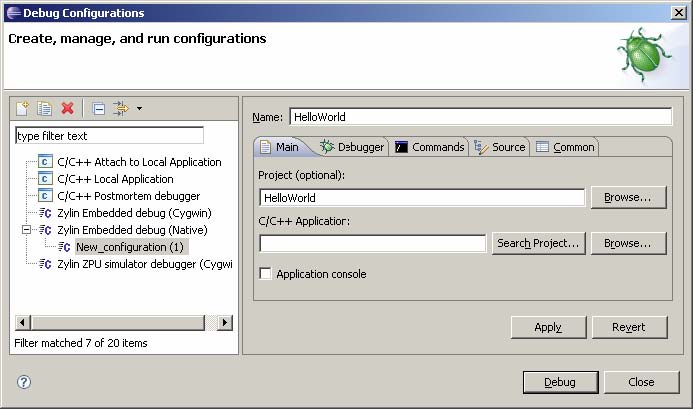
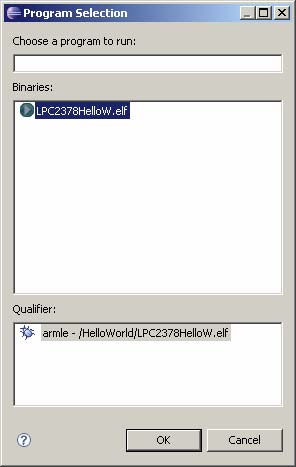
Click “Search Project...” and choose the ELF file that was generated during the build, Click OK.
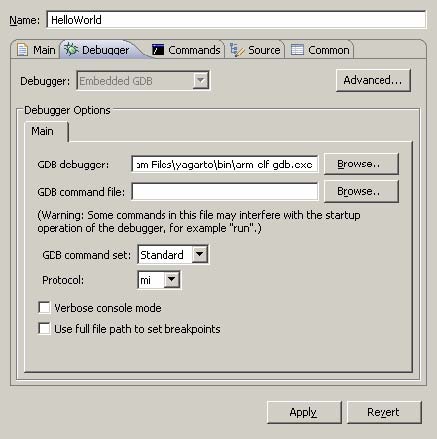
Select the “Debugger” tab and use the “Browse...” button to set the “GDB debugger:” to the YAGARTO executable arm-elf-gdb.exe.
Clear the “GDB command file:” (unless you have one you want to use).
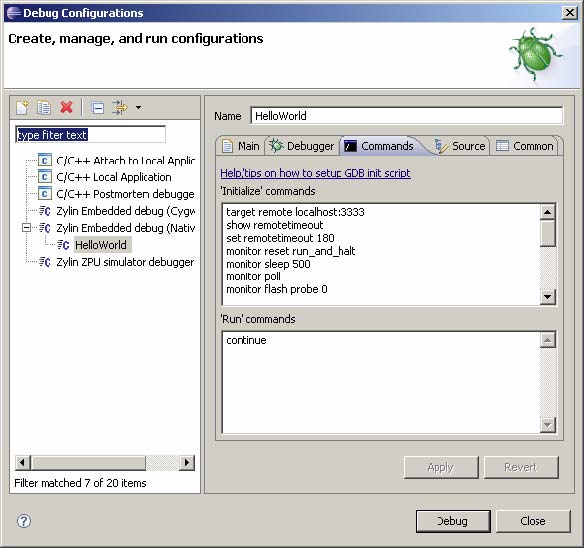
Select the “Commands” tab, copy and paste the ‘Initialize’ commands from the lpc2378_flash.gdb file except for “continue”, and put “continue” in the ‘Run’. This file is in the <WORKSPACE PATH>\HelloWorld\prj folder.
NOTE: All of the commands are not shown below in the scrolled window.
If necessary, change the drive letter and path the the .hex file to where it is in your project.

Click Apply.
Click Close.
In Eclipse Click Run / External Tools / External Tools Configurations...
Select “Program” and Click on New o Fill in the form as follows:
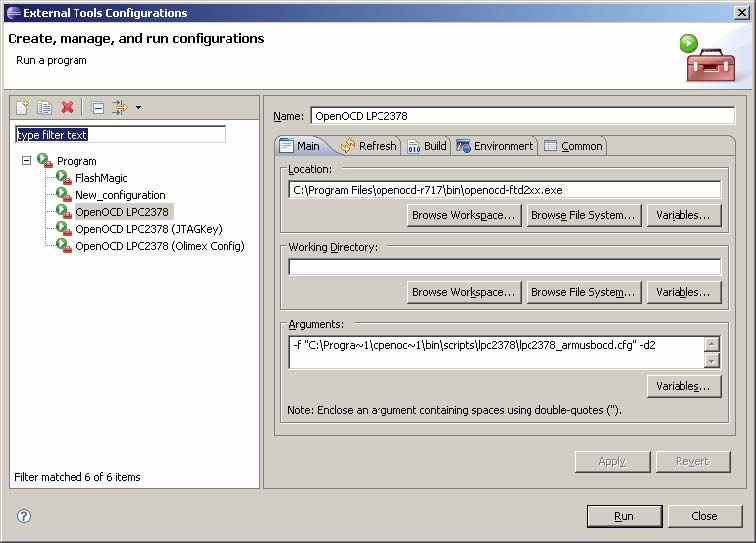
NOTE: Ignore the other configured external programs.
Click Apply
Click Run (make sure all the hardware is connected)
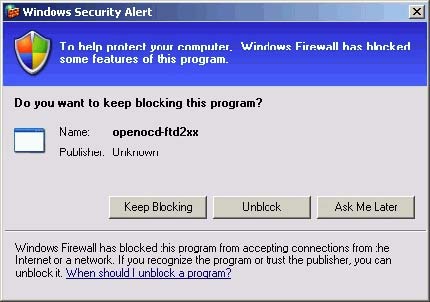
A Windows Security Alert dialog box may appear because OpenOCD uses ports 3333 and 4444 to communicate with the other programs. Unblock the ports.
From the Console window in Eclipse this should appear:
Open On-Chip Debugger (2008-06-19 19:00) svn: 717
URL: http://svn.berlios.de/svnroot/repos/openocd/trunk
Info: options.c:50
configuration_output_handler(): Open On-Chip Debugger (2008- 06-19 19:00)
svn: 717 Info: options.c:50 configuration_output_handler(): jtag_speed: 50, 50
Info: jtag.c:1389 jtag_examine_chain(): JTAG device found: 0x4f1f0f0f (Manufacturer: 0x787, Part: 0xf1f0, Version: 0x4)
Warning: embeddedice.c:185 embeddedice_build_reg_cache():
EmbeddedICE version 7 detected, EmbeddedICE handling might be broken
Info: jtag.c:1389 jtag_examine_chain(): JTAG device found: 0x4f1f0f0f
(Manufacturer: 0x787, Part: 0xf1f0, Version: 0x4)
Note
the first line indicates that the OpenOCD chain is working - precise output may differ between releases. The Warning is just indicating that complete documentation was unavailable for the detected EmbeddedICE version 7 macrocell.
To run the debugger, click the down arrow to the right of the insect icon and select Debug Configurations..
Select the HelloWorld debug configuration created previously.

Click Debug.
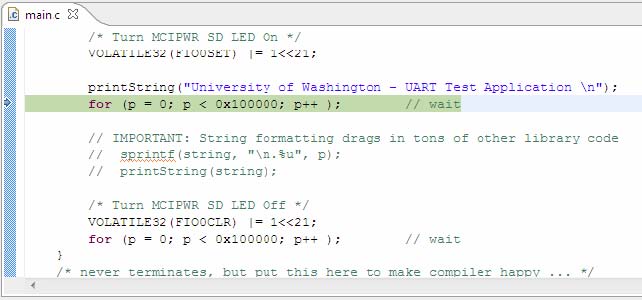
If all goes well, HelloWorld should hit a breakpoint in main.c at initHardware();

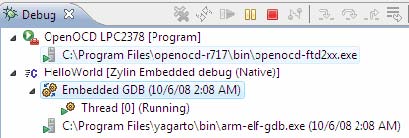
In the Debug window, Click on OpenOCD LPC2378 [Program]
The Consoles should display something like the following:
Open On-Chip Debugger (2008-06-19 19:00) svn: 717 URL:
http://svn.berlios.de/svnroot/repos/openocd/trunk Info:  options.c:50
configuration_output_handler(): Open On-Chip Debugger (2008- 06-19
19:00) svn: 717 Info:   options.c:50 configuration_output_handler():
jtag_speed: 50, 50 Info:   jtag.c:1389 jtag_examine_chain(): JTAG
device found: 0x4f1f0f0f (Manufacturer: 0x787, Part: 0xf1f0, Version:
0x4) Warning: embeddedice.c:185 embeddedice_build_reg_cache():
EmbeddedICE version 7 detected, EmbeddedICE handling might be broken
Info:  jtag.c:1389 jtag_examine_chain(): JTAG device found: 0x4f1f0f0f
(Manufacturer: 0x787, Part: 0xf1f0, Version: 0x4) Info: server.c:78
add_connection(): accepting 'gdb' connection from 0 Warning:
gdb_server.c:416 gdb_get_packet_inner(): acknowledgment received, but
no packet pending
Info:   jtag.c:1389 jtag_examine_chain(): JTAG device found:
0x4f1f0f0f (Manufacturer: 0x787, Part: 0xf1f0, Version: 0x4)
User: User: debug cpsr: User: User: in 0.890625s Info:  jtag.c:1389
jtag_examine_chain(): JTAG device found: 0x4f1f0f0f (Manufacturer:
0x787, Part: 0xf1f0, Version: 0x4)
target.c:957 target_arch_state(): target state: halted
armv4_5.c:307 armv4_5_arch_state(): target halted in Thumb state due
to request, current mode: Supervisor 0xa00000f3 pc: 0x7fffe152
gdb_server.c:574 gdb_output(): flash 'lpc2000' found at 0x00000000
gdb_server.c:574 gdb_output(): erased sectors 0 through 26 on flash
bank 0
User: User: debug cpsr: User: User:
C:\UWScratch\HelloWorld\LPC2378HelloW.hex in 4.531250s (0.707759 kb/s)
User:        target.c:1838 handle_soft_reset_halt_command():
requesting target halt and executing a soft reset
User:   gdb_server.c:574 gdb_output(): force hardware breakpoints
enabled
In the Debug window, click on HelloWorld [Zylin Embedded debug (Native)]
The Console window should display something like the following:
target remote localhost:3333
0x7fffe152 in ?? ()
show remotetimeout
Timeout limit to wait for target to respond is 2.
set remotetimeout 180
monitor reset run_and_halt
JTAG device found: 0x4f1f0f0f (Manufacturer: 0x787, Part: 0xf1f0, Version: 0x4)
monitor sleep 500
monitor poll
target state: halted
target halted in Thumb state due to debug request, current mode: Supervisor
cpsr: 0xa00000f3 pc: 0x7fffe152
monitor flash probe 0
flash 'lpc2000' found at 0x00000000
monitor flash erase_sector 0 0 26
erased sectors 0 through 26 on flash bank 0 in 0.890625s
monitor reset run_and_halt
JTAG device found: 0x4f1f0f0f (Manufacturer: 0x787, Part: 0xf1f0, Version: 0x4)
monitor sleep 500
monitor poll
target state: halted
target halted in Thumb state due to debug request, current mode: Supervisor
cpsr: 0xa00000f3 pc: 0x7fffe152
monitor flash write_image erase C:\UWScratch\HelloWorld\LPC2378HelloW.hex 0 ihex
auto erase enabled
wrote 3284 byte from file C:\UWScratch\HelloWorld\LPC2378HelloW.hex in 4.531250s (0.707759 kb/s)
monitor soft_reset_halt
requesting target halt and executing a soft reset
monitor arm7_9 force_hw_bkpts enable
force hardware breakpoints enabled
set language c
break main
Breakpoint 1 at 0x138: file src/main.c, line 97.
set remotetimeout 10
target.c:957 target_arch_state():
target state: halted
armv4_5.c:307 armv4_5_arch_state():
target halted in Thumb state due to request, current mode: Supervisor 0xa00000f3 pc: 0x7fffe152
gdb_server.c:574 gdb_output():
auto erase enabled
gdb_server.c:574
gdb_output(): wrote 3284 byte from file
continue
Note: automatically using hardware breakpoints for read-only
addresses.

Breakpoint 1, main () at src/main.c:97
97           initHardware();
In the Debug window, select Embedded GDB, click the Resume button to resume execution of HelloWorld.
The Red LED to the bottom left of the LCD should toggle on for one second and off for one second.
If a terminal program is running at (38400, 8, N, 1) an the serial port is connected to the LPC- 2378-STK’s RS232_0 connector, the message, “Olimex LP-2378-STK... alive!!!” should be scrolling down the terminal screen.
In the Debug window, click the Pause button to pause execution of HelloWorld. Execution of HelloWorld should stop and the source line at which execution has stopped should be displayed in the source window.
In the Debug window, click the Resume button to resume execution of HelloWorld. The Red LED should resume blinking again, and the serial prints should resume as well.
In the Debug window, click the Stop button to terminate debugging.


In the Debug window, click OpenOCD LPC2378 [Program], and click the Stop button to terminate OpenOCD.

Right-click on one of the terminated items and select Remove All Terminated.
Relaunch OpenOCD by clicking on the external tools icon.

If OpenOCD terminates with an error, unplug the USB cable from the ARM- USB-OCD, wait a few seconds, re-plug the USB cable, wait a few seconds (or until Device Manager refreshes and displays the Olimex OpenOCD port, Olimex OpenOCD JTAG Interface and Olimex OpenOCD serial driver.
Try relaunch OpenOCD by clicking on the external tools icon.
Refer to Jim Lynch’s tutorial “Using Open Source Tools for AT91SAM7S Cross Development revision C.pdf” in the ESP documents folder for additional information and usage scenerios.
Summary
You have successfully achieved the following:
- Installed Eclipse, a popular and powerful IDE for Embedded Systems.
- Installed a full version of GNU tool chain running natively on Windows.
- Installed and setup the OpenOCD drivers and Flash Magic utility.
- Finally built, installed, and transferred your first embedded program onto the Olimex LPC2378-SDK board.
Note: common with all documents mistakes are made, please provide feedback see section [1.1.2] for details.