
Introduction to Geographic Information
Systems in Forest Resources |
Exercise: Importing Data
Objective:
- Download GIS data from the web and import it to ArcGIS.
- Find information about data sources by using the National Spatial Data and
Clearinghouse.
In the last 10 years there has been a tremendous growth in number of online geospatial
data providers and data sets available. This lesson will introduce just a few
of these data providers (there is no definitive list anywhere of data providers
and available data sets). Finding data is frequently a needle-in-haystack operation
that requires patience, intuition, and luck.
When you do find data, the file formats may also vary greatly. This lesson
introduces techniques for handling a number of these different data sources,
but again, there is no definitive list of the file types you are likely to encounter,
and no single location for instructions on how to handle each of these formats.
Important Note: this lesson uses tools that are only available with the ArcInfo run level of ArcGIS Desktop. In order to complete all the parts of this lesson you will need to use a computer on campus that has the full ArcInfo license. If you use your student evaluation version (ArcEditor run level) you will not be able to complete this lab.
- Perform drive
substitution to create drives L (CD) and M (removable drive).
- Set up directories
- Download and import E00 layers from the WAGDA web
site
- USDA Geospatial Data Gateway
- Download SDTS DEM data
- Import SDTS DEM
- Get and view USGS DRG data
Perform drive substitution
Perform drive
substitution to create the virtual drives L and M.
Set up directories
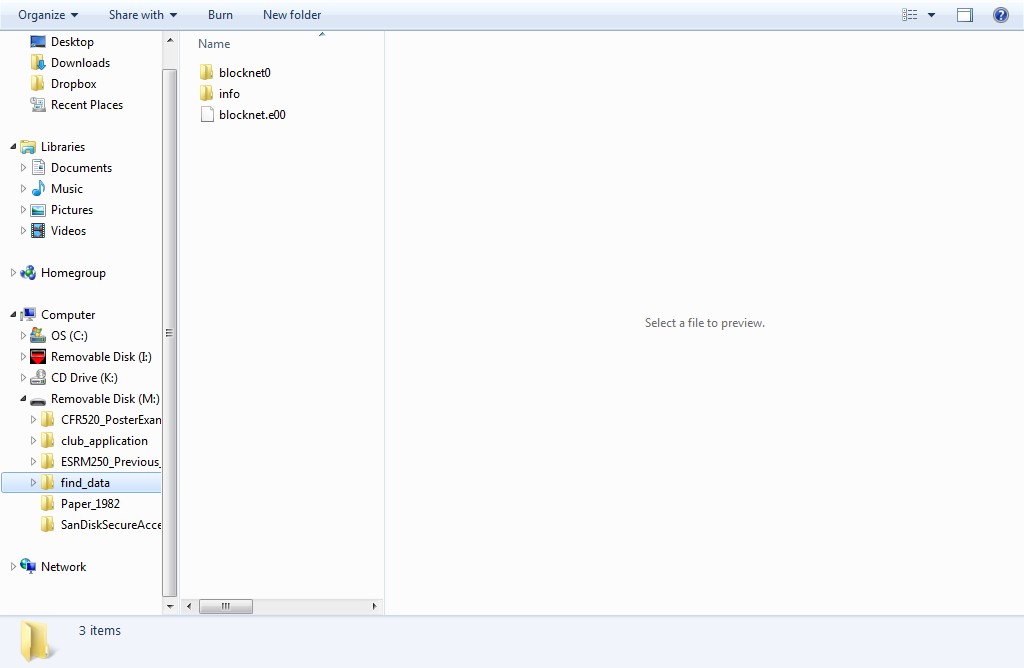
Open the Windows Explorer to drive M:. Create a directory called find_data
for today's lesson files.
Download and import E00 layers from the a WAGDA web site
The file you will download is compressed as a zip file, which is a
common file compression format. Like other zip file, you need to unzip the download file and "Add Data" in your ArcMap documents.
- Go to the king county data store in WAGDA website.
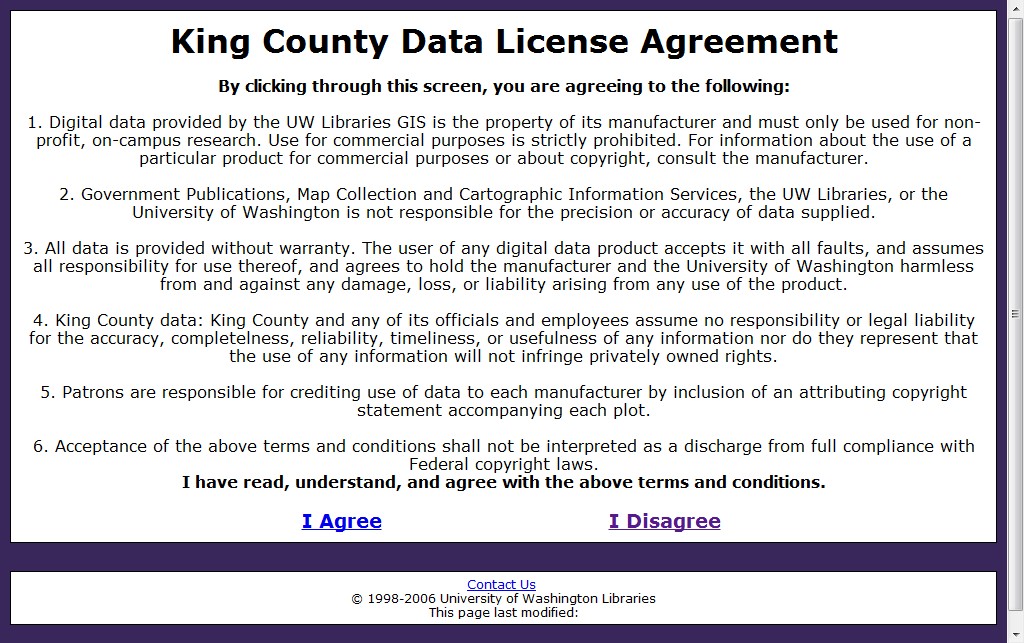
- Click I Agree to enter the King County GIS Data listing webpage.
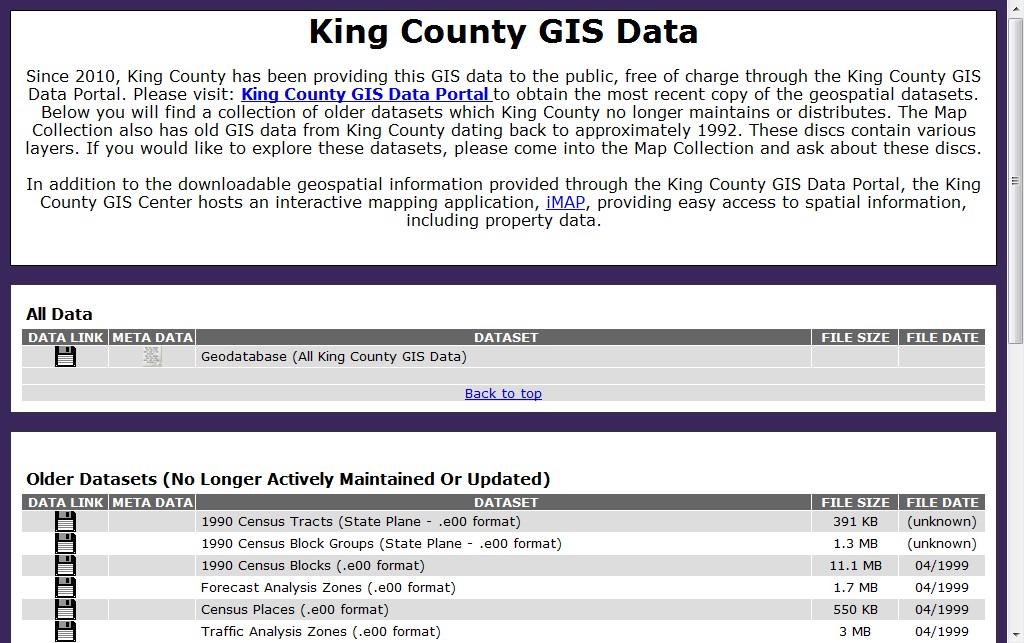
- There are many data can be downloaded from this webpage. You will notice there is only two main categories: All Data and Older Datasets.
- Click the "DATA LINK" of " Habitat Areas" and save it to the directory you just made, find_data.
- Unzip the file with right click, select "Extract All...".
- After the extraction, Open the ArcMap and add the habitat layer from "Add Data"
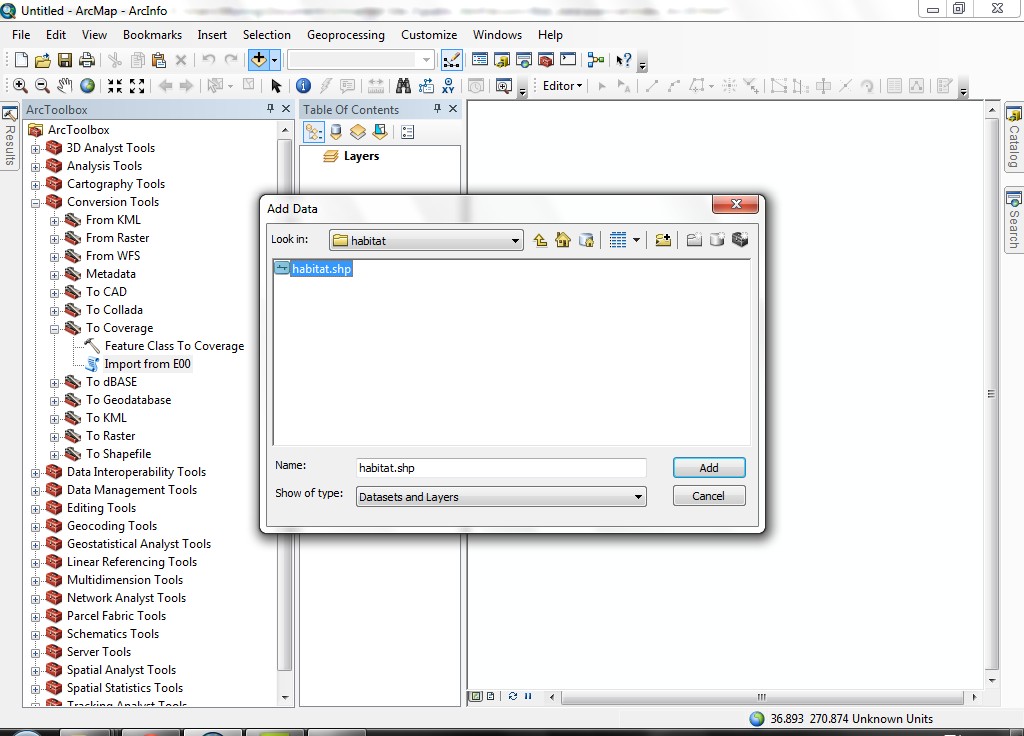
- Save this document and named find_data.mxd in M:\find_data.
- Save your ArcMap document (it may crash during the next step).
- Second, download the "1990 Census Blocks" with e00 data format and unzip it (like you did in step 4-5). e00 data format is a interchange file, that can be opened from ArcMap with some constraints. Hence, you need to save it to your "M:\find_data" directory ONLY, or you may not be able to open it.
- Use "Search" winder, type in e00 to find the tool called: Import from e00 (conversion). Click and Open it.
For the Input Interchange File, select blocknet.e00. Use the default output file location, type the Output name as "blocknet0" (only use lower case for the name)
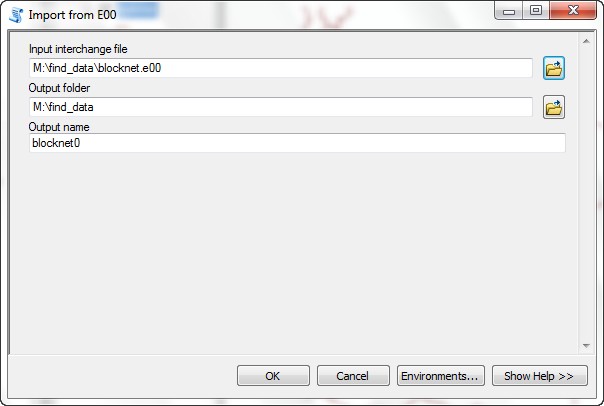
- Click OK.
- Examine your file system now. Note that new files exist: info and
blocknet0. The info directory contains binary tables in INFO
format. You should never do anything with the info directory; doing so will corrupt your data! The blocknet0 directory contains the coordinate
data for the blocknet0coverage.
- Add this new layer to a data frame.
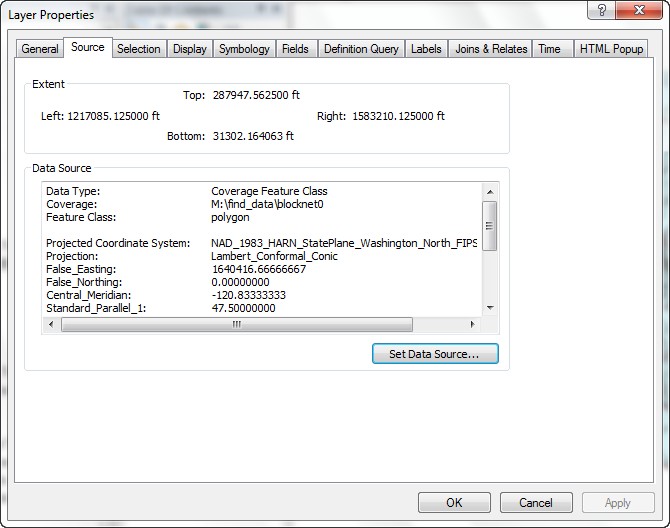
- ArcInfo coverages (if built properly) will have projection information listed
in a file in the coverage directory. Check the layer projection from propertities:
- Third, if you would like to access the all data of King County, click the "DATA LINK" within "All Data" category window, it will redirect you to the
King County GIS Data Portal webpage, from there, you can choose to download a whole geodatabase (option 1), some layers within the same theme (option 2), or
any single layer (option 3).
You have just downloaded a GIS dataset in zipped ArcInfo Interchange File
format from the web and imported it into ArcGIS. Many of the datasets available
on the web are stored in this format so being familiar with this can be important.
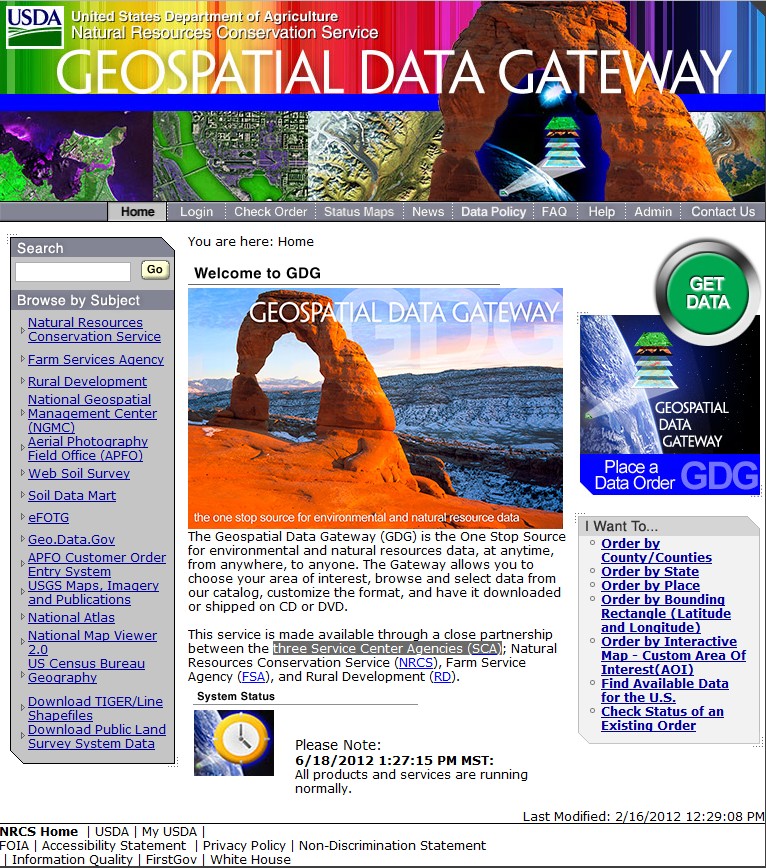
USDA Geospatial Data Gateway
The Geospatial Data Gateway (GDG) is the One Stop Source for environmental and natural resources data. The information from Gateway are provided by three Service Center Agencies (SCA); Natural Resources Conservation Service (NRCS), Farm Service Agency (FSA), and Rural Development (RD).
- Open a new web browser window to http://datagateway.nrcs.usda.gov/GDGHome.aspx
- The link will take you the GDC website.
Click the link for Get Data.
- First of all, put WHERE is focused area to search (choose the Washington State and Snohomish County in this lab exercise).
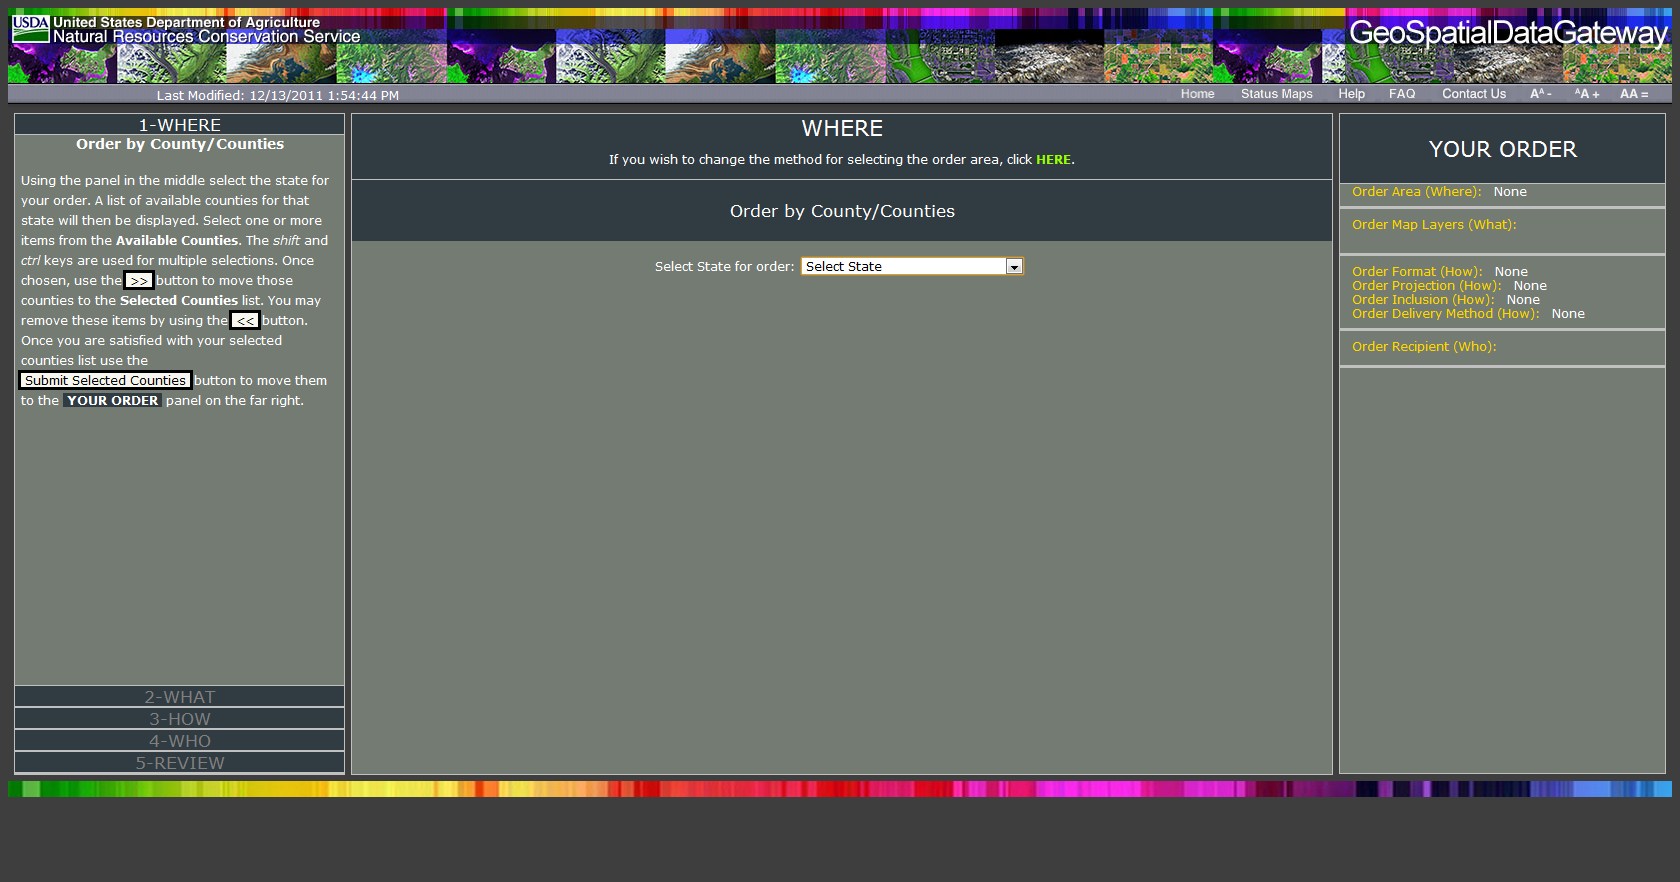
- Second, select one to multiple layers that fit your needs (WHAT section). In this lab exercise, choose the National Land Cover Dataset (by State).
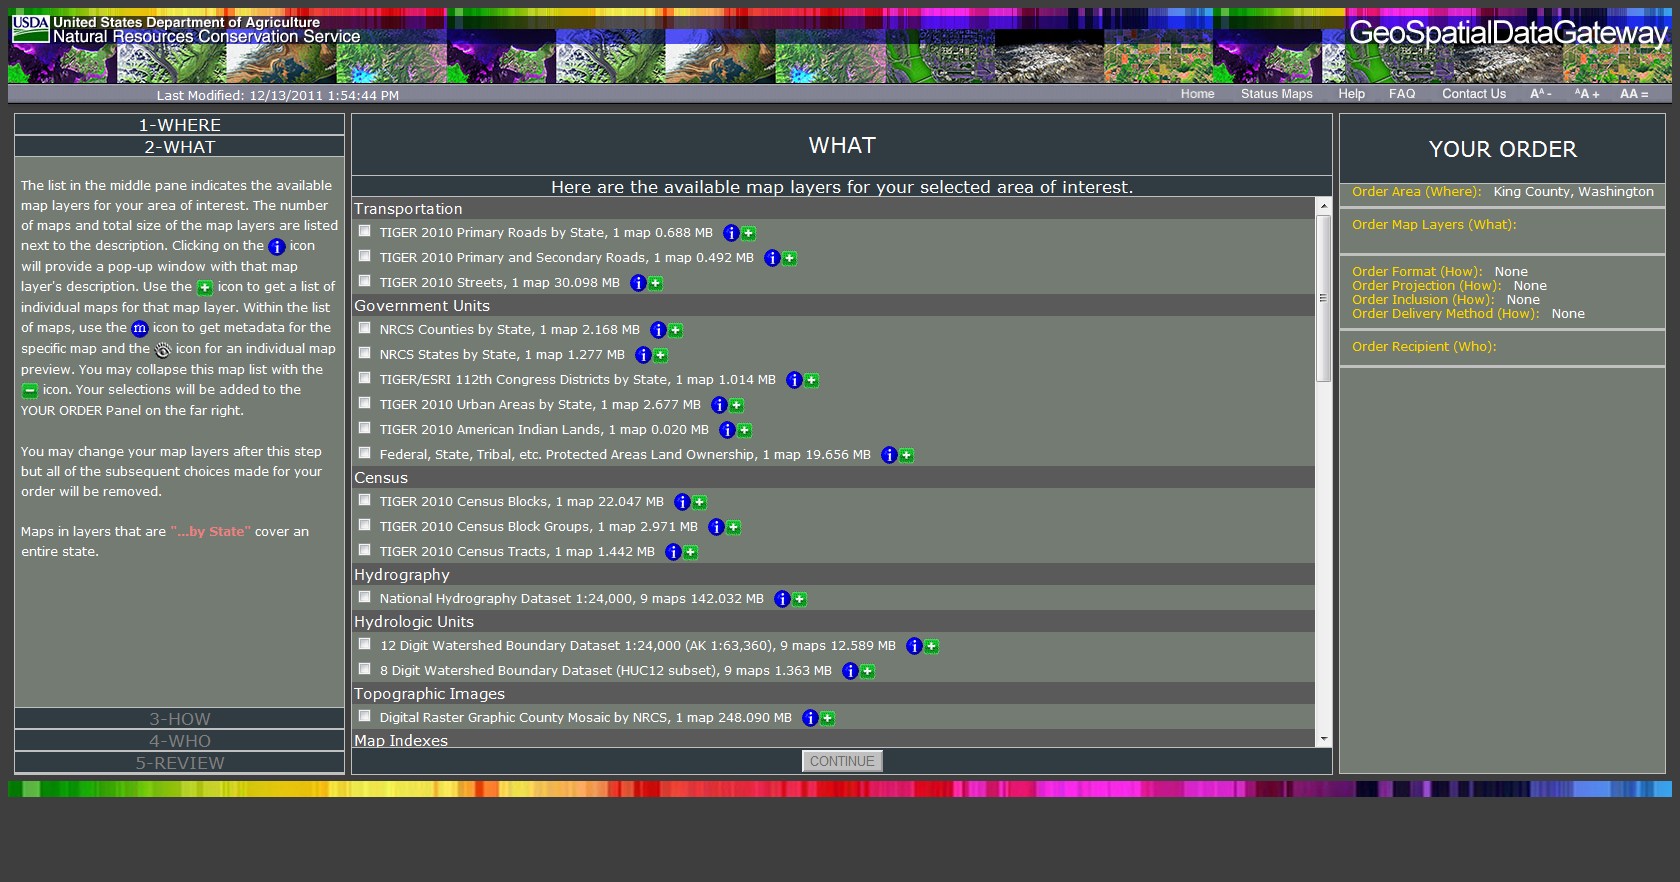
- Third, fill in more related information, includes the delivery format (FTP Free Download or Cost for CD/DVD), and the basic information of you (HOW and WHO section).
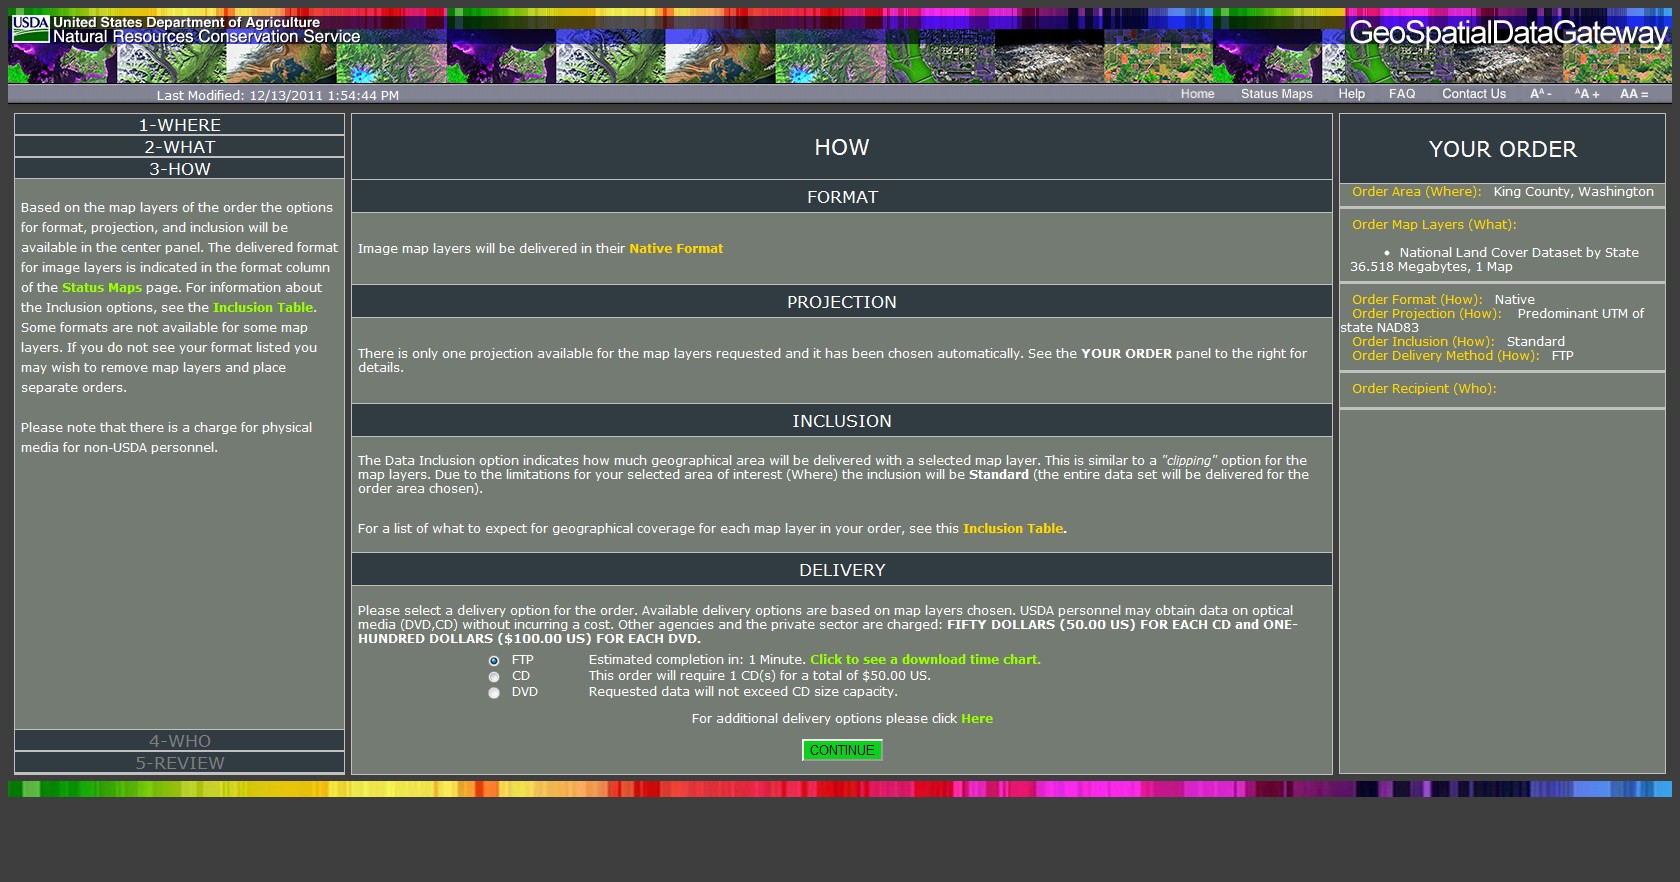
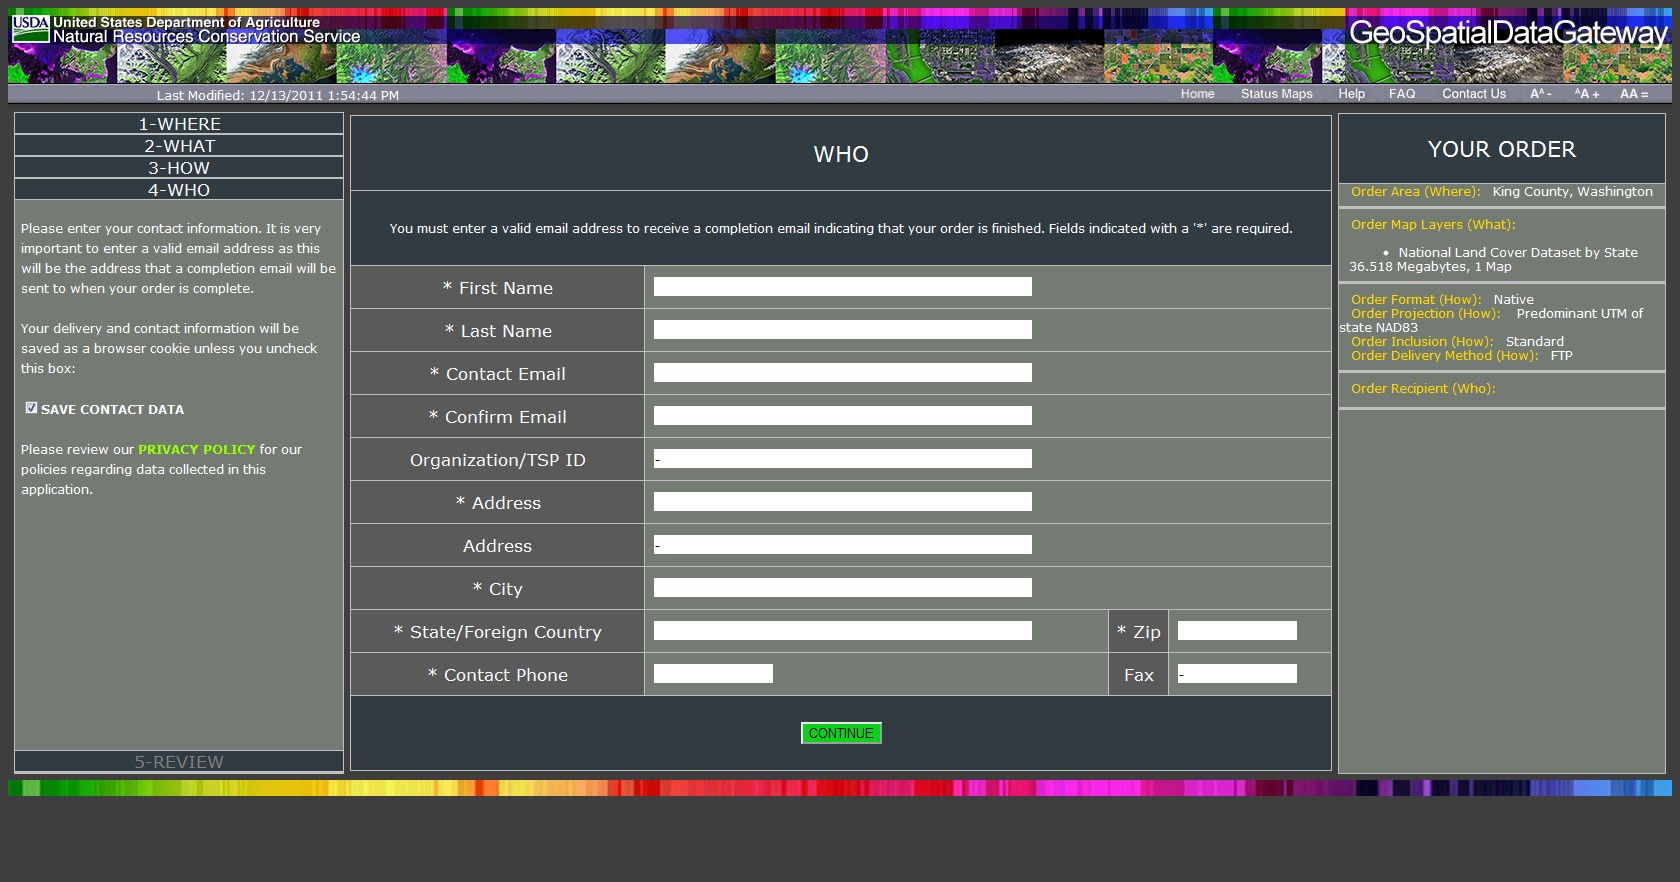
- Finally, click CONTINUE to review your order. Your data should be ready within 5 minutes and a email notification will email to your mailbox.
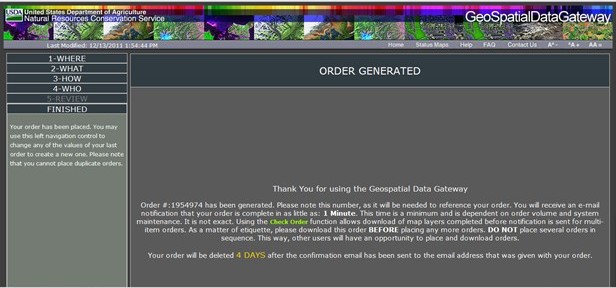
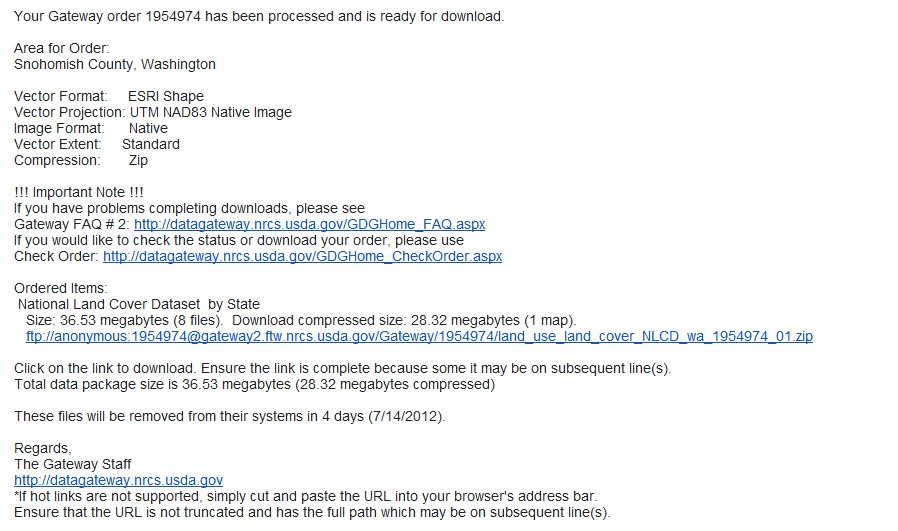
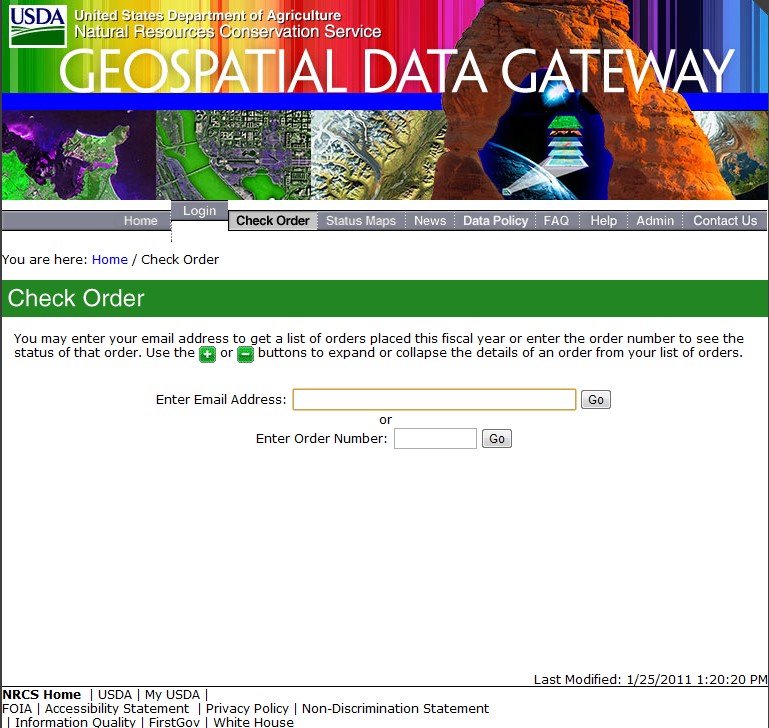
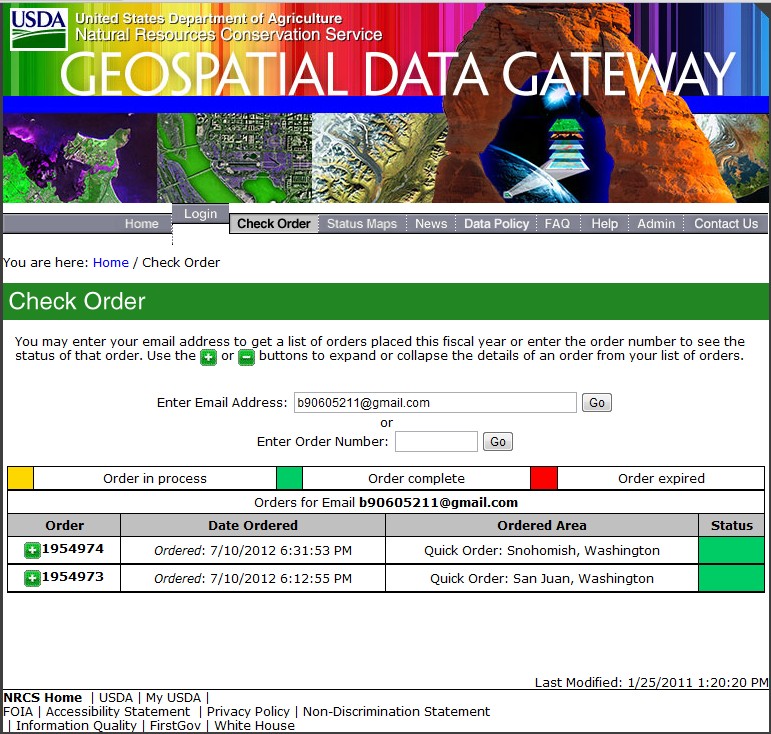
- You can either click the link to retrive the information from the email, or you can check the order from the website and download from there.
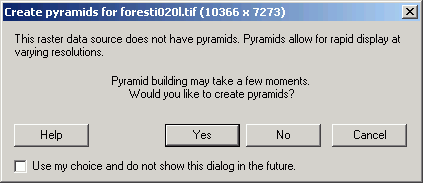
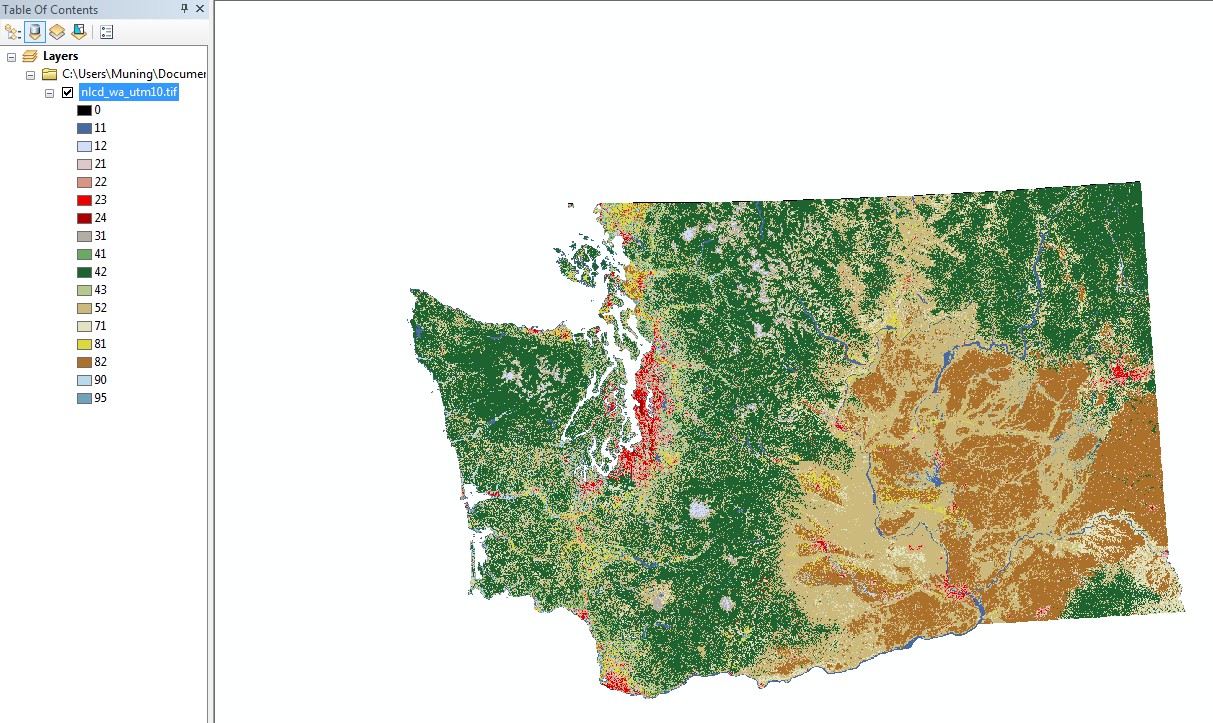
- Extract the file and save it to M:\find_data. Open the ArcMap and add nlcd_wa_utm10.tif into ArcMap
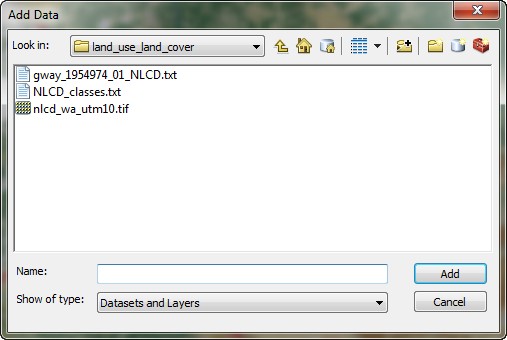
- If the Create pyramids dialog opens, click Yes.
- The result of Land Cover is a raster layer, the code and meaning linkages are mentioned in the text file. From now, you will be able to download some important information from this Getway.
Download Spatial Data Transfer Standard (SDTS) DEM data
- Enable the Spatial Analyst extension (we will need this for importing and
displaying DEM grid datasets).
- We will be downloading and working with data from the Grand Coulee Dam
7.5 min quadrangle.
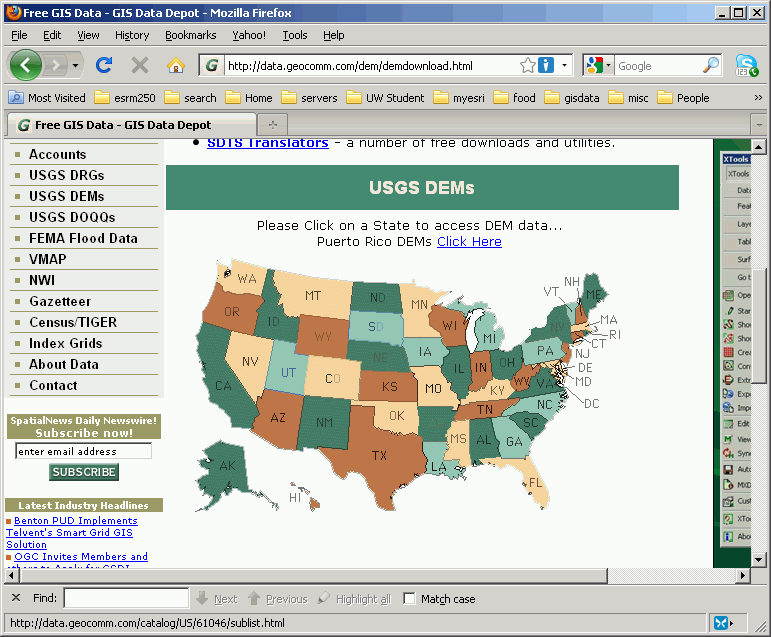
- Right click the link http://gisdatadepot.com/dem, click "Open in new window".
- When you have the GIS Data Depot web site up, click DOWNLOAD DEM DATA HERE ( http://data.geocomm.com/dem/demdownload.html).

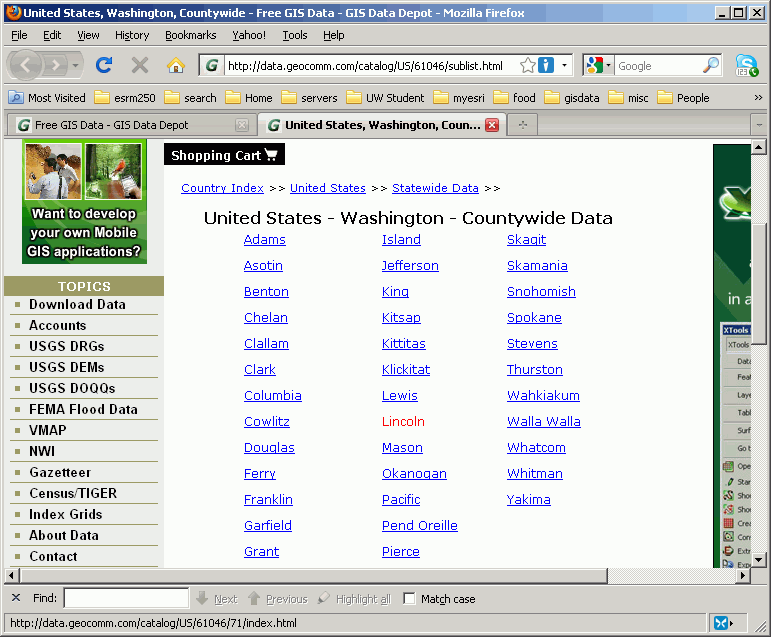
- Click Washington State on the map
- Click Lincoln.
- Click Digital Elevation Models (DEM) - 24 K at the top
of the list.
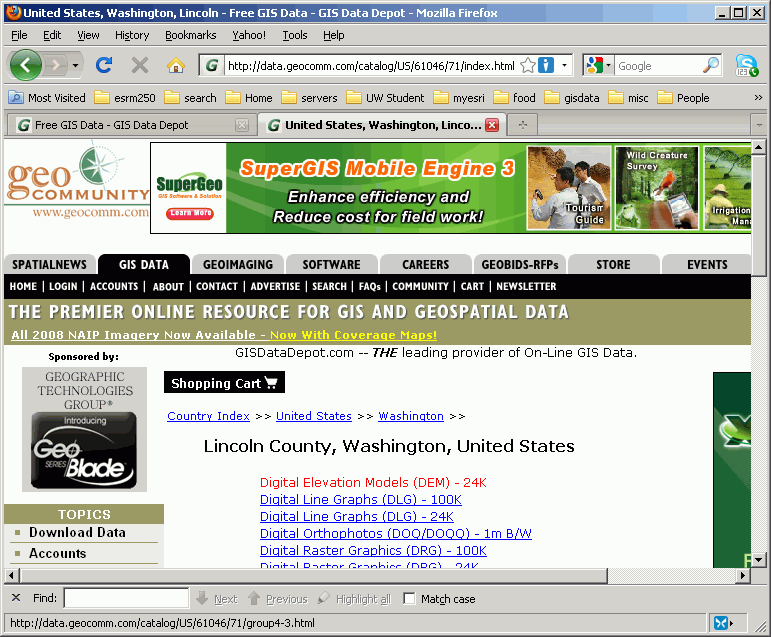
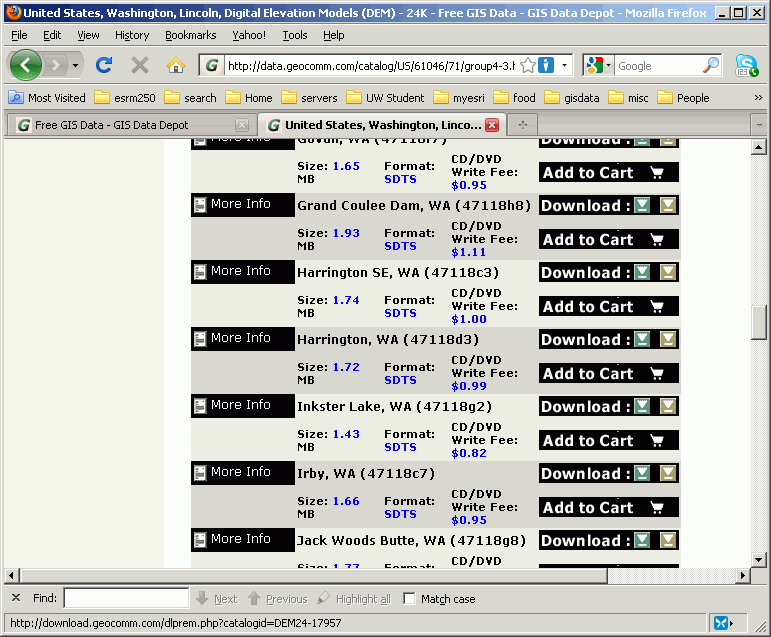
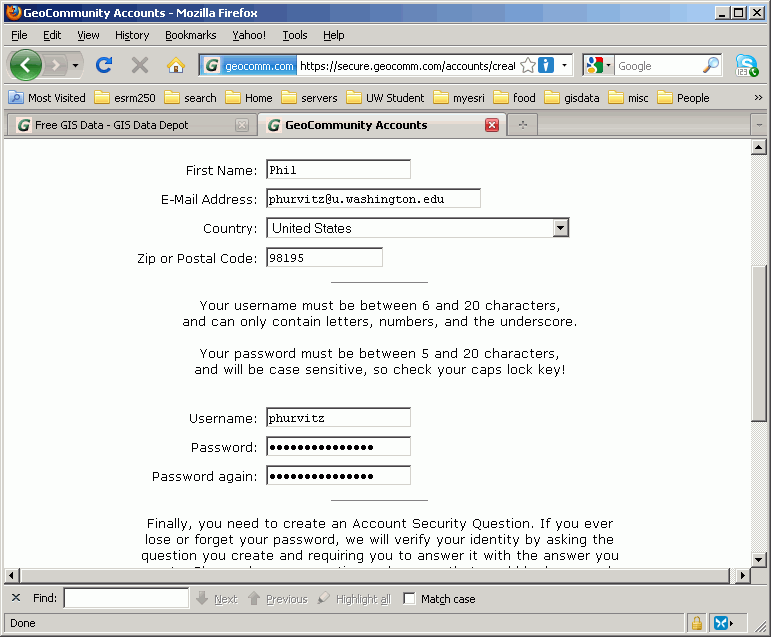
- Find the quad for Grand Coulee Dam. Click the green Download button
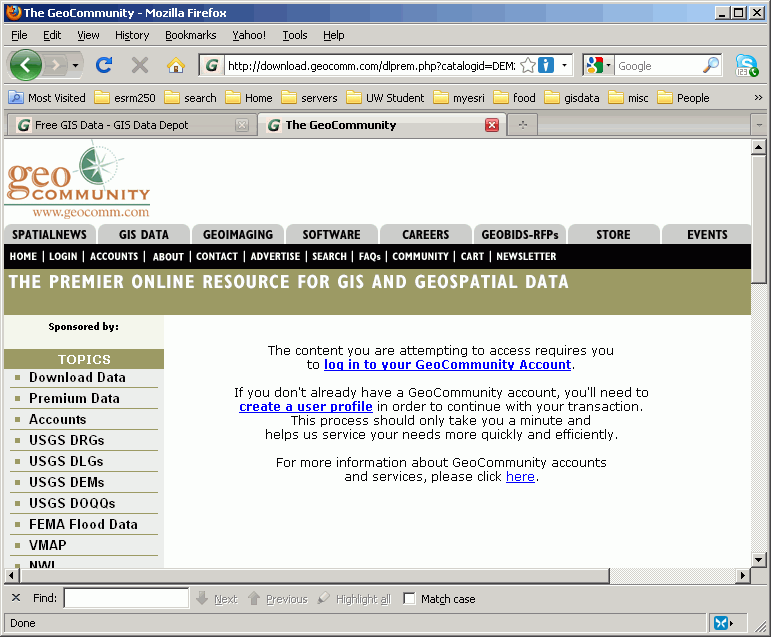
to go to the download page. You will need to register before you can download
files. It should only take a few minutes to register; if you plan on getting more data you should register. If you do not want to register, skip ahead.
- The next few steps cover the registration process.
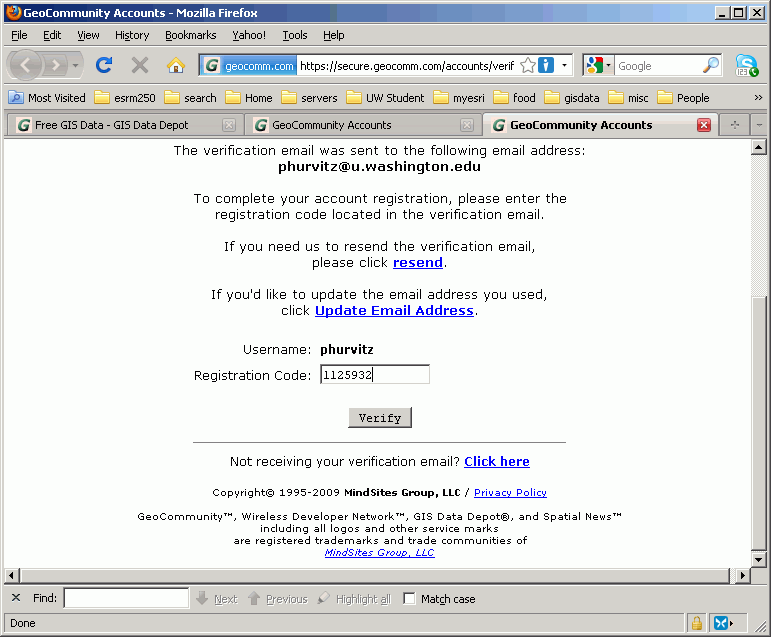
- Click create a user profile, then enter the necessary information.
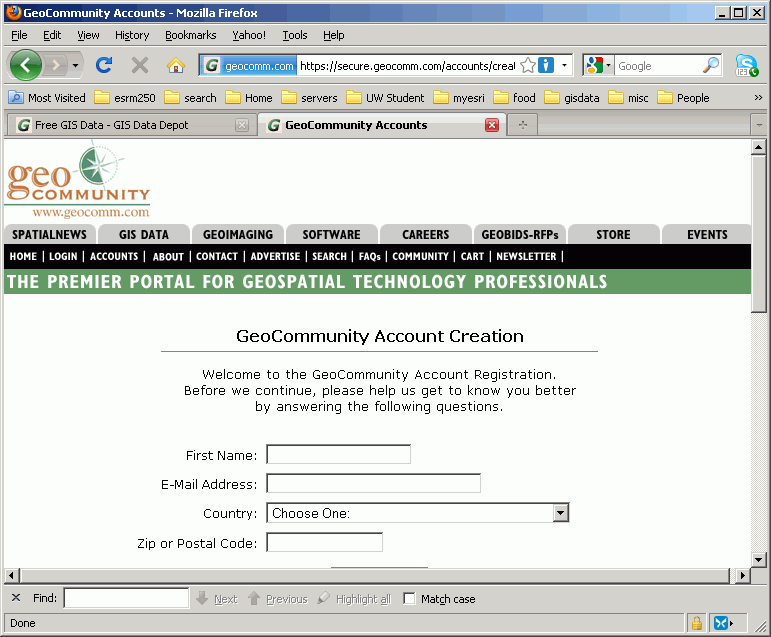
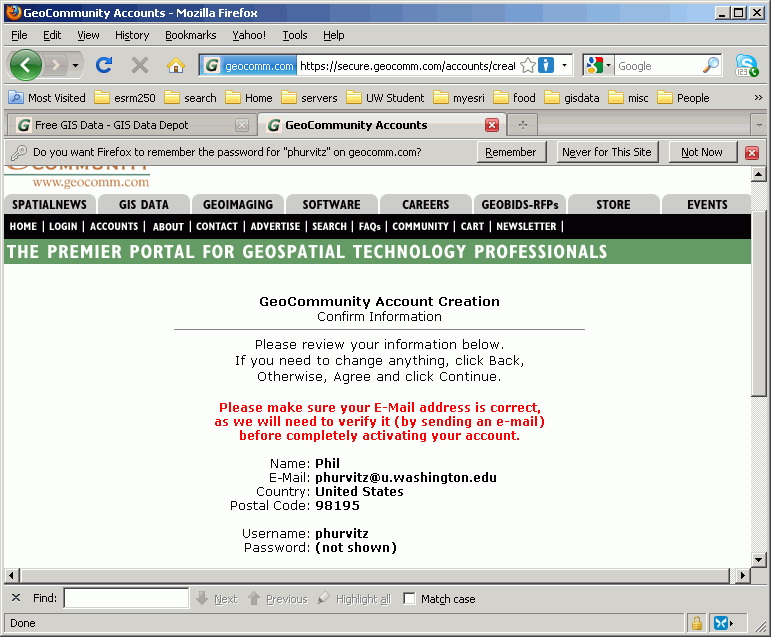
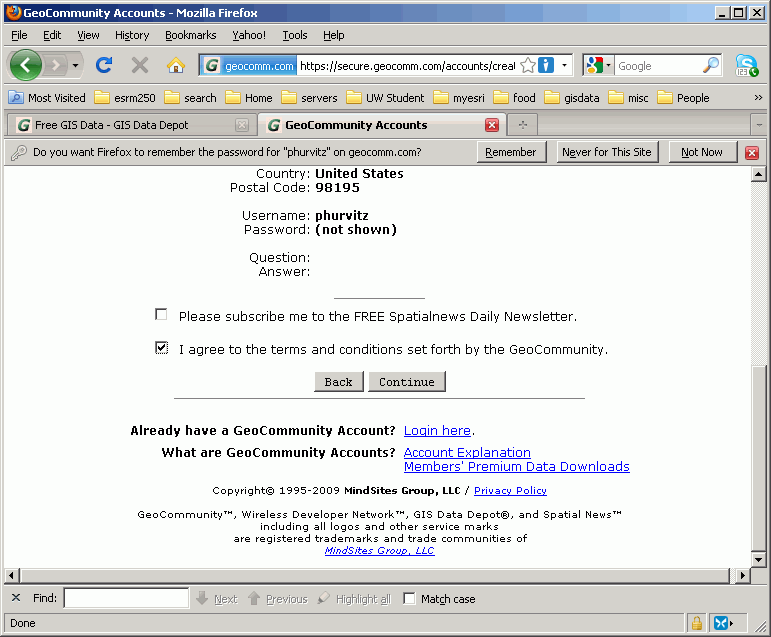
- Agree to the conditions and click Continue.
- You should get an e-mail message that gives you a URL in which to enter the registration code. Copy the registration code and navigate to the URL.
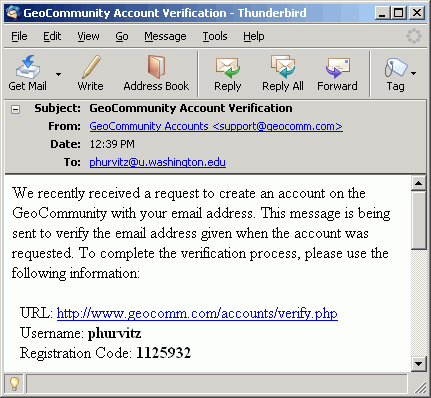
- Enter the registration code and you can now download data from the GIS Data Depot.
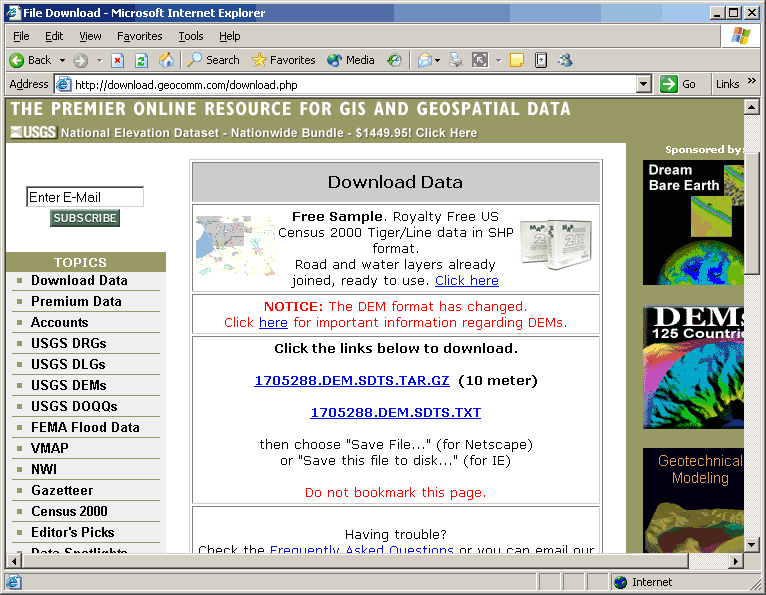
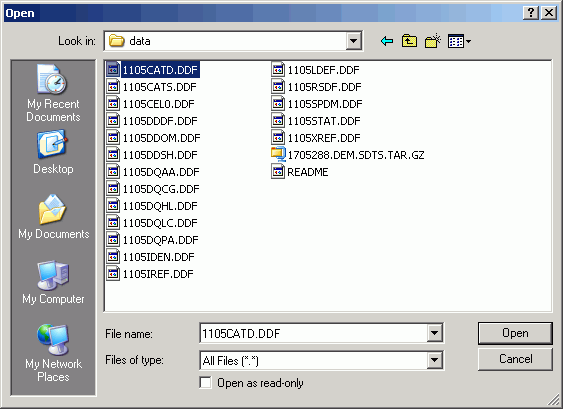
- If you have registered, you will see the File Download page below. Click the link
for 1705288.DEM.SDTS.GZ to download the SDTS-format DEM file. Save it in M:\find_data\grand_coulee\data.
- If you have not registered, save this copy (1705288.DEM.SDTS.zip) to M:\find_data.
- Open a Windows Explorer and navigate to the M:\find_data
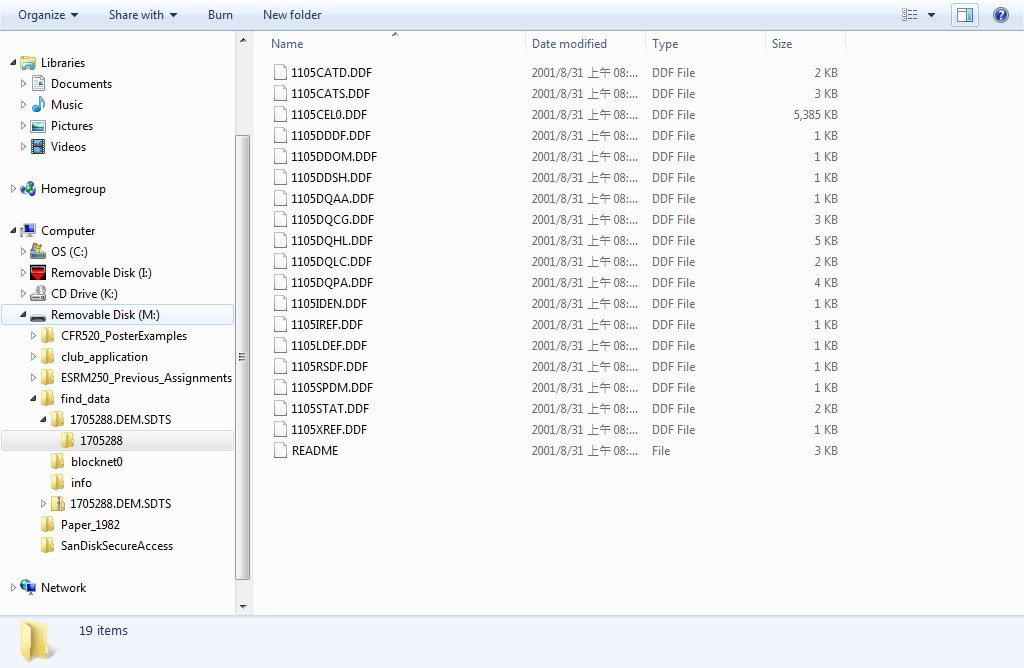
directory. You should see the SDTS zipped file. Right click and select "Extract All..."
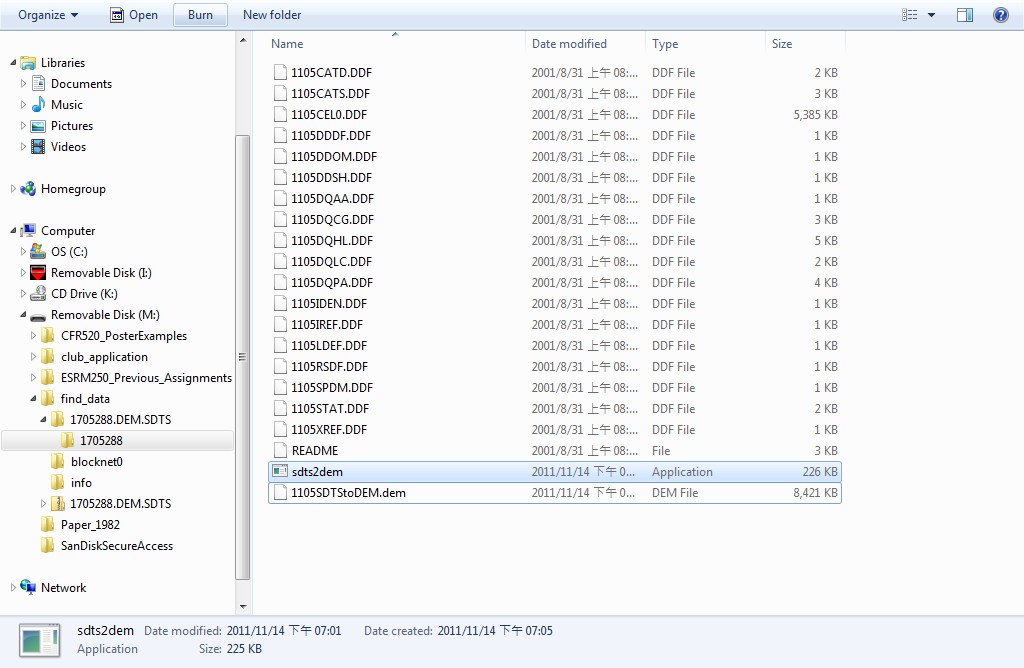
- You should now have all the component files in the M:\find_data\1705228
directory. Note the file names start with 1105. This information will be used later.
You have just downloaded an SDTS format DEM from the USGS web site and extracted
the individual files making up the SDTS dataset. Most of the Washington state
DEMs are available in USGS DEM format, but if you are searching for DEM data
for other states, you may encounter SDTS formatted digital elevation data. You
will now convert the SDTS data into USGS DEM format, which can be imported within
ArcGIS.
Convert SDTS DEM to raster grid
Method 1: Transfer SDTS to DEM
If you do not have "ArcInfo Workstation" licence (normally you will not have in your desktop or laptop). You need to transfer SDTS format to USGS DEM format to import this type of file into ArcMap.
- Download the "SDTS2DEM" from the tool webpage, saved it into "M:\find_data\1705288" directory only.
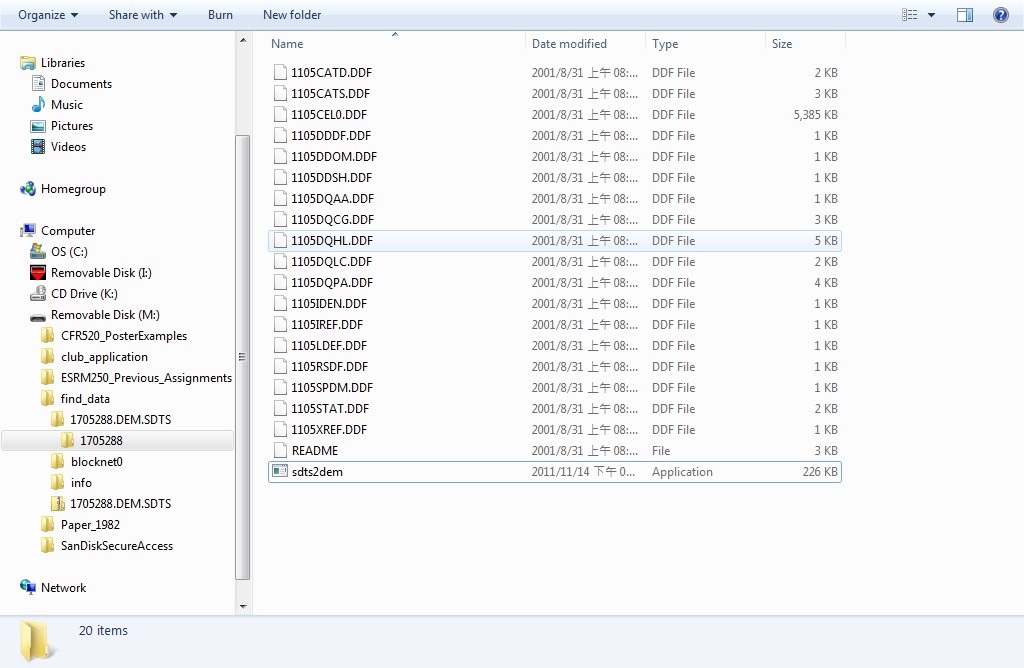
- Doublic click on the sdts2dem application, it will open a commend window.
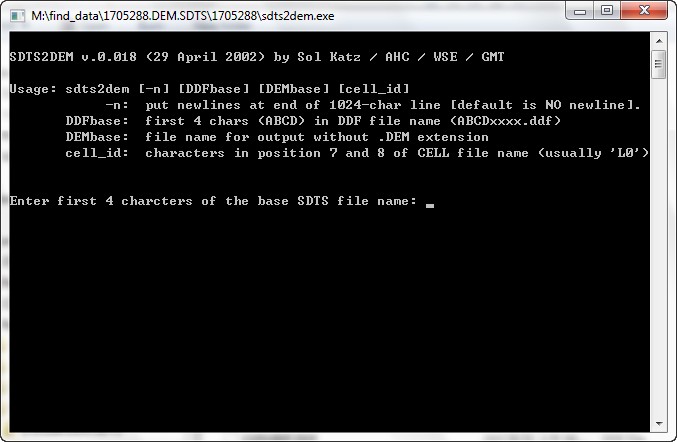
- Type in the first 4 charcters of the base SDTS file name: 1105.
- Type in the output filename: 1105SDTStoDEM
- Enter the 2 chars in position 7-8 of the CELL file name (usually L0): L0 (optional, may not show)
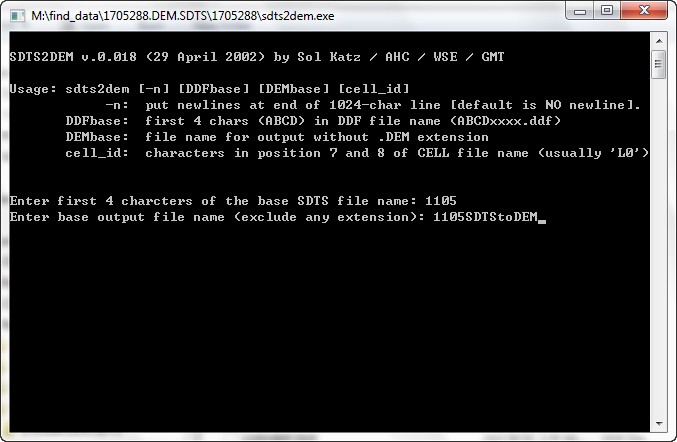
- Hit Enter, it will automatically generate the DEM layer for you. You can check the file from file manager
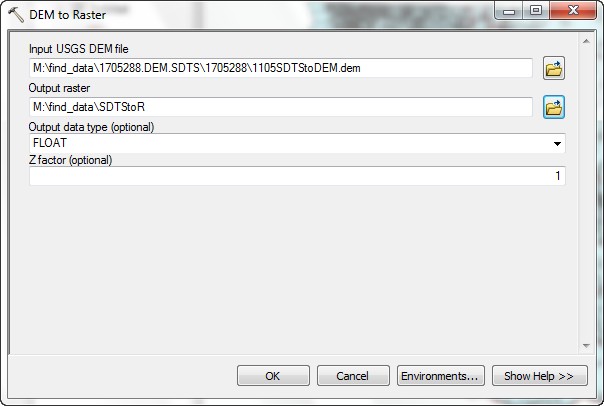
- Import this DEM layer into ArcMap by using DEM to Raster tool. (Not clear how? See Getting and importing 10 m USGS DEMs from Raster Analysis II)
- After imported the DEM, you can see the Raster layer from ArcMap.
Method 2: ArcInfo Workstation Only (Optional, not for Arc10 anymore)
ArcGIS can import SDTS format DEMs directly to raster grids.
- Open the ArcToolbox tool Coverage tools
> Conversion > To Coverage > Import from SDTS. Even though
the tool is listed under Coverage Tools
(which implies vector data), it will convert an SDTS format raster file to
a grid.
.
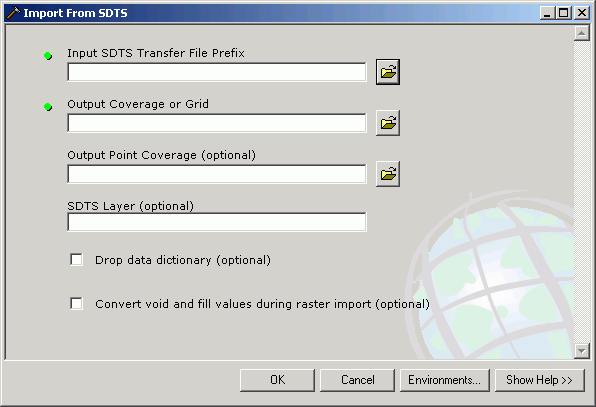
- Select one of the unzipped files.
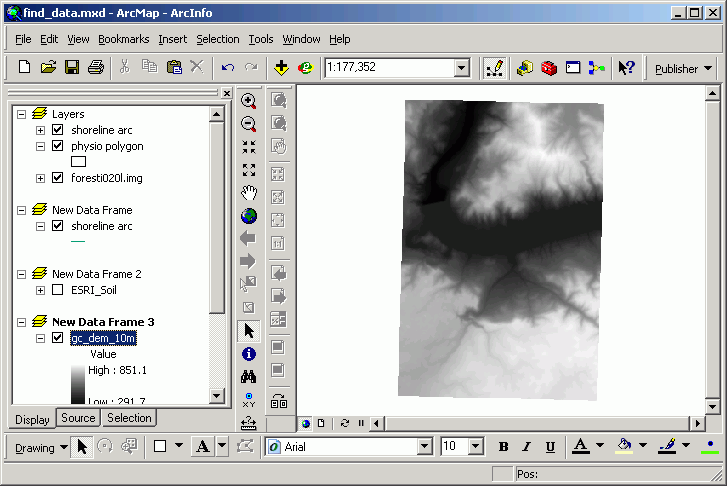
- Set the output to M:\find_data\gc_dem_10m.

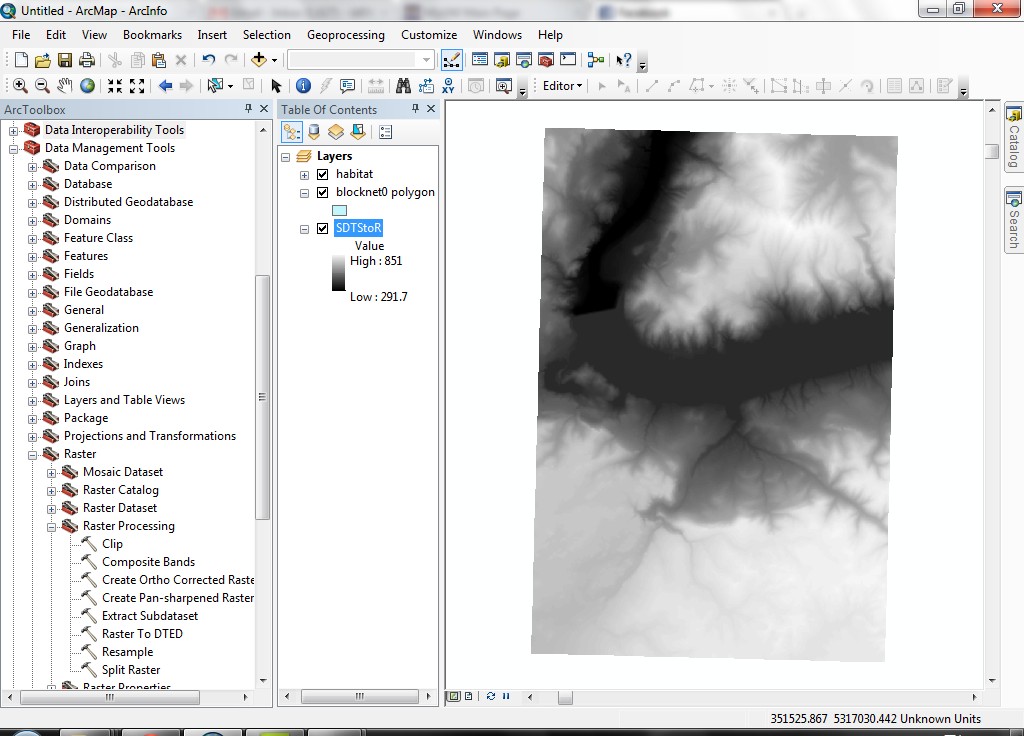
- Create a new data frame and Add the grid layer.
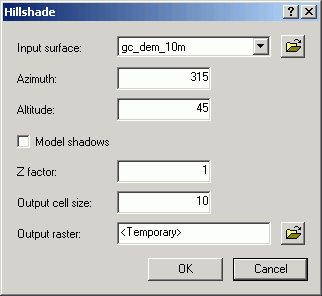
- Create an analytically hillshaded grid from the elevation grid (Spatial
Analyst > Surface Analysis > Hillshade).
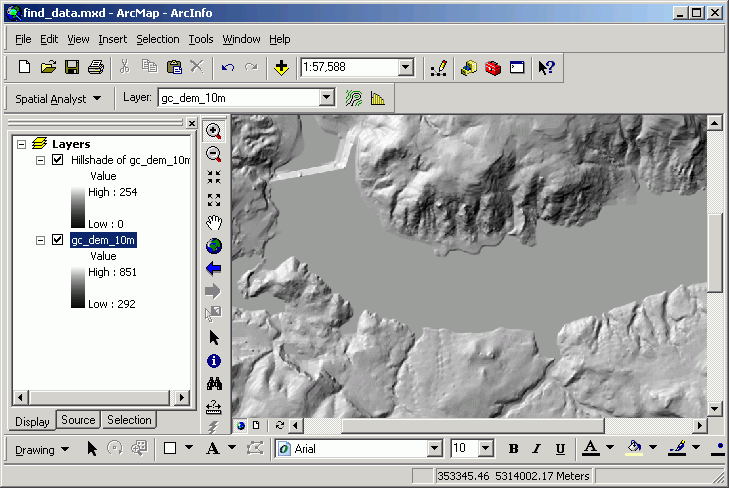
The dam is clearly visible on the western side of the DEM, spanning the Columbia
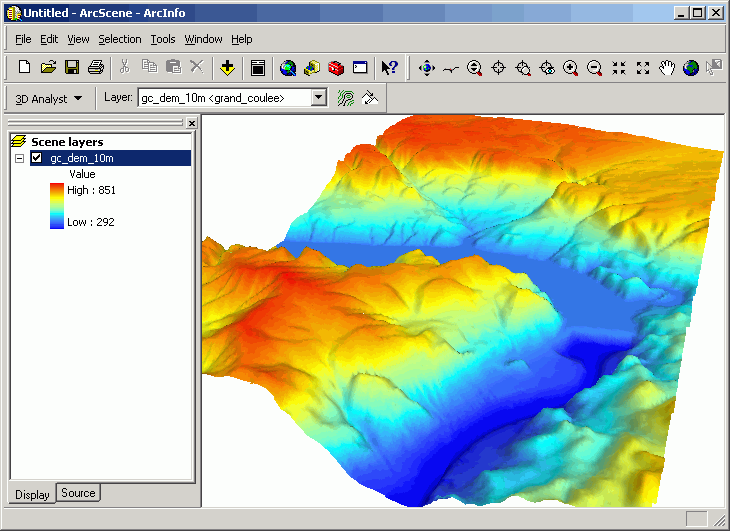
River.
This is cool to look at in ArcScene (this is shown with a Z-exaggeration factor
of 3):
You have just completed the process of downloading a digital elevation model
in SDTS format, converted SDTS to DEM format, imported into ArcGIS, and created
an analytically hillshaded view of the Grand Coulee Dam 7.5 minute quadrangle.
You should be able to repeat this process for any area in the USA that has SDTS
DEM data.
Get and view USGS DRG data
The last step in looking at the Grand Coulee area will be to download and view
the scanned USGS 7.5 minute quadrangle digital raster graphic (DRG).
- Visit the WAGDA page
for digital raster graphics and find the Grand Coulee Dam quadrangle (within
the larger Ritzville quad).
If the download seems to be exceedingly slow, or if the link is dead, you
can download a local copy of the files (both image and world file in a single
Zip file, o47118h8.zip).
- Unzip the file to extract the files o47118h8.tif, o47118h8.tfw,
and o47118h8.tfw83. The larger TIFF file is the image itself, and the
other two files are world files (which are used for georeferencing
images), one for UTM NAD27, and the other for UTM NAD83.
- Make sure both the image (TIFF) and the world file (TFW) are in your M:\find_data
directory.
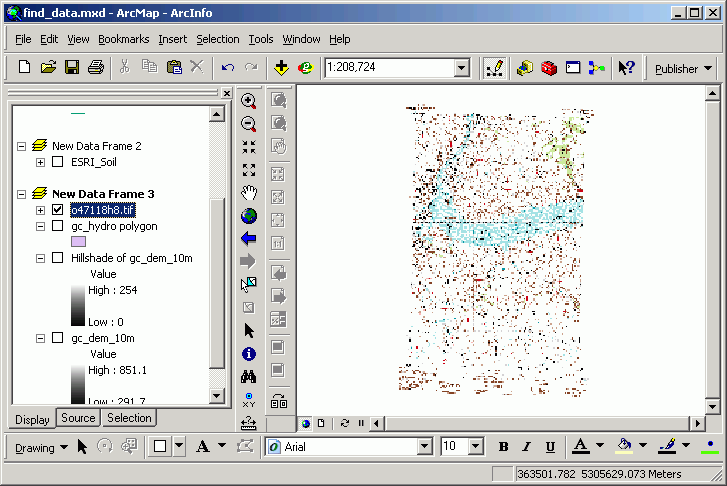
- Load the image into your data frame. Alter the drawing order so that the
image is the first to draw. Zoom into the western side of the map, right at
the dam. What is the elevation of the dam?
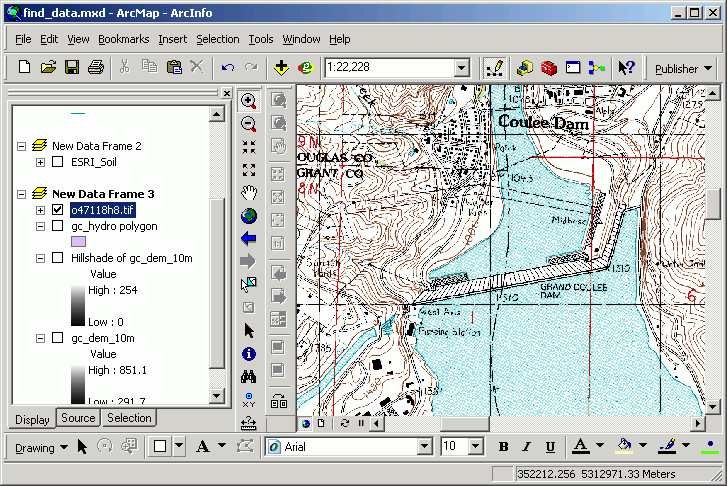
- Open ArcScene and add the sdtstor (you made in SDTS to DEM section) and o47118h8.tif to.
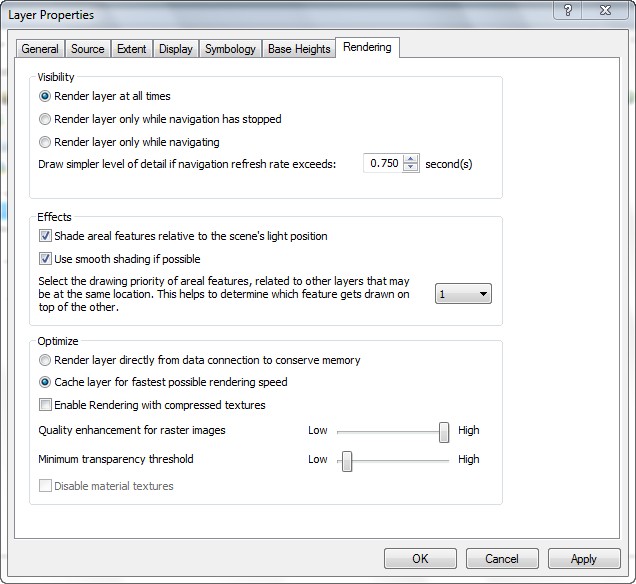
- Open the properties of the image file (o47118h8.tif). Two settings are required for this display:
- Alter the Rendering tab properties for shading (check Shade areal features... and Use smooth shading...).
- Slide the Quality enhancement for raster images to High.
- Change Base Heights tab properties:
- Use the DEM grid (sdtstor) for the base heights (the vertical surface for draping)
- Set the Z factor to 3 (increase the vertical exaggeration)
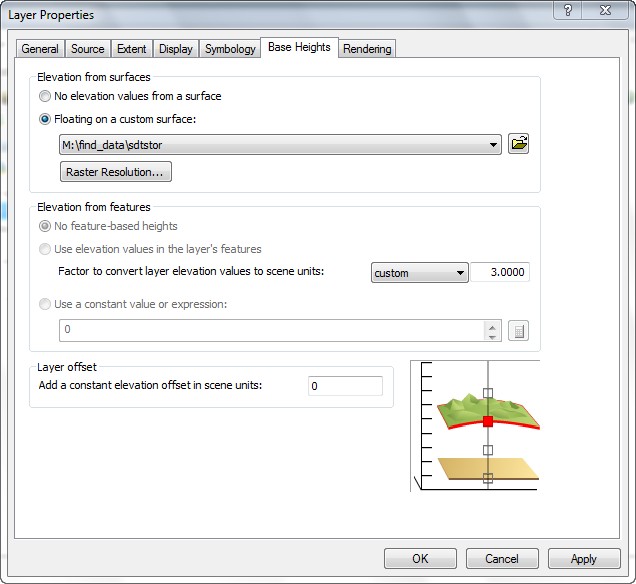
- Do not display the DEM (it is present for surface draping only)
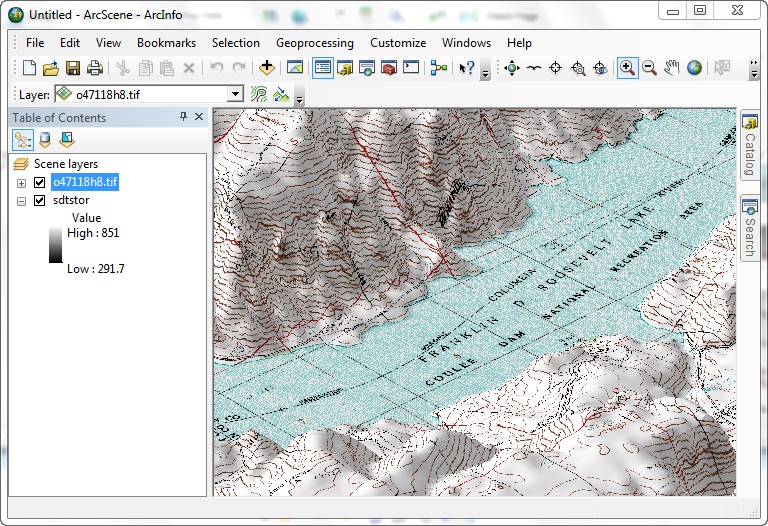
You have just downloaded a USGS digital raster graphic (scanned quad sheet) and displayed it in a 3D renderer (ArcScene).
REMEMBER TO TAKE YOUR CD AND REMOVABLE DRIVE
WITH YOU!!!!
Return to top
 |
|
The University of Washington Spatial Technology, GIS, and Remote Sensing
Page is supported by the School
of Forest Resources
|
|
School of Forest Resources
|
 UW
Home
UW
Home