These instructions show how to create the course data CD using Windows Disc Image Burner (CD writing
software in MGH). If you have any problems to create the CD in your personal machine,
please go back and read the instructions again, carefully. Last resort, ask
TA.
Download and unzip the ISO file. The file is zipped ISO image of the course
called esrm250_aut2004.iso.zip.
The file should be 245,304,931 bytes in size.
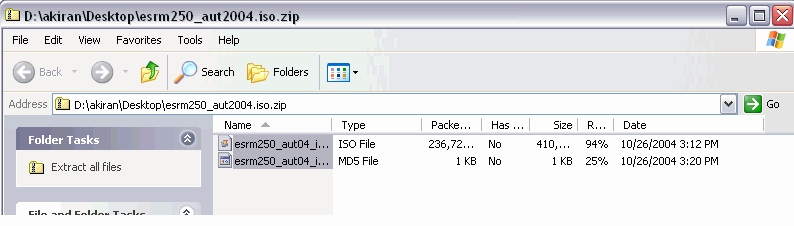
Right click on the zip file you downloaded, choose "Extract All" to unzip the file before buring the CD.
Unzip the file or open the zip file. Be Sure to Check the contained files, there should be 2 separate
files:
esrm250_aut04_iso_02.iso esrm250_aut04_iso_02.md5
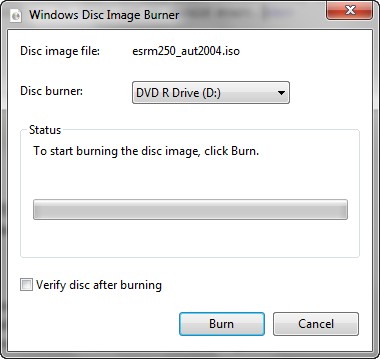
Right-cick ONLY the ISO file. Click OPEN, it will start automatically (this should work in MGH).
Insert a blank CD into the CD-R drive and click "Burn"
After the recording session is complete you should have a functional CD
for the quarter.
Make sure and write your e-mail address on your CD in case of loss. Write on the CD with a permanent felt-tip marker only (if you use a ball-point pen you will damage the CD. Keep the CD in a case to avoid
scratches.
Using WinImage in your home computer.
You need two free software applications: WinZip and WinImage.
Get WinZip (if you don't know how to do this, read the
instructions).
Download and Unzip the course data CD (a zipped ISO image of the course CD). The file is about 250 MB so you should do this in a location that has a fast internet connection, two steps to open this file:
Save the zip file above to your local folder. Open the file or double-click
on the zip file.
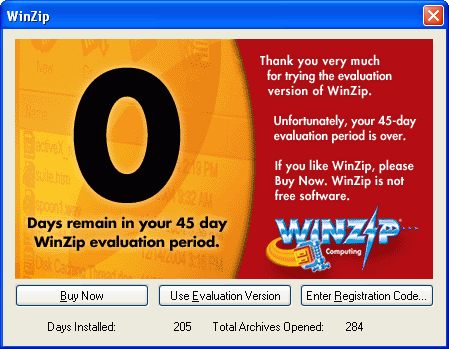
WinZip should start. Click "Use Evaluation version"
if you do not have a full license.
Winzip opens and shows two files.
Highlight both of them and extract to your folder (Drag them to your local folder
or desktop)
esrm250_aut04_iso_02.iso esrm250_aut04_iso_02.md5
Do not copy the ISO file directly to your CD or you will have a non-functional CD.
Use WinImage to extract the file from
the iso file.
Save the file on your desktop and run the installer.
Run Winimage.
Select File > Open and navigate the local folder which contains "esrm250_au04_iso_02.iso" and open the file.
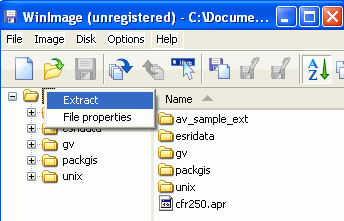
At the left window, right-click on the top folder which contains
all folders. Choose "Extract".
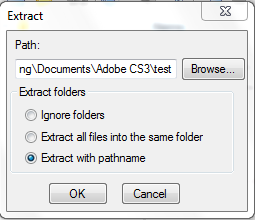
Select a local folder and choose "Extract with pathname" and click OK.
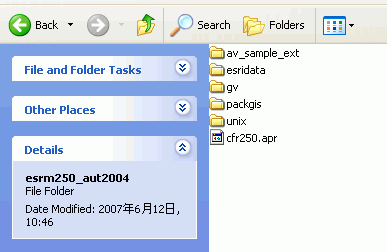
Make sure that you have all folders like below at your local folder.
You can now copy all files above to a writable CD.
Using Virtual Drive when you did not have the blank CD
If you forgot to bring your course CD, you can use the following method to mount your ISO files into a virtural drive by using one application.
Download the ISO file. The file is zipped ISO image of the course
called esrm250_aut2004.iso.zip.
The file should be 245,304,931 bytes in size (~250MB).
Right click on the zip file you downloaded, choose "Extract All" to unzip the file before buring the CD.
Unzip the file or open the zip file. Remember where you save them (which folder). It should be composed of 2 separate
files:
esrm250_aut04_iso_02.iso esrm250_aut04_iso_02.md5
Download virtual drive application: Virtual Clone Drive. This software is the freeware, and its size is 1.51MB. Install this program and you will see the small icon in the language bar (next to the date):
Right click the icon, select "Drive L:", then select "mount..."