| XNA Game-Themed CS1 Examples (XGC1) | |
|
Release 3.0 (XNA V4) |
|
Reference: This is the seventh tutorial on how to work with the XNACS1Lib library. It is assumed you have read and understand the previous six tutorials:
Goals : This tutorial concentrates on describing how to work with Key Bindings:
1. Map your Keys:
The first thing you need to do, is create a .ini file, called CS1Setting.ini, of keyboard bindings. To do this, just create a .txt file and change the extension to .ini. Next, you need to map your keys.
A typical keyboard mapping looks like the following:
[Keyboard]
A-key=K
B-key=L
X-key=J
Y-key=I
LeftShoulder=U
RightShoulder=O
TriggerLeft=M
TriggerRight=OemPeriod
TriggerBack=F1
Start=F2
ThumbLeft-Up=W
ThumbLeft-Down=S
ThumbLeft-Left=A
ThumbLeft-Right=D
ThumbRight-Up=Up
ThumbRight-Down=Down
ThumbRight-Left=Left
ThumbRight-Right=Right
Dpad-Up=F
Dpad-Down=V
Dpad-Left=C
Dpad-Right=B
LeftStickButton=LeftShift
RightStickButton=RightControl
However, you can set them to whatever you like.
The CS1Setting.ini file must always start with the [Keyboard] tag.
2. The Solution Explorer:
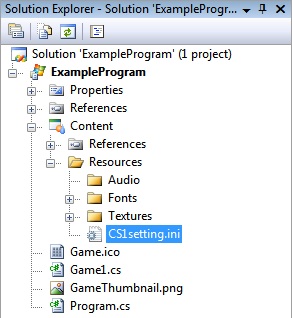
Once you have the CS1Setting.ini file created, you need to add it to the Solution Explorer like you would anything else.

|
As illustrated in the above figure, you will notice the Resources folder and the CS1Setting.ini file. The process of including the CS1Setting.ini files into the project works identical to that of *.jpg Texture files, where you would right-mouse-button click on the Resources folder and add the existing CS1Setting.ini.
Once you have the CS1Setting.ini file in your Soultion Explorer you need to set the correct properties to be used. To do this, right click on your CS1Setting.ini file and select properties. Then all you need to do is change "Build Action" to "None" and change "Copy to Output Directory" to "Copy Always."
3. Possible Keys:
The possible keys you can choose for the keyboard bindings are as follows:
Q| Kelvin Sung Computing and Software Systems University of Washington, Bothell ksung@u.washington.edu |
Michael Panitz Business And Information Technology Cascadia Community College mpanitz@cascadia.eduu |

|
This work is supported in part by a grant from Microsoft Research under the Computer Gaming Curriculum in Computer Science RFP, Award Number 15871 and 16531. |