TAPESTRY: The Art of Representation and Abstraction
Notes: Driving
SETUP
Assuming you have a model.
The BIG Picture
You need to define a path along the road, and then attach a camera to that path.
DO THIS
- Using one of the spline/curve tools, create a 2D-path (a simple "wire") along the road surface. You might want to set "snap to face" in the object snaps if the surface is variable, or draw it in plan first, and then move points up to get the heights right.
- Set up an intial view to work with. FRONT or RIGHT side views work well. Don't forget to make it "visible" in the Views palette. [You may also need to choose "Include views and lights" in the "Fit All" option dialog (double-click the "Fit All" tool -
 or
or  ) from the tools along the lower-left window edge.]
 - Using a view in which you can clearly see both the path and the camera (the default "30-60" view is good), select "Animate along path"
 from the animation tools.
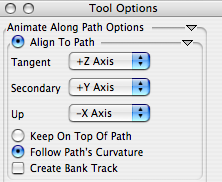
 - Compare the tool option settings to those shown at right. If necessary, change your settings to match those shown here.
- Select the camera graphic by clicking on the "line of sight". Now select the "path object" you created in the first step.
- "Test drive" the new animated camera by clicking on the "play" button in the Animation palette.
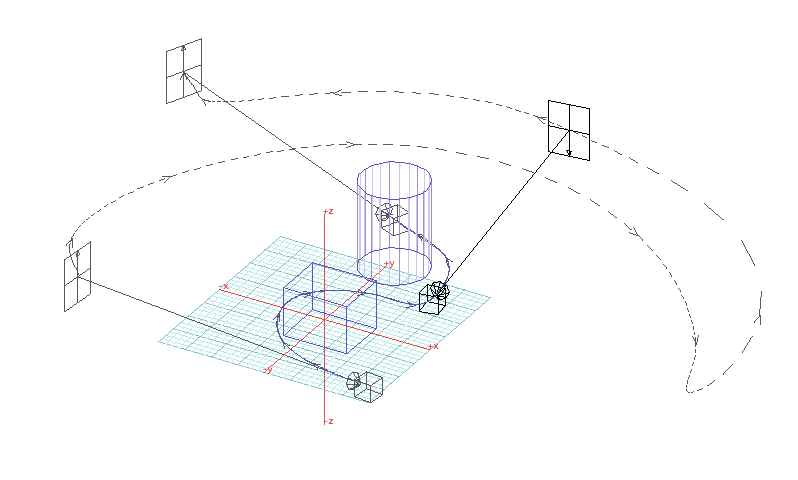
- The resulting path should look a bit like the example shown below. (Note, this will produce a pretty poor animation since it spends most of its time looking away from the geometry!)
Last updated: April, 2014
