TAPESTRY: The Art of Representation and Abstraction
Microsoft Movie Maker
What is Microsoft Movie Maker?
Movie Maker allows you to perform a variety of composition tasks, including movie editing and assembling individual frames into a playable movie ("video file" as they call it). It is one of several so-called "Microsoft Essentials" that the company makes available for free download on their website. The program may also be already installed, so you may want to do a search for it before downloading, just to be sure.
Using Movie Maker

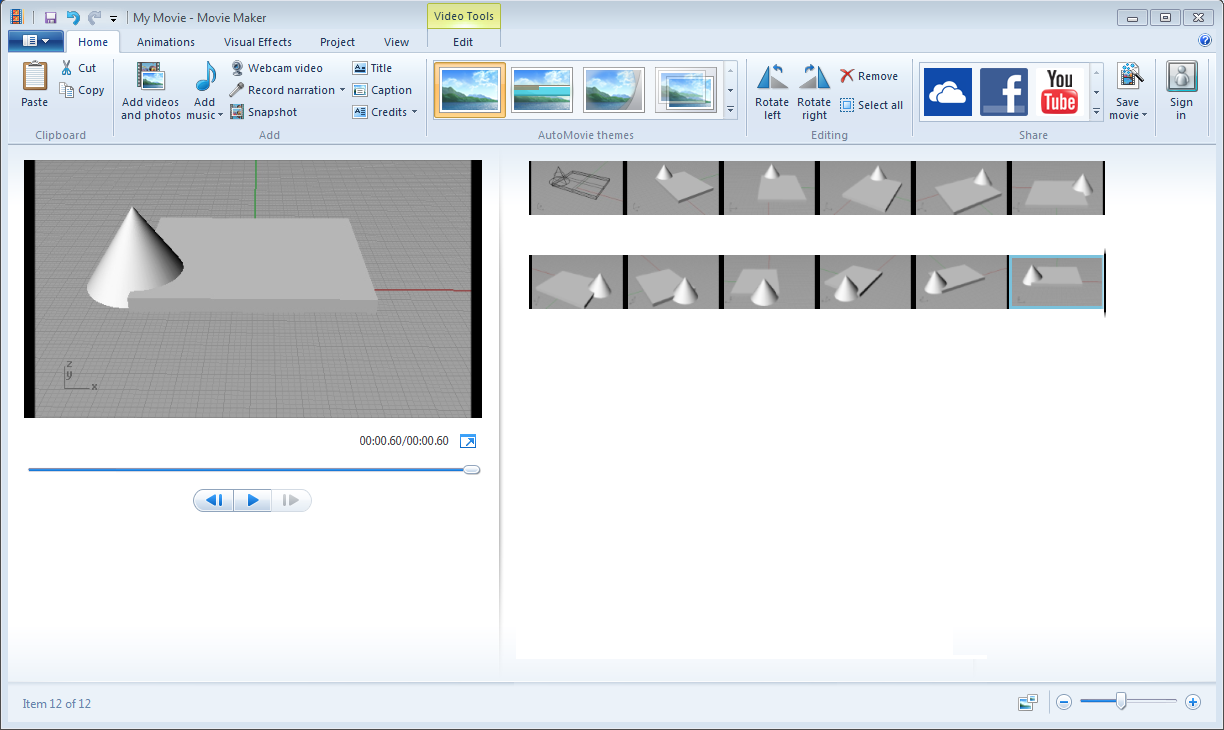
The Movie Maker interface is shown above. As shown, there is an area on the right which displays the collection of material the user is assembling into a move. On the left is a preview window for the movie. At the top are a series of tabbed toolbars for invoking various actions on the current movie project.
- Click in the area on the right to select the individual image files created by V-Ray or Kerkythea. Note that you can use a windowed selection to select groups of files, and you can remove individual frames from the work-space if you get frames you did not intend to use.
- When first loaded into the workspace, all the frames will be selected (outlined in light blue). If not, you can use the "Select All" button on shown on the "Home" tab. It is important to select all the frames, because in the next step you will set the frame-rate for the movie, and it is an attribute of the individual frames.
- In the Video Tools > Edit tab, set the Duration:. This is a time-interval in seconds, so something like 0.066 (15 frames/second), 0.05 (20 frames/second) or 0.033 (30 frames/second) is what you're looking for.
- You can "test drive" the animation by clicking on the playback controls on the left side of the interface, under the playback window, and adjust timing as needed.
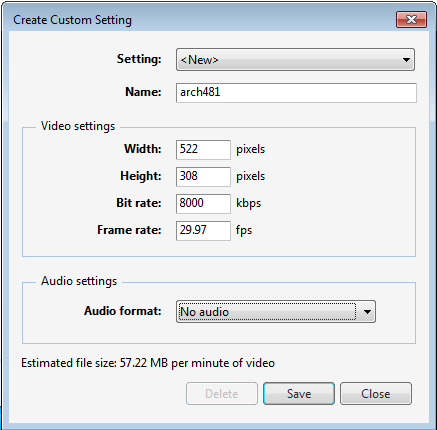
- When you are satisfied with the movie, you need to save it as a stand-alone playable video using the Save Movie control. Movie Maker's default behavior is to resize each frame of the movie to one of several standard sizes during the save process. That's OK, but if you wish to save the movie with the frame sizes unchanged from their original rendering, you need to create, save, and use a Custom Setting. Access this by clicking on the down-arrow in the lower right of the SaveMovie control.
-
 Using the Create Custom Setting dialog, set the output size to the same size as your rendered images, and set the Audio format to "No Audio" to keep the file small. Give it a name and save it. You'll only need to do this once (for a given size), as you can reuse this setting.
 - Once you've made your Custom Setting, the name will show up in the Save Movie options. Select it.
- When prompted, pick MPG-4 / H.264 as the output format.
That's it. You're done. To test your movie, you can double-click it in the Windows Explorer window. It should open in your usual movie-player. Placing the movie in a web page should make it possible to present it online. Or you can upload it to You Tube and start your own movie channel!
Last updated: April, 2014
