TAPESTRY: The Art of Representation and Abstraction
Rhino + V-Ray: Texture Mapping Controls
Rhino Texture Mapping Properties
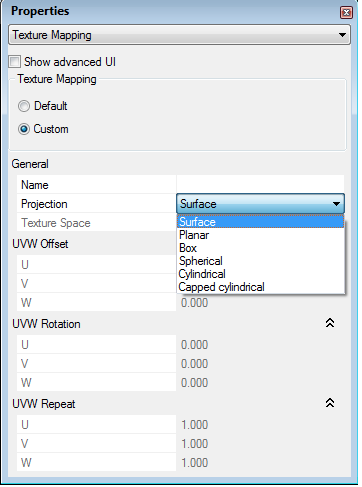 In addition to Object Properties and Material Properties, every unique object in Rhino has Texture Mapping Properties. These determine the way in which a texture is applied ("wrapped") onto the object. If you need to access these properties, you almost certainly need to use the "Custom" options, as shown at right.
Names
It is recommended that you name your textures (Under "General") according to how they are used. This will help you avoid changing texture mappings inadvertently.
Projection
The important settings here are the projection or mapping type (more detail), the Texture Space (usually OK by default), and the UVW Repeats which control how many copies of the texture are applied, and thus control the scale (but see additional discussion below).
Getting a Uniform Texture
The default behavior in Rhino is to treat each surface as a separate object, stretching and orienting the assigned texture to fit. This is almost always wrong, producing mis-aligned, mis-oriented, and variably-scaled applications of the texture (see below).
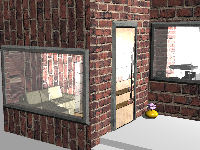
To apply your texture in a uniform way, select all the surfaces that share the texture and then select the "Object Properties" display. Switch to "Texture Mapping" (pull-down at the top of the panel). Now, using the pop-up, set the "Projection" to "Box". Check that the "Texture Space" is singular (meaning that all the objects share the texture in the same way). If you need to scale the application of the texture, adjust the UVW Repeat values and/or the Size values (see below).
Scaling Textures
It is helpful to think of the texture image being some real-world size related to the rest of your model. By default, a V-Ray texture is applied by Rhino using the "Surface" mapping, so that it appears to have the same size it would have in the real world (so a 500x500 pixel image with a 96dpi resolution will be 5.2" square when applied to the model), regardless of the model dimensions. However, you can (and usually should) override this behavior.
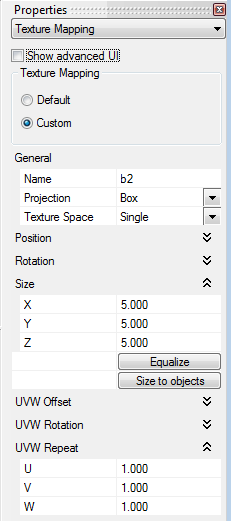
In the "Properties > Texture Mapping" panel, select "Custom" and set the Projection to "Box" as described above. The custom settings will display Position, Rotation, and Size as well as UVW Offset, Rotation, & Repeat fields shown above (Note: the  and
and  icons can be used to expand or collapse display of the various input fields. As shown, only Size and UVW Repeat are expanded.) Use Size to declare the model-space dimensions of your texture image. For example, if you scanned a 4x5" photograph of a pet to include in your rendering, you might declare its SIZE to be 4" x 5", regardless of the scan resolution. On the other hand, you could make it 8" x 10" equally well.
The UVW settings (UVW Offset, UVW Rotation, UVW Repeat) control how the texture image is fit into the "Size" rectangle. Making a single 4x5" desktop photo of your pet, you would set UVW Repeats to 1.00, and the size to 4"x5". However, if the geometry to which the texture is applied is 8"x10" instead, you will get 4 copies of your photo in a 2x2 grid. An equivalent way would be to set UVW Repeats to 2.000 and the size to 8"x10". Applied to an 8x10 frame, this would also produce a 2x2 grid of images.
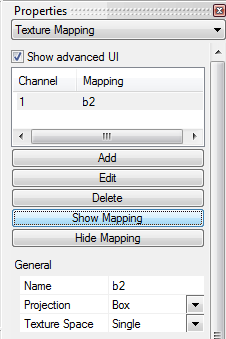
The Advanced UI Texture Widget
If you check the "Show Advanced UI" box at the top of the Texture Mapping display, you can activate a visual mapping controller by also selecting "Show Mapping". Depending on the current Projection type, an object will be added to the model (see below) that represents the texture pattern. It is drawn dotted, but may be selected and dragged about or rotated in the model as if it was "real" geometry.
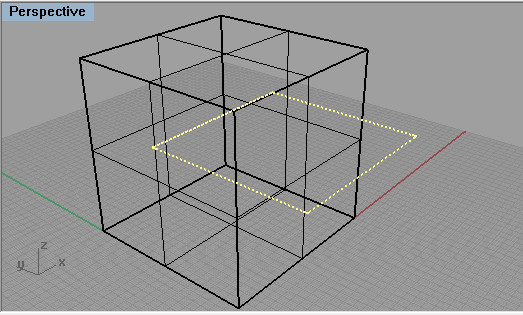
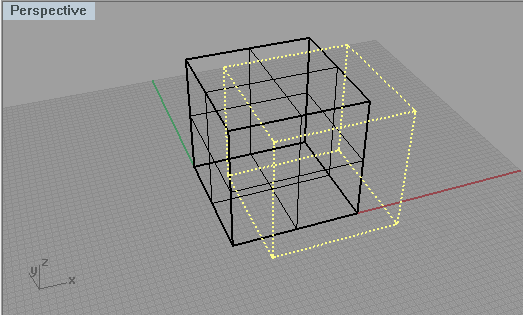
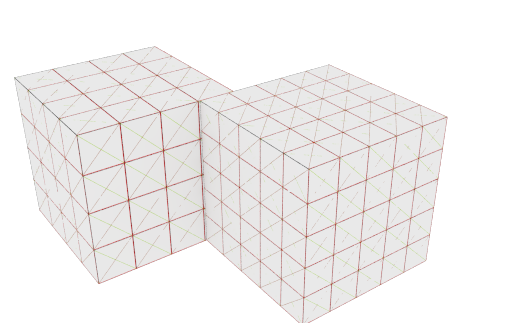
The dotted shape represents one instance of the texture, but it is only a seed. Think of it as one sugar-cube out of a grid of sugar-cubes that will be built flush against its faces. It sets the starting point and orientation, but as many copies of the texture will be made as needed. In the images below, note the "downsized" yellow texture widget in the corner of the left-hand cube, and the resulting pattern on the cube when rendered. (The cube on the right is sized 20"x20", with UVW Repeats of 5,5,5.)
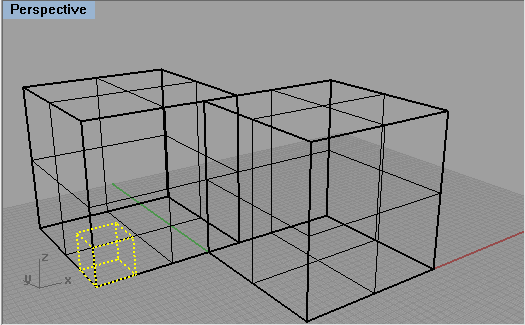
More than one object in your model may have a visible texture widget, but only one will be active (shown in yellow) at a time. To remove the widget display, select the object (not the widget) and click on "Hide Mapping".
Related Video Tutorials
- CBE tutorial: Rhino texture-mapping widget (part 1)
- CBE tutorial: Rhino texture-mapping widget (part 2)
Last updated: November, 2016
