TAPESTRY: The Art of Representation and Abstraction
How To make a "one-poly person" in form-Z
What is a "one-poly person"?
One way to keep file sizes (and rendering times) under control is to use textures instead of geometry. If you have a photograph of something (e.g. a person) that you'd like to include in your model with minimal geometry, you can do this by constructing a one-polygon surface onto which you map a text built out of the photo.
The model shown in these images consists of three 2D surfaces, the floor, the wall, and the "person". The floor and wall are not touched in what follows, beyond coloring them gray.
Step 1: Creating the texture images
 [Photo] |
 [Mask] |
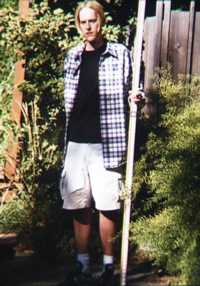
This process starts with a photograph such as the Photo shown at left, above. The image should normally be relatively low resolution (less than 1000px in any direction). The photo above was opened in a photo-editor and converted to the black and white image shown at right (here called Mask). Many techniques could be used for this, from painting to level manipulation.
Note: The two images should have the same pixel dimensions. In the end, the mask image should be converted to just two colors (black and white) before saving, to make sure there were no grays, and it should be saved to a lossless format (e.g. TIF, PNG) to prevent compression artifacts from showing up (from JPG compression, for example).
Step 2: Defining the Surface Style
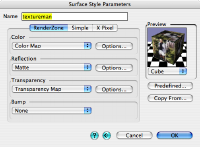
Clicking in a blank part of the Surface Styles palette brings up the "Surface Style Parameters" dialog shown here. The Color and Transparency are each set to use an image as the source of their data ("Color Map" and "Transparency Map"). The "Options" button brings up another dialog where the "Load" button gives access to a file-selection dialog. Assign the Photo to the Color Map and the Mask to the Transparency Map.
Step 3: Apply the Texture
![]() Apply the new texture as you would any Surface Style, using the "Palette Tool".
Apply the new texture as you would any Surface Style, using the "Palette Tool".
Step 4: Adjust the Texture Map Controls
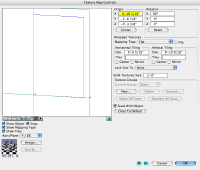
![]() Once the texture is applied, it needs to have some parameters set (click the image for help finding these in the dialog box)
Once the texture is applied, it needs to have some parameters set (click the image for help finding these in the dialog box)
- Change the "Mapping Type" to "Flat".
- Rotate the texture coordinate system 90 degrees around the x-axis to align with the (vertical) polygon.
- Unlock the size (set "Lock Size to" "None"), so you can set the "Tiles" to 1 horizontal and 1 vertical repetition.
- Drag the texture origin (red coordinate axes) to the lower-left corner of the polygon.
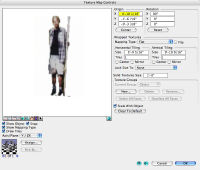 The resulting texture map, rendered within the Texture Map Controls dialog, should look like this. Confirm the dialog (click OK) to apply the changes.
Step 5: Rendering - Almost done!
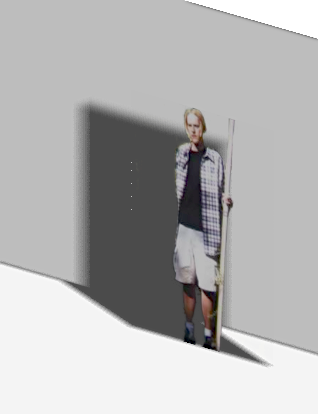 When rendered as part of the model, using Renderzone, you might see this. Note the oddly rectangular shadow? That's the shadow of the texture's "parent polygon". As it stands, we can see through the transparency map, but the sun cannot. How do we get the shadow-casting process to honor the transparency map? That's what's next.
![]() Shadows are an interaction of Light, Geometry, and Rendering. In this case, we want to change the Light, so double click on the shadow-casting light in the lights palette, bringing up the "Light Parameters" dialog. Clicking the "Shadows" 'tab' displays the options shown at left. Changes:
Shadows are an interaction of Light, Geometry, and Rendering. In this case, we want to change the Light, so double click on the shadow-casting light in the lights palette, bringing up the "Light Parameters" dialog. Clicking the "Shadows" 'tab' displays the options shown at left. Changes:
- Change "Soft (Mapped) Shadows" to "Hard (Raytraced)" shadows.
- Now, change the shadows to "Transparent"
Finished Texture
That's it! You've created a texture that covers the polygon perfectly and casts a shadow that is appropriate. If you can see through your "person" check to make sure the transparency map is just black and white. If your shadow or image is jagged around the edges, check to make sure the transparency map is just black and white and saved as PNG or TIF.
Last updated: April, 2014
